Search This Blog

Friday, March 31, 2023

SYNC CALLS WITH ASYNC-AWAIT

While working with JavaScript, often we use XRM.WebAPI to query Customer data. Sometimes requirements make us retrieve data synchronously. Till now we were using XMLHTTPRequest with async property set to true or false to specify WebAPI call to be async or sync. However, this method is not available with v9.0 Xrm.WebApi. for sequential calls, you have to do nested success callbacks. This will return a Promise object and executed in browser.

Alternatively, now we can use “aysnc” and “await” keywords in your JavaScript and achieve similar results.

For example, we want to check if an opportunity exists on change of child record and perform some business logic, we need to make a sync call.

To achieve this, we need to decorate method with “async” keyword and use “await” before invoking my method (getopportunity).

1

2

3

4

5

6

7

8

9

10

11

12

getopportunity: async function (opportunityId) {

        var data = null;

        await Xrm.WebApi.online.retrieveRecord("opportunity", opportunityId, "?$select=

       new_eventendtime,new_eventstarttime").then(

            function success(result) {

                data = result;

            },

            function (error) {

                console.log(error.message);

            }

        );

        return data;

    },

1

2

3

4

5

6

7

8

9

10

11

ChildRecordChanged: async function (executionContext) {

        var formContext = executionContext.getFormContext();

        var opportunityobject = formContext.getAttribute('opportunityid').getValue();


     var result = await getopportunity (opportunityobject [0].id.replace('{', '').replace('}', ''));


            if (result != null) {

                //business logic goes here

                }

            }

      },


The word “async” ensures that the function returns a promise, and wraps non-promises in it.

The keyword “await” makes JavaScript wait until that promise settles and returns its result.

Await only works within Async functions


Making Xrm.WebApi Synchronous calls in v9

 We know that XMLHttpRequest can be used both synchronous & asynchronous, this actually empower every developer to do the API calls the way we want with a single boolean parameter.

Asynchronous: req.open(....., true);
Synchronous: req.open(....., false);
v9 comes with Xrm.WebApi methods without this option & its always going to be asynchronous. What if you want a synchronous mode?
Note:
We can achieve the same result but not with a simple bool param.

If you want to have a series of calls sequentially, you have to do nested success callback. ie chain of Async calls. It’s basically going to return a Promise object & will be executed in browser.

For more info, Refer this GitHub issue (credits to Vivek)

Xrm.WebApi.retrieveRecord("account", "", "?$select=_ownerid_value")
    .then(function (account) {
        return Xrm.WebApi.retrieveRecord("team", account._ownerid_value, "?$select=_businessunitid_value")
    })
    .then(function (team) {
        return Xrm.WebApi.retrieveRecord("businessunit", team._businessunitid_value, "?$select=name")
    })
    .then(function (bu) {
        console.log(bu.name);
    });
 Example above:
  • retrieves account by account
  • then retrieves an owning team of the account
  • then retrieves a business unit of that team
  • then writes business unit name to console
If you need to call multiple retrieves in parallel instead calling them in sequence, you can use jQuery.when() (assuming you are already using jQuery):
$.when(Xrm.WebApi.retrieveRecord("account", "", "?$select=name"),
       Xrm.WebApi.retrieveRecord("contact", "", "?$select=fullname"))
    .then(function (account, contact) {
        console.log(account.name);
        console.log(contact.fullname);
    });


Saturday, March 25, 2023

Type of View Microsoft Dynamics 365

 Forms are used to work with single records; Views are used to view multiple records 

at the same time. There are different views available for each entity.

It's possible to create different types of Views for each entity, and also you can modify 

existing Views.


There are three types of views:


  • System views
  • Public views
  • Personal views


System Views


System views are special views that are available for system entities and are automatically 

created when you create custom entities.


System views are not shown in view selector, and you can't use them in forms, or as a list

 in a dashboard. You cannot deactivate or delete a system view, but you can customize them. 


Also, you can include these views in a solution to export and import in another environment.


Available system views are (these are created automatically when a new entity is created):


  • Advanced Find View
  • Quick Find View
  • Associated View
  • Lookup View


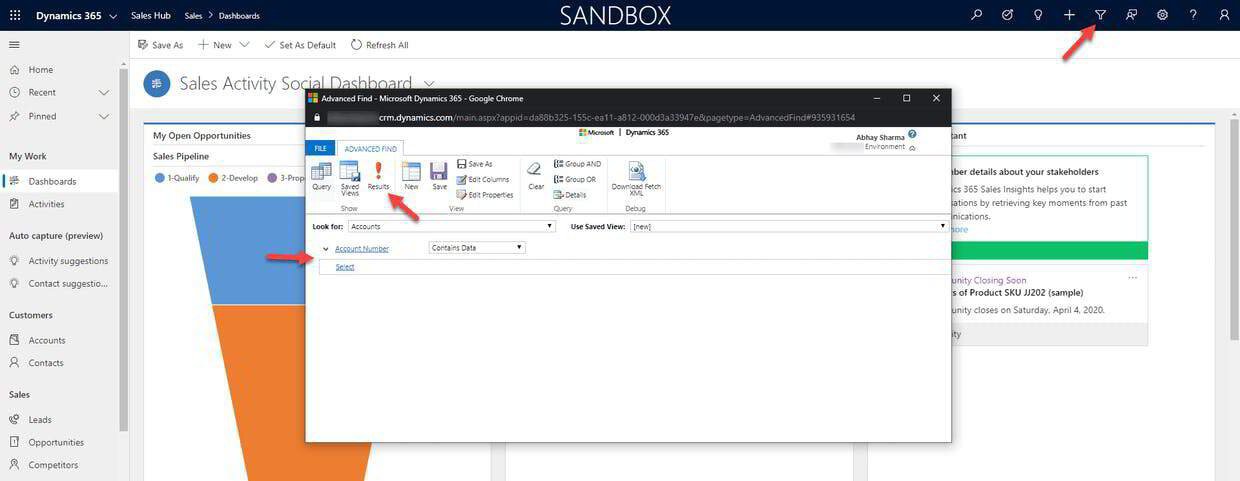
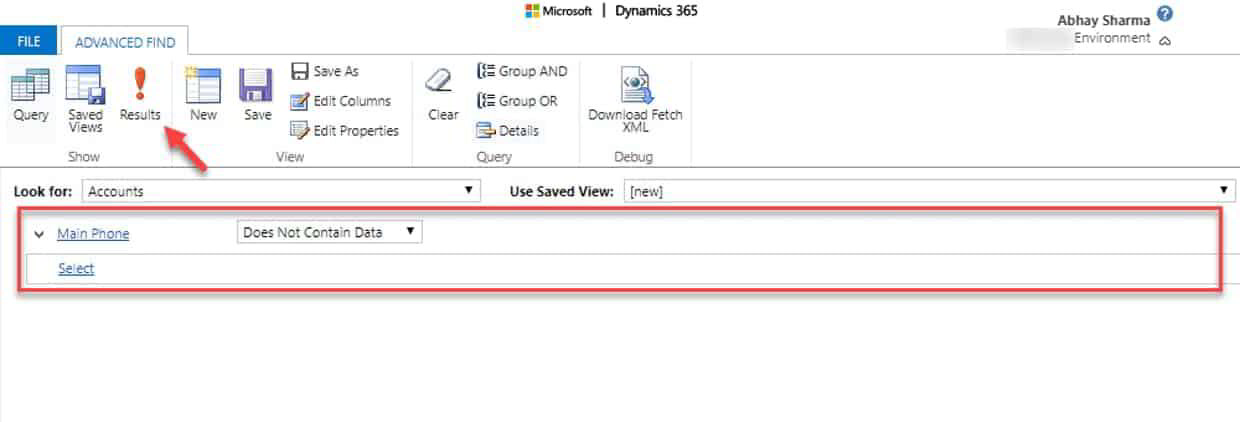
Advanced Find View: It allows you to create advanced search queries. Click Advanced 

Find from the right top side of the screen.


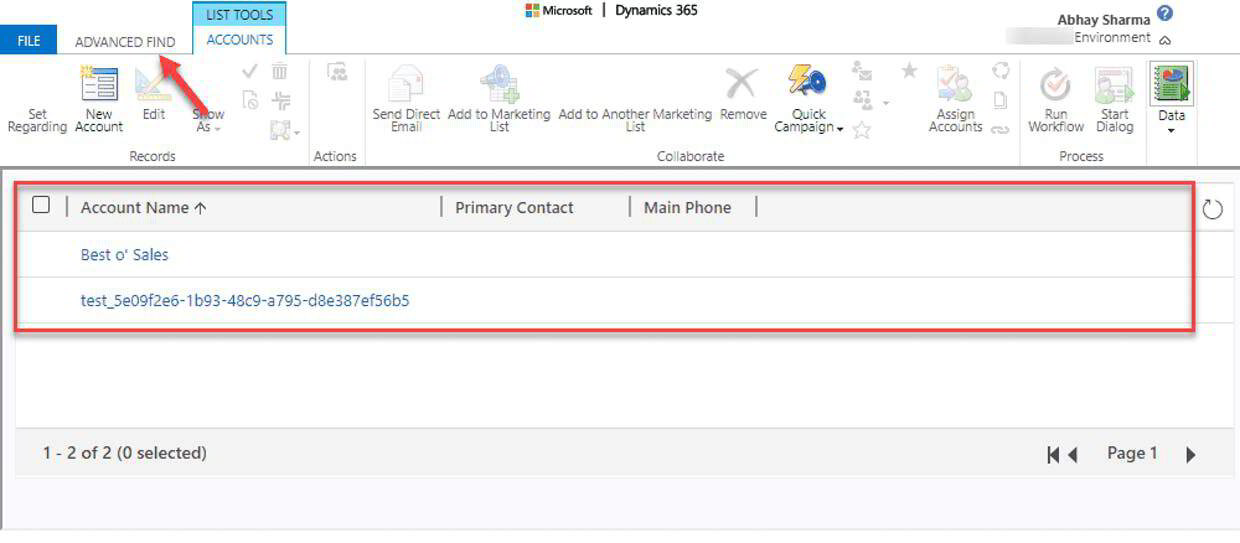
Select an entity in Look for and apply filters click Results.

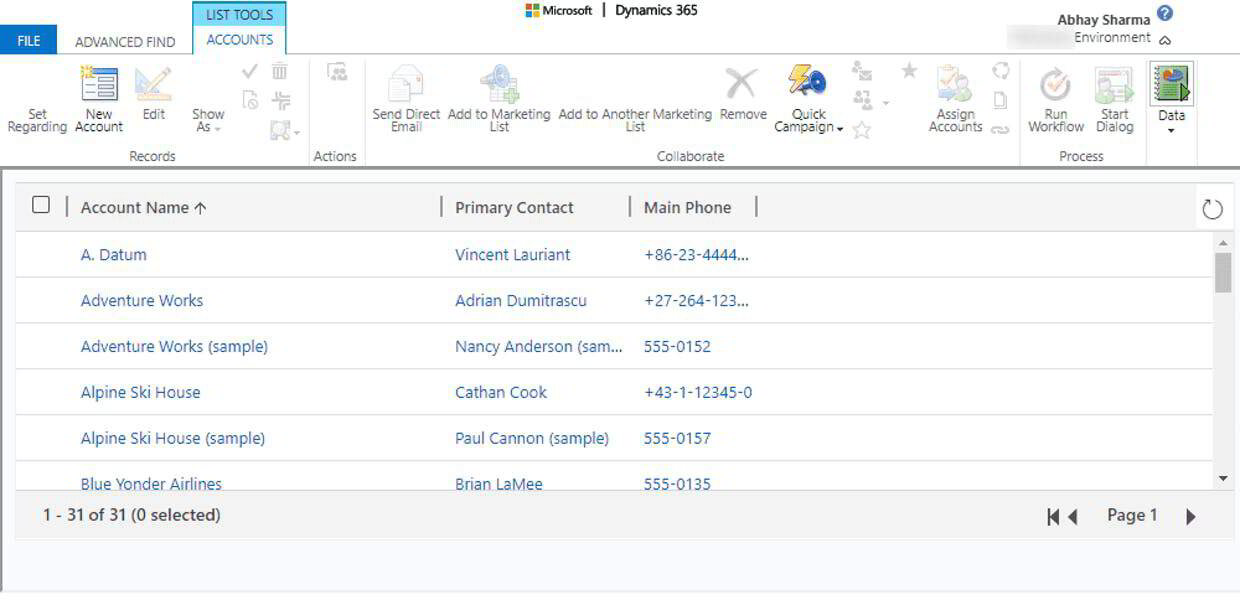
You can see the result in Advanced Find, as shown below. The below Advanced Find view is of Account entity. Similarly, you have Advanced Find View for each entity.

To customize Advanced Find View, please follow the steps below:


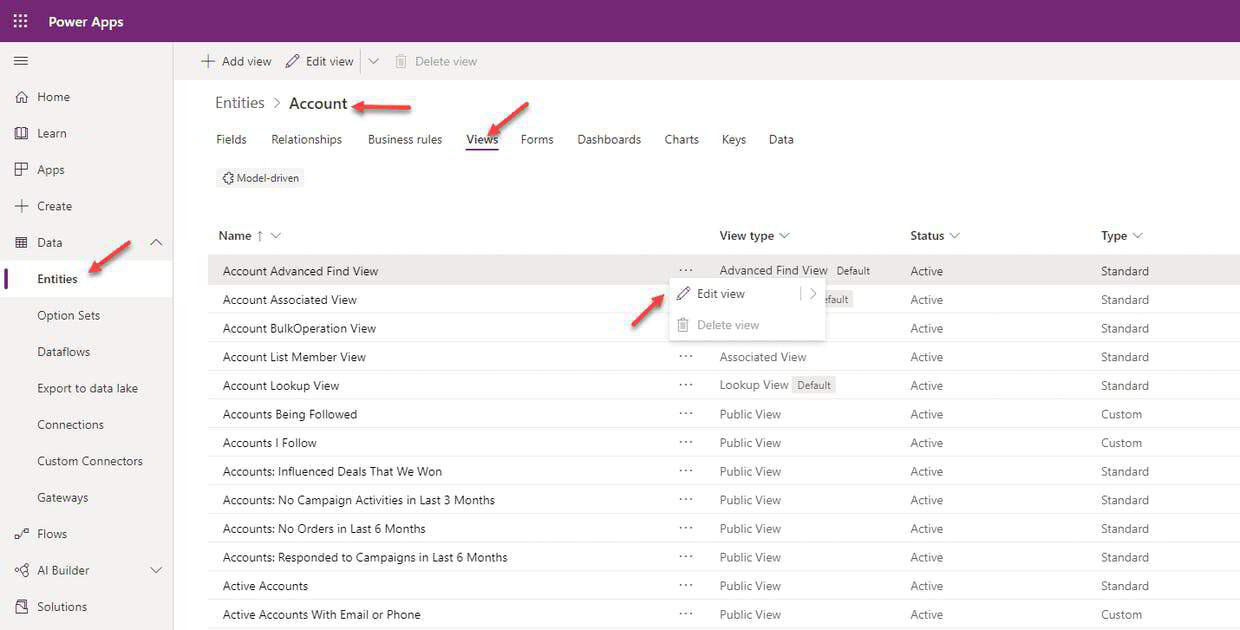
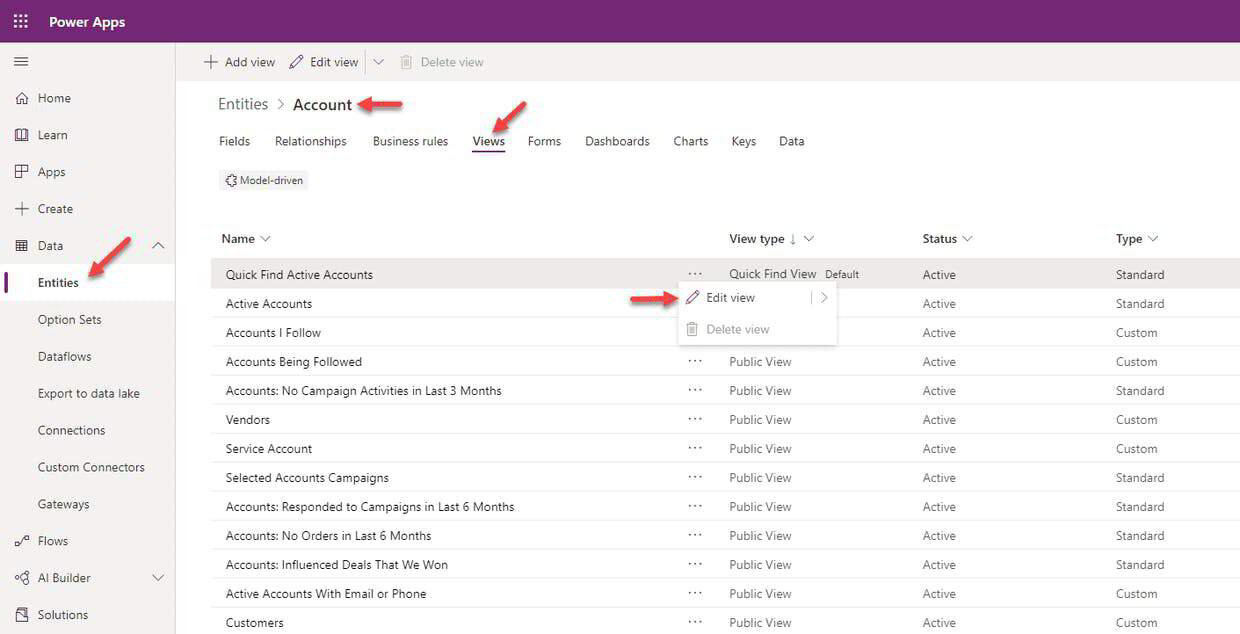
Open Power Apps Maker Portal (https://make.powerapps.com/), expand Data and click 

Entities.


Select the Account entity, click Views.


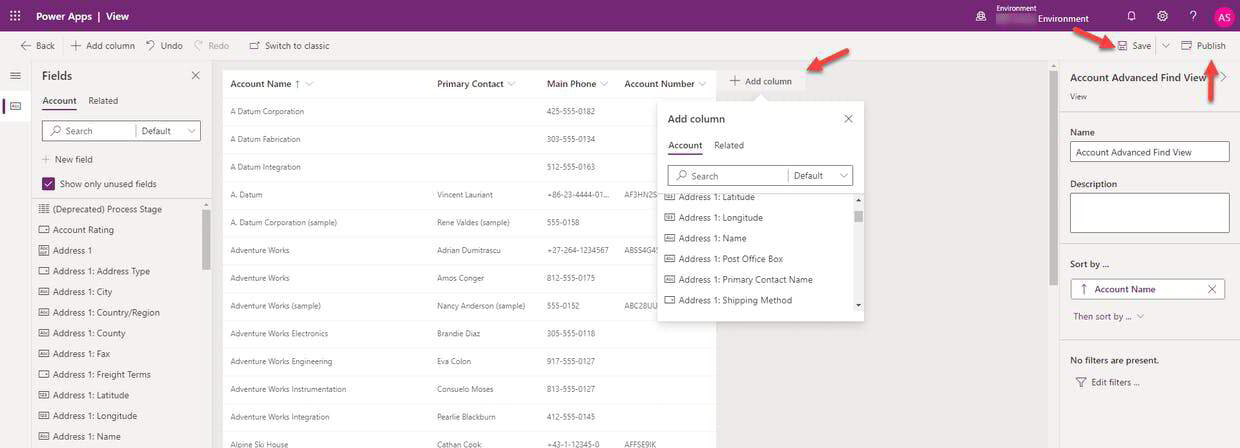
Then select more commands and click Edit view for Account Advanced Find View.

Select the required columns by using the + Add column option.


After completing, click Save and then click Publish.

Quick Find View: It allows you to search for records for an entity. You need to open an entity if you want to search for records using Quick Find View.


Open an entity, click the search box, enter a search query, and press enter.


You will see records matching this query. You can also use a wildcard search.

To customize Quick Find View, please follow the steps below:


Open Power Apps Maker Portal (https://make.powerapps.com/), expand Data and click Entities.


Select the Account entity, click Views.


Then select more commands and click Edit view for Quick Find Active Accounts.

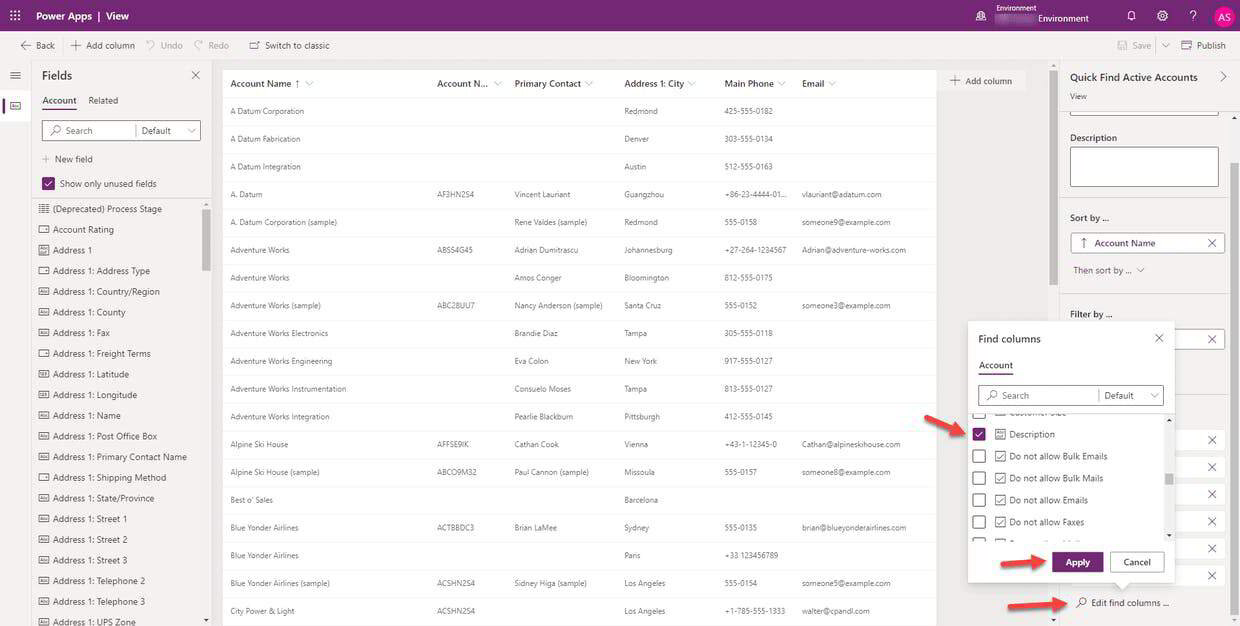
You can search only in the columns that are part of find columns. If your search is not resulting in any result, the reason may be the column(s) is(are) not part of find columns.


To add a column in find columns, click Edit, find columns and select the required column and click Apply. You can select one or more columns as per your requirements.

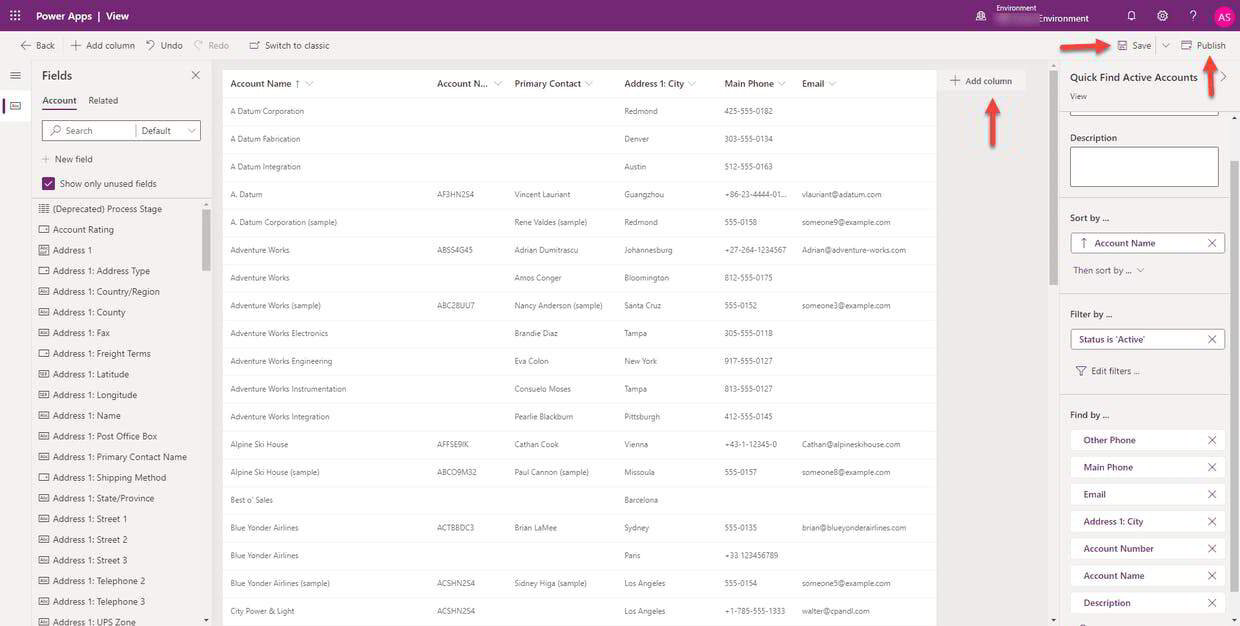
Add columns to the view by clicking + Add column.


After completing, save the view by clicking Save and click Publish.

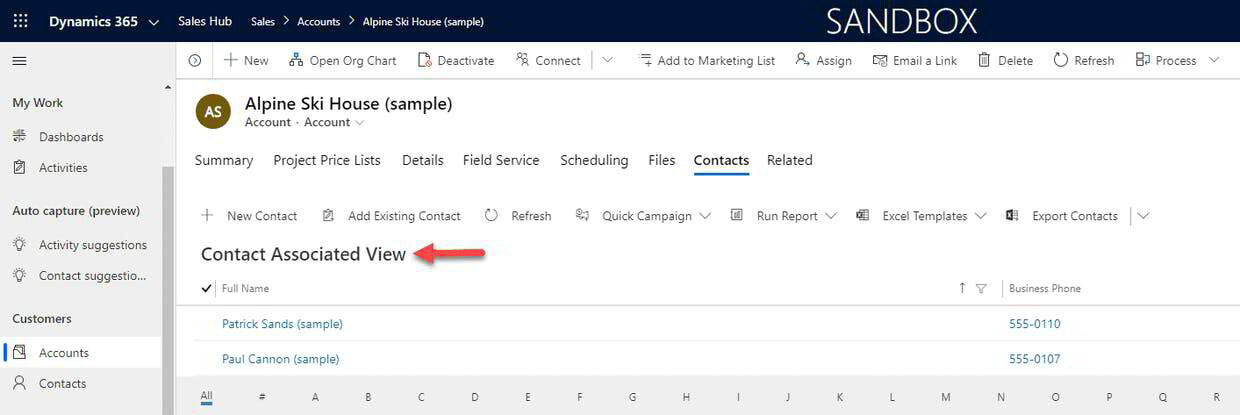
Associated View: It allows you to see associated or related entity records. For example, on Account entity, you can see associated contacts.


Click Accounts, open any record and click Related and then the related entity (in this scenario, it's Contacts)

You will see all the contacts associated with this Account.

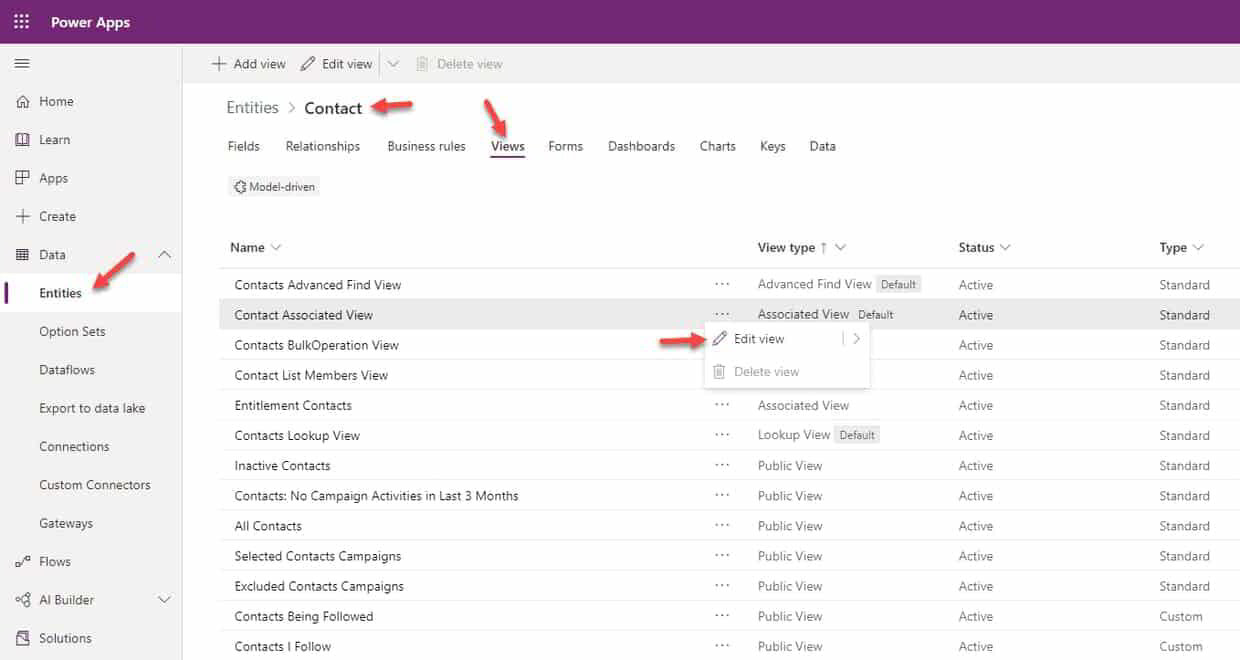
To customize this Associated View (contact entity), please follow steps below:


Open Power Apps Maker Portal (https://make.powerapps.com/), expand Data and click Entities.


Select the Contact entity, click Views.


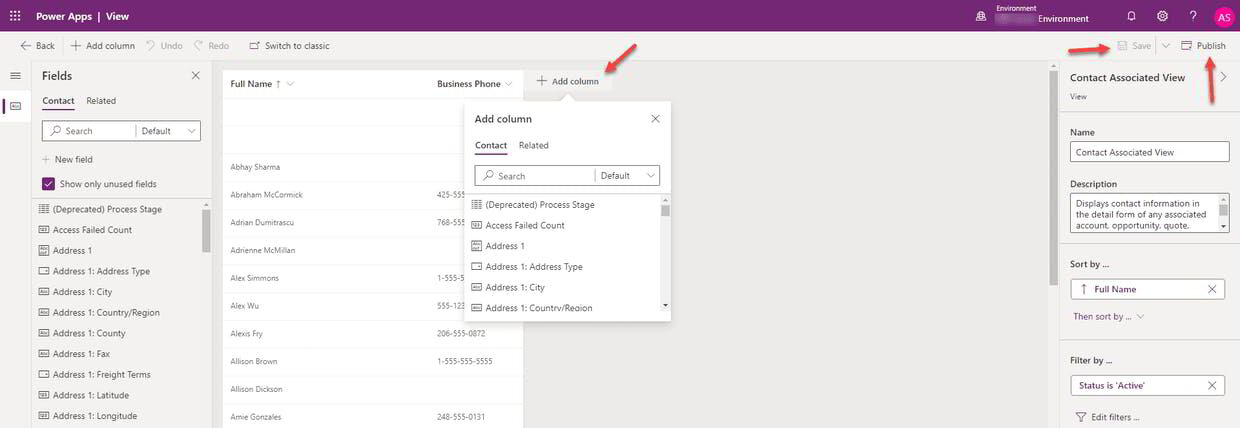
Then select more commands and click Edit view for Contact Associated View.

Add columns to the view by clicking + Add column.


After completing, save the view by clicking Save and click Publish.

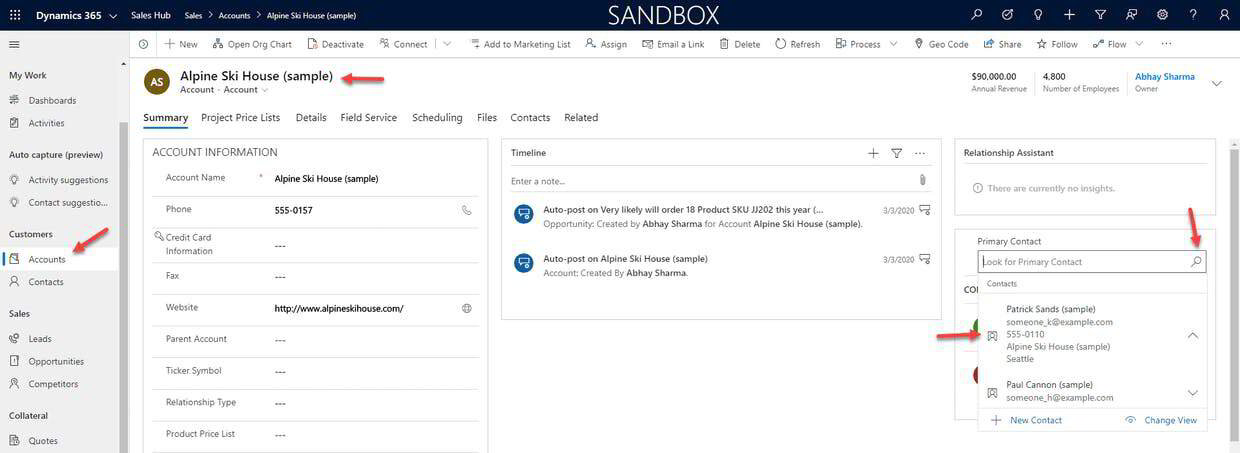
Lookup View: It allows you to see and select records from a lookup field. For example, on Account entity record, you can click the Primary Contact lookup field to see contacts lookup view.


Click Accounts, open any record and click Primary Contact lookup to see contacts lookup view. By default, it shows two fields in the lookup, but you can expand to see five fields from the lookup view.

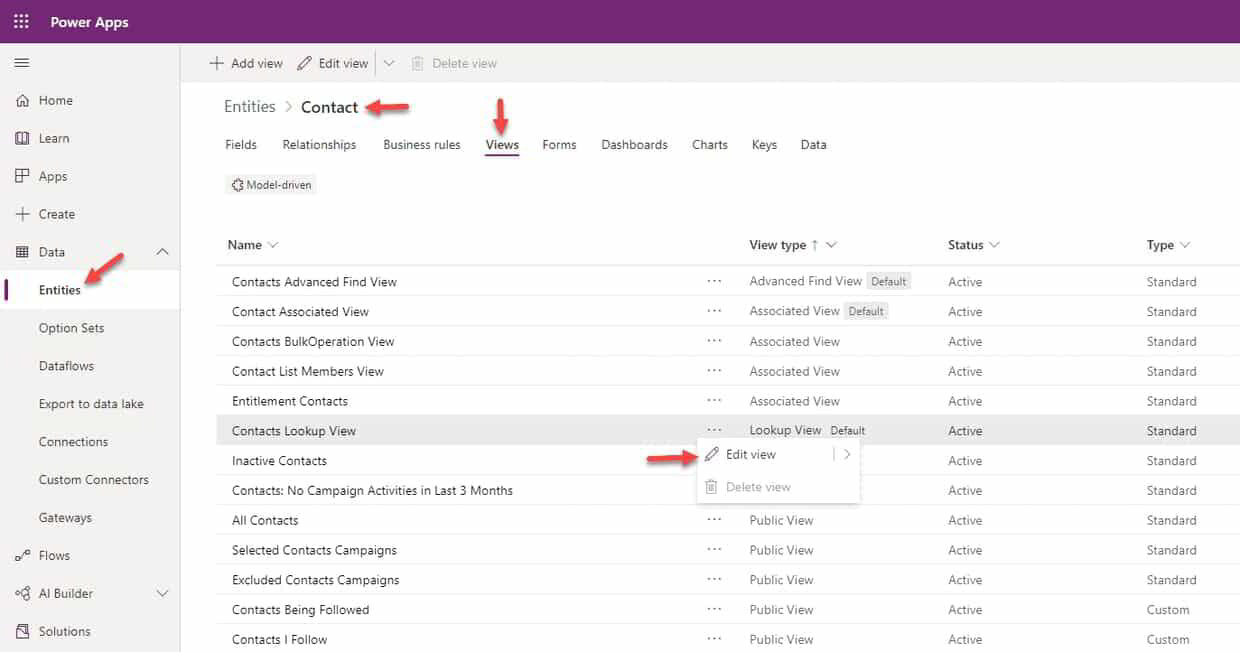
To customize this Lookup View (contact entity), please follow the steps below:


Open Power Apps Maker Portal (https://make.powerapps.com/), expand Data and click Entities.


Select the Contact entity, click Views.


Then select more commands and click Edit view for Contacts Lookup View.

Only the first five columns will be visible in the lookup view. So, you can select them accordingly. 


Add columns to the view by clicking + Add column. After completing, save the view by clicking Save and click Publish.

Public Views


Public views are general-purpose views that you can customize as per your needs. Unlike system views, you can select public views in view selector and can be used in different components like forms and dashboards.


You can delete any custom public view created by you in an unmanaged solution, but not system-defined public views. Public views can be included in a solution.


Following system and public views are created automatically when a new entity is created:


  • Active view
  • Inactive view


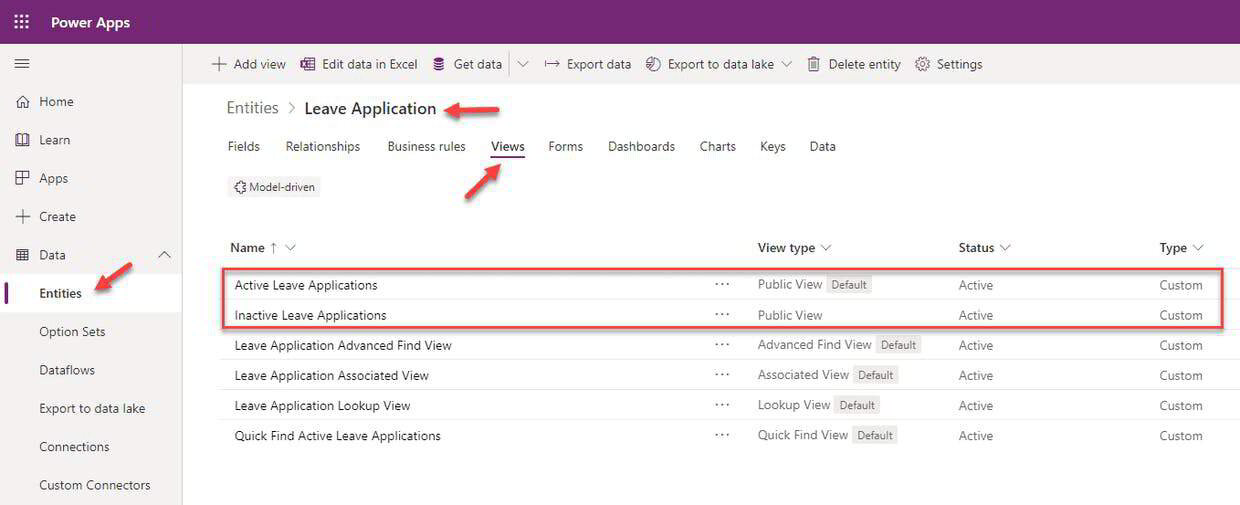
For example, when you create a custom entity, two public views are created, as shown below:


This Leave Application is a custom entity and has the following two public views created automatically:


  • Active Leave Applications
  • Inactive Leave Applications

You can edit these views in the same way as other views. You can create new public views as per your requirements.


Personal Views


Personal views can be created by any user who has User-Level access to actions. These views are visible to only the user who has created it (unless shared with other users/teams).


Users can share personal views with other users and teams. However, you can control permissions of your shared view.


To create a personal view, you can reuse any system or public view.


If you want to transfer the ownership of your personal view to another user, you can do that by assigning the view.


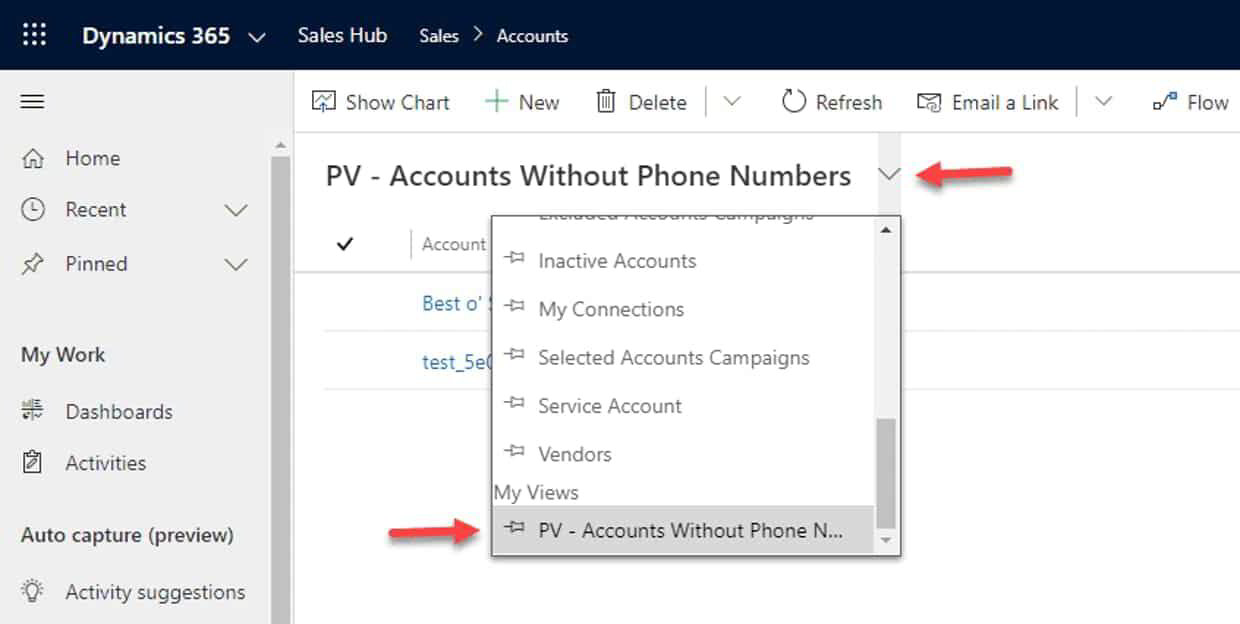
You can see personal views at the end of view selector under My Views.


Please note that personal views cannot be included in a solution.


To create a personal view, open any entity (in this scenario, it's Account). Click More commands and then click Create view.

Select filters are per your requirements and click Results to see the preview of records.

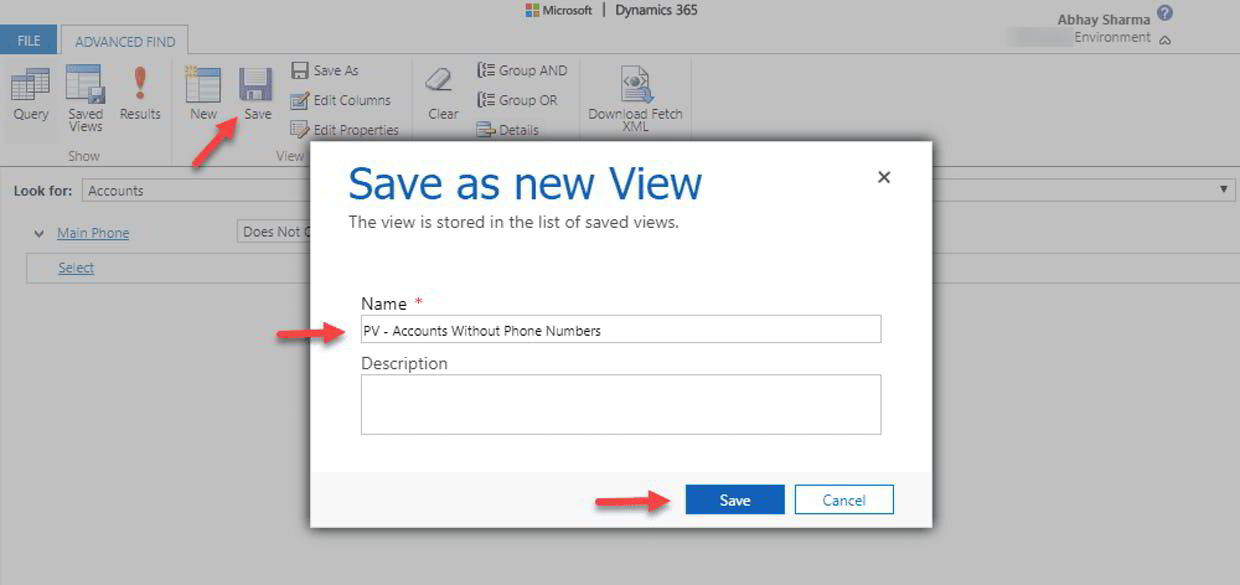
After checking the preview, if you are OK with the results, click Advanced Find.

Click Save. Give it a Name and Description (if required). Click Save to create a personal view.

Click Accounts and then click view selector. You will find the personal view under My Views.