Search This Blog

Friday, June 21, 2024

Comparison of the key differences between outbound and real-time Dynamics365 marketing

 Here is a comparison of the key differences between outbound and real-time Dynamics 365 marketing:

Limitations of Real-Time Marketing

1.        Data management: Real-time marketing requires up-to-date and accurate customer data to be effective. This can be a challenge if data is siloed across different systems or if there are gaps in the data that need to be filled.

2.        Technical capabilities: Real-time marketing requires advanced technical capabilities to collect, process, and analyze customer data in real-time. This can be a challenge for businesses that lack the resources or expertise to implement and maintain such capabilities.

3.        Privacy and security: Real-time marketing requires the collection and storage of large amounts of customer data. This can raise privacy and security concerns, especially if the data is sensitive or if regulations are not being followed.

4.        Scalability: Real-time marketing requires the ability to process large amounts of data and deliver personalized content to a high volume of customers in real-time. This can be a challenge for businesses that do not have the infrastructure or resources to scale their marketing efforts to meet the demands of real-time marketing.

5.        Campaign management: Real-time marketing requires advanced campaign management capabilities to deliver personalized content to customers based on their behavior and interactions with the business. This can be challenging if a business is not equipped to create, manage, and execute real-time campaigns.

6.        Resources: Real-time marketing require high technical know-how, personnel and resources, which not all

Limitations of Outbound Marketing

1.        Timing: Outbound marketing campaigns are typically planned and executed at specific times, which can make it difficult to reach customers when they are most engaged and receptive to marketing messages.

2.        Personalization: Outbound marketing campaigns are often based on demographic and behavioral data, which may not always accurately reflect the current interests and needs of individual customers.

3.        Lead scoring: Lead scoring in outbound marketing is based on historical data and attributes and may not reflect recent changes in customer behavior.

4.        Relevancy: Outbound campaigns often have generic approach and messaging which might not be relevant to all the recipients, decreasing the open and conversion rate.

5.        Channel preference: Outbound campaigns may not take into account that customers prefer different channels of communication and not all of them may be reached through outbound marketing.

6.        Data Management: Outbound marketing often uses large data sets and need a proper system to manage it, which can be a challenge if data is siloed across different systems or if there are gaps in the data that need to be filled.

7.        Opt-out: With the rise of "Do not disturb" laws and regulations, it may be harder to reach out to customers via phone or mail without the risk of them opting out of the communication.

8.        ROI: Outbound campaigns are more expensive to run and may have a lower return on investment than other marketing methods.

Industry best practices of using real time marketing in dynamics365

1.        Segmentation: Segment customers based on their behavior and interactions with the business. This will enable you to deliver personalized content to different segments of customers, which can improve engagement and conversion rates.

2.        Data Management: Ensure that customer data is accurate and up-to-date. This will enable you to make better decisions about the content that should be delivered to individual customers.

3.        Personalization: Use real-time data to deliver personalized content to customers based on their behavior and interactions. Personalized content can increase engagement and conversion rates.

4.        Lead Scoring: Use real-time data to update lead scoring models and prioritize leads based on their likelihood to convert.

5.        Targeted Marketing: Use data to deliver targeted marketing campaigns to customers based on their behavior, needs and interests.

6.        Multi-channel approach: Use multiple channels (e.g. email, SMS, push notifications) to reach customers where they are most active.

7.        Test and optimize: Continuously test different variations of your campaigns and use the data to optimize your campaigns. This will help you identify what works best and improve the ROI.

8.        Automation: Use marketing automation to streamline the personalization and delivery of real-time content. Automation will help you create and execute campaigns more quickly and efficiently.

9.        Compliance and Data Governance: be sure to comply with data privacy laws and regulations and establish guidelines and policies to ensure that data is used responsibly and ethically.

10.     Integration: Integrate real-time marketing with other systems and tools, such as customer relationship management (CRM) and analytics, to gain a comprehensive view of customer interactions.

Using real-time marketing in Dynamics 365 can be a powerful way to engage customers and increase conversion rates, but it requires a strategic approach and the right tools and resources to be successful.

A real-time marketing journey in Dynamics 365 might involve the following steps:

1.        Tracking: Use web tracking or tracking pixels to collect data on customer behavior, such as pages visited, products viewed, and time spent on the website.

2.        Segmentation: Use the collected data to segment customers into different groups based on their behavior, such as those who have viewed a specific product or spent a certain amount of time on the website.

3.        Personalization: Use the segmentation data to create personalized content, such as targeted product recommendations or personalized emails, that will be delivered to customers in real-time.

4.        Lead scoring: Use real-time data to update lead scoring models and prioritize leads based on their likelihood to convert.

5.        Targeted Marketing: Use data to deliver targeted marketing campaigns, such as Abandoned cart campaigns, personalized product recommendations, or personalized email campaigns, to customers based on their behavior, needs and interests.

6.        Delivery: Use marketing automation to deliver the personalized content to customers in real-time, using multiple channels such as email, SMS, push notifications, and web.

7.        Analytics: Use analytics tools to track the effectiveness of the real-time marketing campaigns and measure key metrics such as open rates, click-through rates, and conversion rates.

8.        Optimization: Use the analytics data to optimize the real-time marketing campaigns, test different variations of the campaigns, and refine the targeting and messaging to improve results.

An example of this journey could be as following:

·         A customer visits an e-commerce website and views a specific product page.

·         Using web tracking, Dynamics 365 captures this behavior and segments the customer into a group of people who have viewed that product.

·         Using data, Dynamics 365 sends a personalized email to that customer with a special offer on that product, along with related products they might be interested in.

·         The customer clicks on the email and returns to the website, and Dynamics 365 updates the lead score of that customer.

·         Dynamics 365 send real-time abandoned cart campaign with a reminder of the products they were interested in and a special offer, to encourage customer to complete the purchase.

·         customer makes the purchase, Dynamics 365 sends a personalized post-purchase email and suggest complementary products to the purchase.

·         All of these interactions are tracked and analyzed by Dynamics 365 to understand customer behavior and optimize future marketing campaigns


Overall, real-time marketing is more responsive to customer interactions, more personalized and adapt to customer needs while outbound is more planned, and based on historical data. Both type of marketing plays different role in business and should be used accordingly.


Saturday, June 15, 2024

Azure DevOps with Power Apps deployment


Microsoft Power Apps are extremely popular with organisations who needs a reliable platform to make business applications.

In this blog I will walk you through how to use Azure DevOps to enable CI/CD for Microsoft PowerApps.

Prerequisites

  • Microsoft PowerPlatform Account
  • An Azure DevOps Account
  • Azure Account
  • Bitbucket Account

You will learn

  • How to use Azure DevOps to enable CI/CD for Microsoft PowerApps.

Blog Outline

  1. Create PowerApp Environments
  2. Create PowerApp in Dev Environment
  3. Create Service Principals with PowerPlatform Permission
  4. Create Power Platform Service Connections in Azure DevOps
  5. Create Bitbucket Service Connection in Azure DevOps
  6. Create Azure DevOps Build Pipeline
  7. Create Azure DevOps Release Pipeline
  8. Test the CI/CD Flow
  9. Summary
  10. References

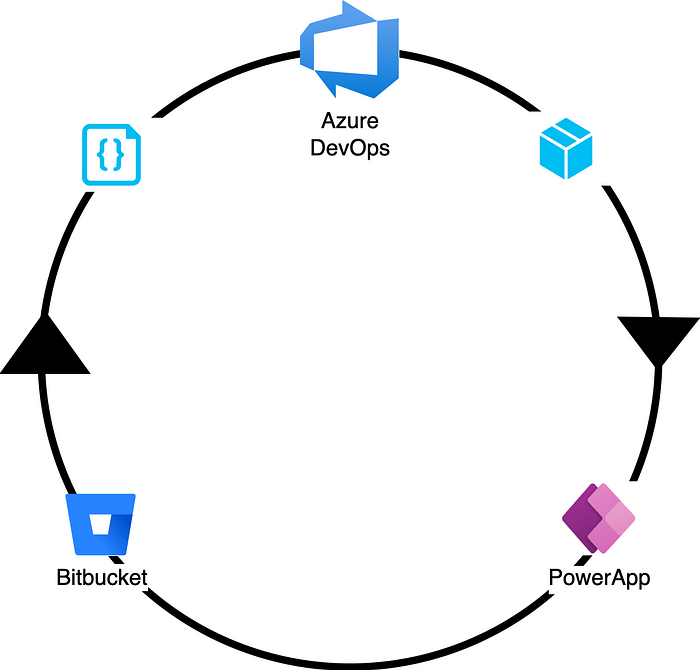
Azure DevOps Architecture


  1. Once developer has finished the development and wants to deploy to UAT & Production, developer will manually trigger the Build Pipeline.
  2. DevOps Build Pipeline will export the PowerApps Solution from PowerApp Dev Environment and Commit to Bitbucket.
  3. DevOps Build Pipeline will create the Build Artifact.
  4. When Build Artifact is created, this will automatically trigger the Release PipeLines for UAT and Production.
  5. Once Approvers approve the UAT release and the deployment will be completed for UAT environment.
  6. After UAT testing, Approvers will approve the Production release and the deployment will be completed for the Production environment.

Let’s go step by step to create this process.

1. Create PowerApp Environments

We will have following environments,

  • DEV Environment — PowerApp will be developed in this environment.
  • UAT Environment — PowerApp will be tested by the testing team in this environment.
  • Production Environment — PowerApp production environment.

Go to PowerPlatform Admin Portal and create environments. I have already setup environments for Dev, UAT and Production.

2. Create PowerApp in Dev Environment

Let’s create a sample PowerApp.

  1. Go to this Link to Create Power App.
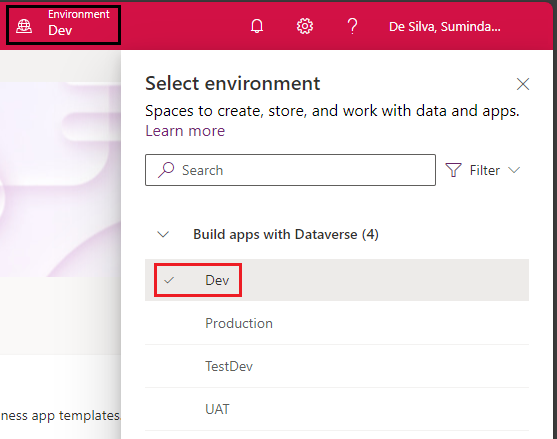
  2. Make sure Dev environment is selected.

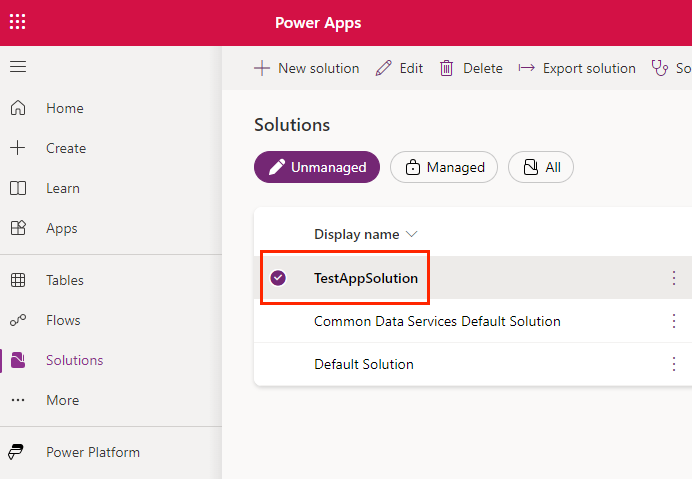
3. Create a new Solution (“TestAppSolution” in this example) under Dev environment.

Inside the solution create a New Power App (“TestApp” in this example).

Now we have the below setup,

Dev (Environment) -> TestAppSolution (Solution) -> TestApp
UAT (Environment)
Production (Environment)

3. Create Service Principals with PowerPlatform Permission

1. Create 3 Azure app registrations for the 3 environments. Make sure to create a client secret for each of them and copy them. Please follow this guid to create Azure App Registrations.

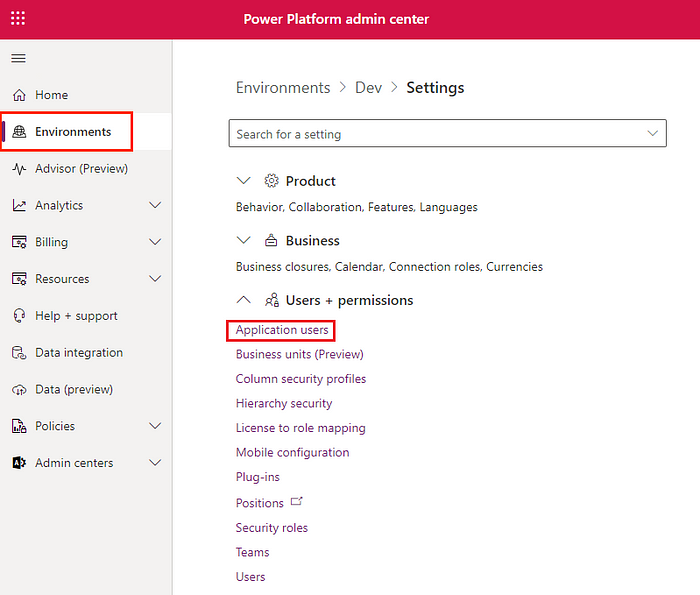
2. Go to PowerPlatform Admin Portal and select the Dev Environment.

3. In your environment settings, Switch to the Application Users view as below.

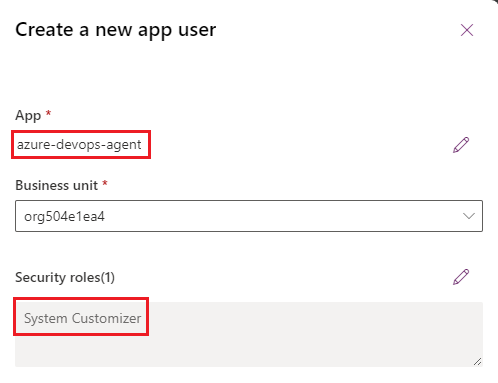
4. Add the UAT Azure App Registration (App name in my case is “azure-devops-agent”) as an application user and provide the security role — System Customizer

Please follow this guide for above steps.

Now this Application User will have the necessary permissions required to export or import the PowerApps Solution.

Similar to this, assign 2 Azure app registrations as Application Users for UAT and Production environment as well. These Azure App Registrations will be used to create Azure DevOps Service connection for each environment.

4. Create Power Platform Service Connections in Azure DevOps

Here we will configure the service principals created for each environment as service connections.

1. Go to Visual Studio Market place and add Power Platform Build Tools to your Azure DevOps Organization.

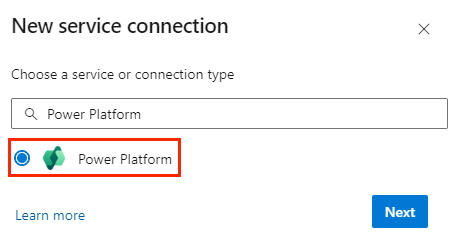
2. Go to Azure DevOps Service Connection and create new Service Connection with Type — Power Platform.

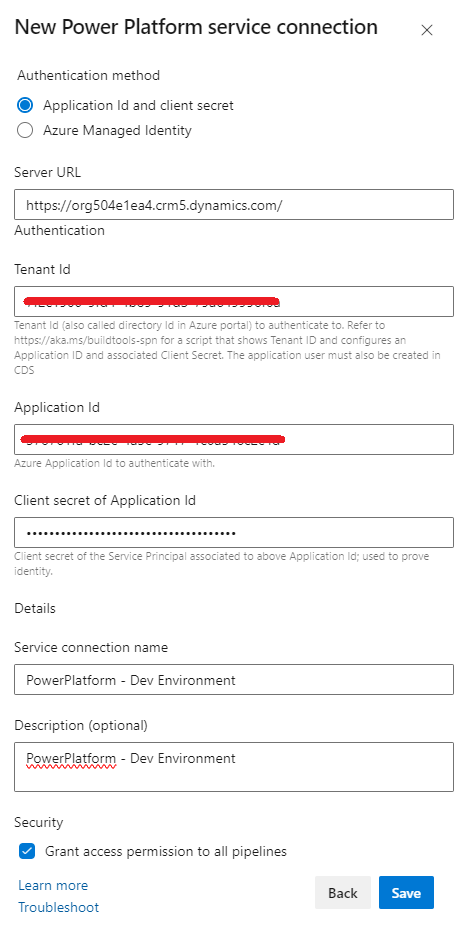
3. Configure the details required for the service connection.

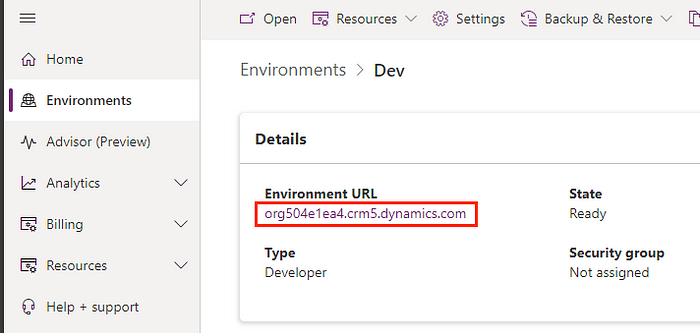
In order to get the Server URL, Go to PowerPlatform Admin Portal and select the environment as below.

Tenant Id — Your Azure Subscription Tenant ID

Application Id — Application Client ID of the Azure App Registration created in Step 3.1. You can find this in the Overview section of the Azure App Registration.

Client secret of Application Id — Copy the client secret generated in Step 3.1 here.

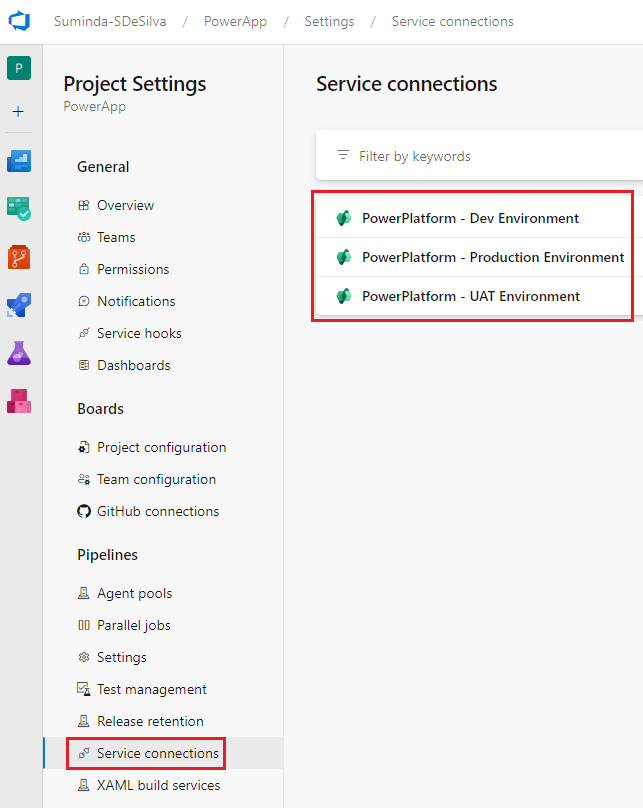
Configure 3 service connections for each environment as below.

5. Create Bitbucket Service Connection in Azure DevOps

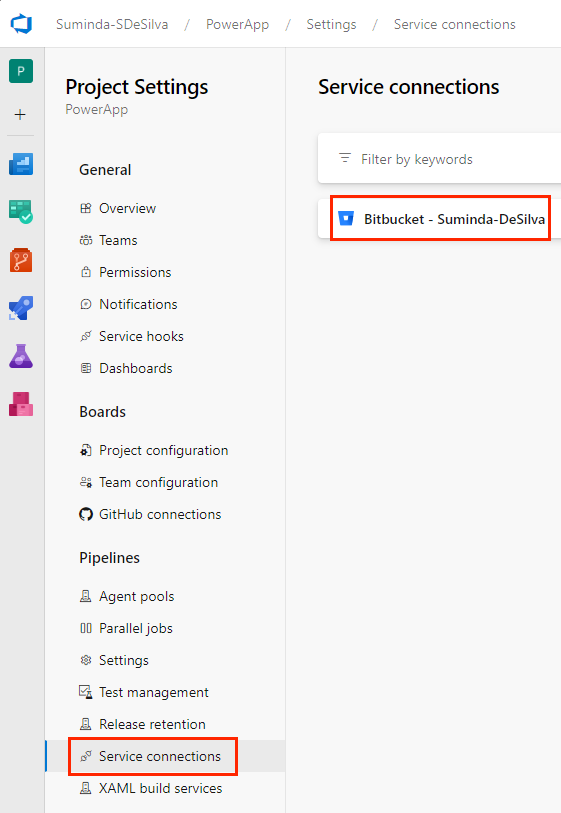
Follow this Documentation and create Bitbucket service connection as below.

6. Create Azure DevOps Build Pipeline

1. Create a Bitbucket Repository to store the Power App package. In this example I have created “PowerAppTest”.

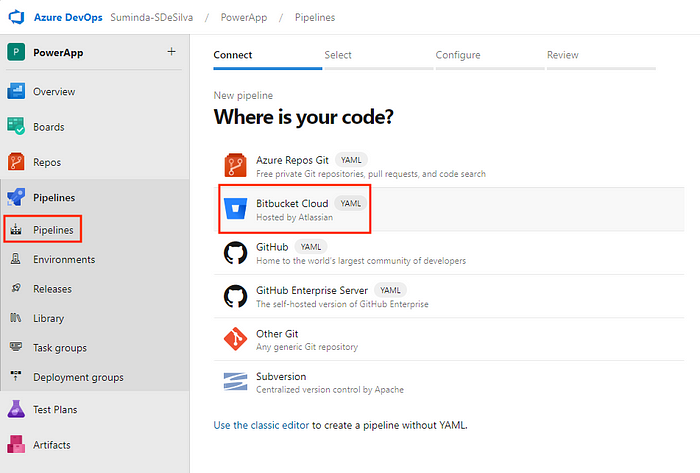
2. Go to Azure DevOps Pipelines and select Bitbucket Cloud as below. Select the repository afterwards.

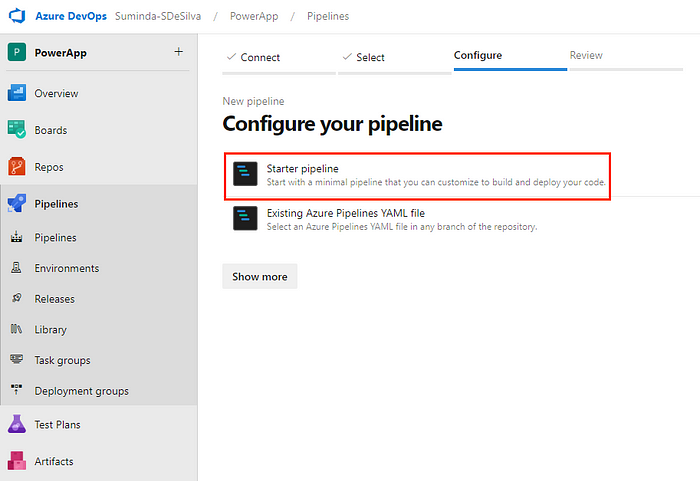
3. Select “Starter pipeline”.

4. Use below Azure Pipeline YAML configuration. I have renamed the pipeline file as “azure-build-pipeline.yml”. This can be any name you want.

5. Click “Save and Run”. Make sure to give a commit message in the next window and click “Save and Run”.

This file will be committed to the Bitbucket repository. Azure DevOps will utilise this file whenever the developer wants to start a build to be deployed to UAT and Production.

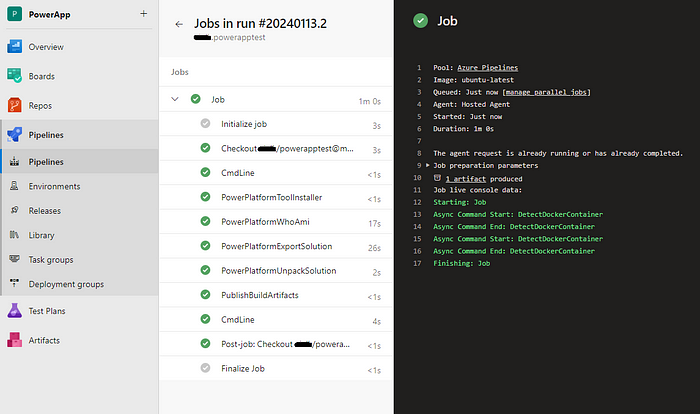
This will trigger the Build Pipeline as below.

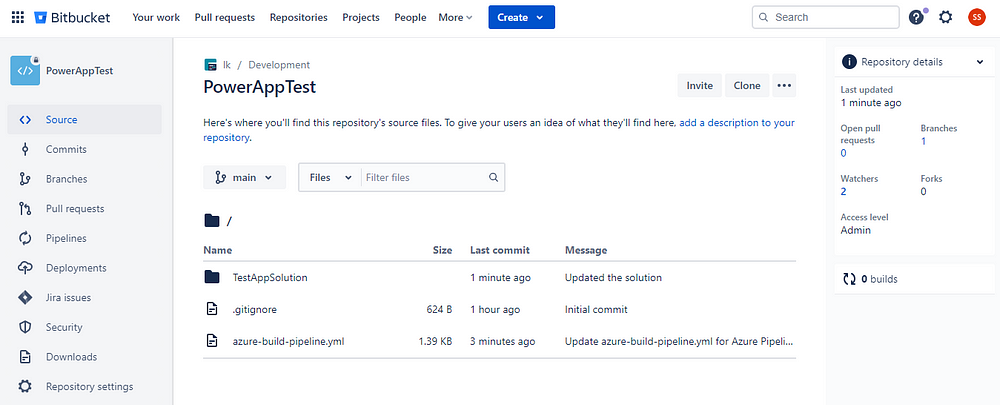
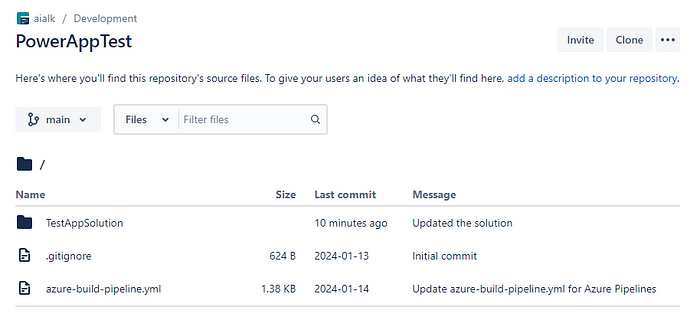
After the Build pipeline is completed, go the Bitbucket repository to see it is updated with the Power App solution code and “azure-build-pipeline.yml” file as below.

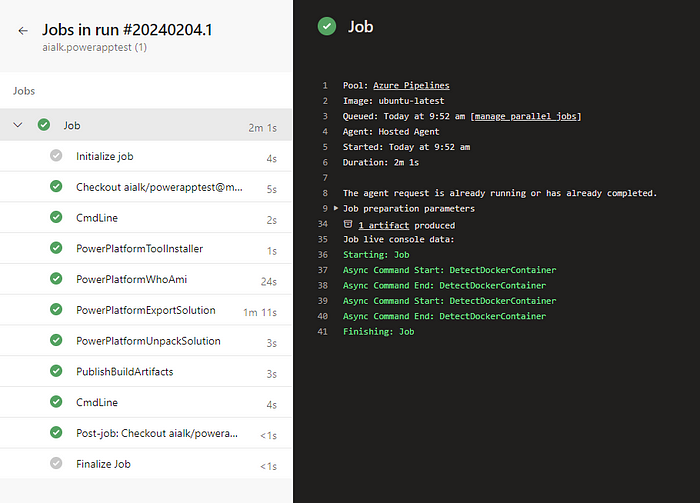
There are 8 steps in this Azure Pipeline file.

1. Checkout Step — This step configures how Pipeline check out the Bitbucket repository. This step is used to make sure Bitbucket credentials are persevered throughout all the steps with “persistCredentials” property.

2. CmdLine@2 Task — This command line step sets the Bitbucket username in Git configurations and checks out the repository.

3. PowerPlatformToolInstaller@2 Task — This task installs a set of Power Platform–specific tools required by the agent to run the Microsoft Power Platform build tasks. This task doesn’t require any more configuration when added.

4. PowerPlatformWhoAmi@2 Task — Verifies a Power Platform environment service connection by connecting and making a WhoAmI request. This task can be useful to include early in the pipeline, to verify connectivity before processing begins.

Note Dev environment service connection is used here since we need to connect to the Dev environment of the Power App to export the solution.

5. PowerPlatformExportSolution@2 Task — Exports the solution from the Dev environment and saves to “SolutionOutputFile” location as a Zip file.

6. PowerPlatformUnpackSolution@2 Task — Takes a compressed solution file and decomposes it into multiple XML files so that these files can be more easily read and managed by a source control system such as Bitbucket. In this case “SolutionTargetFolder” will contain the decomposed project files.

7. PublishBuildArtifacts@1 Task — Use this task to publish build artifacts to Azure Pipelines so it can be used by Azure Release Pipelines.

8. CmdLine@2 Task — This command line step commits the Power App solution to Bitbucket.

Committing the Power App solution to Bitbucket can also be done directly via Power Platform as well. There’s a feature in PowerApps to connect to a Git Repository and have the code automatically commit to Repository. Please refer to below Link.

So there is an option to have PowerApp configured with Bitbucket and use that Bitbucket repository from Azure Devops to trigger the Release Pipelines. At the time of the writing, this is a Preview feature.

7. Create Azure DevOps Release Pipeline

Now we need to create a Release pipeline to deploy the Power App to UAT environment.

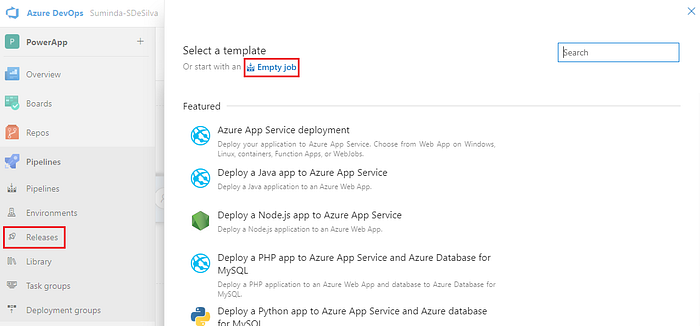
1. Create New Release PipeLine and Start with Empty Job.

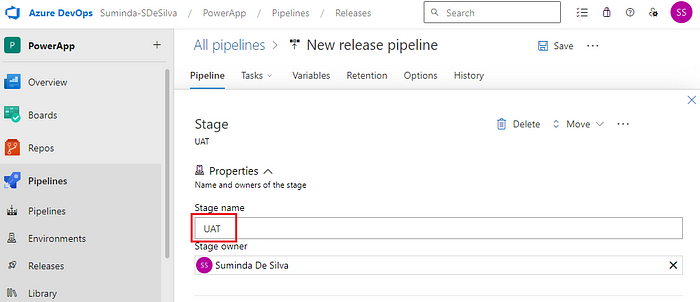
2. Rename the Release Pipeline as UAT.

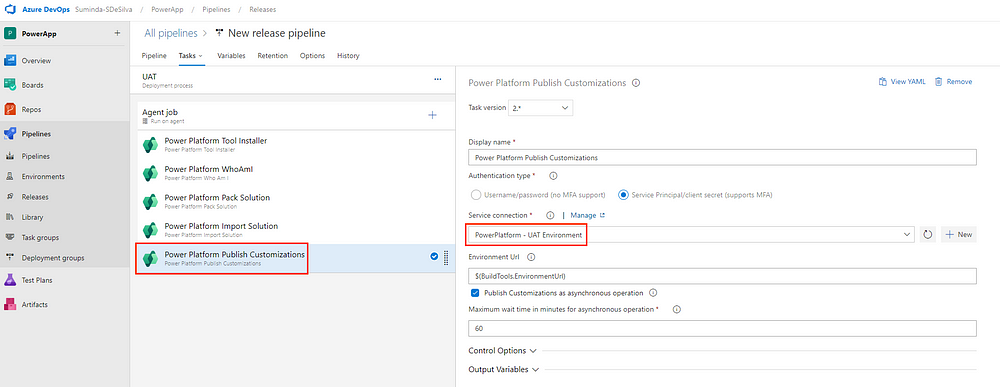
3. Go to Tasks and Add Power Platform Tool Installer.

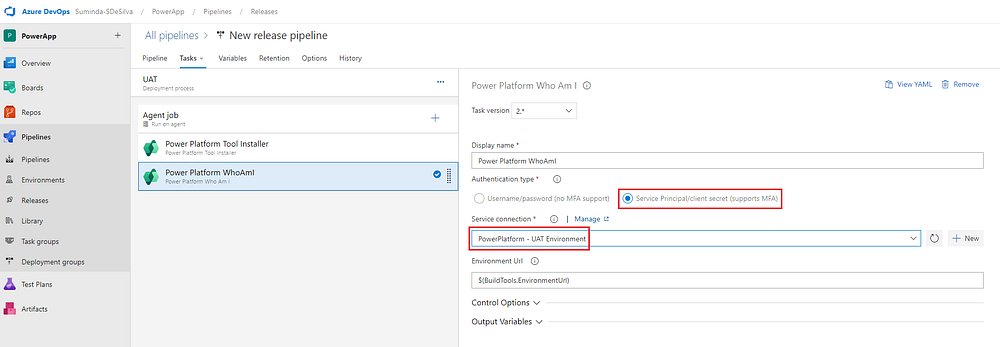
4. Add Power Platform Who Am I Task and configure as below. Make sure to select UAT Service Connection since we need to deploy into the UAT environment.

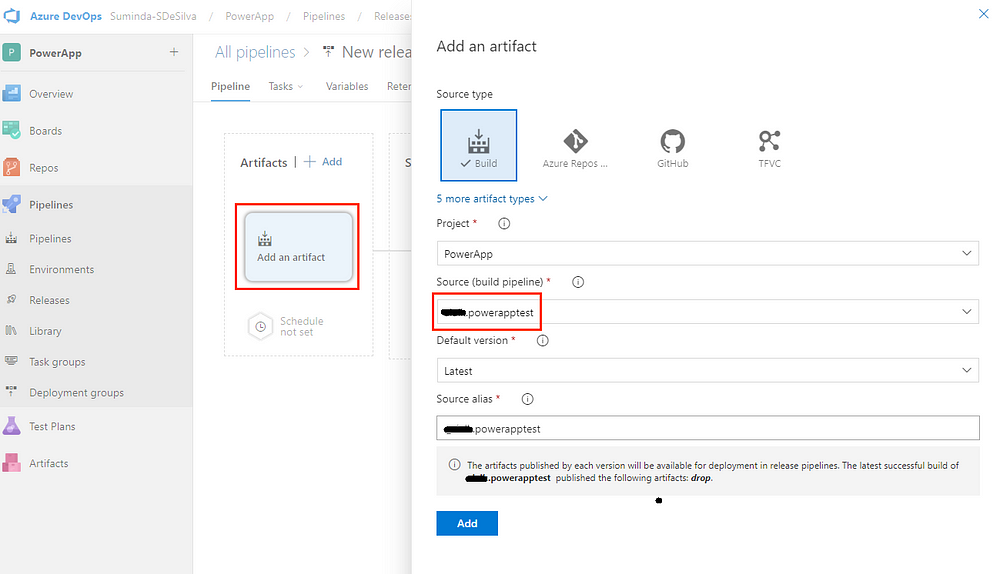
5. Add Artifact of the Build Pipeline we have previously created.

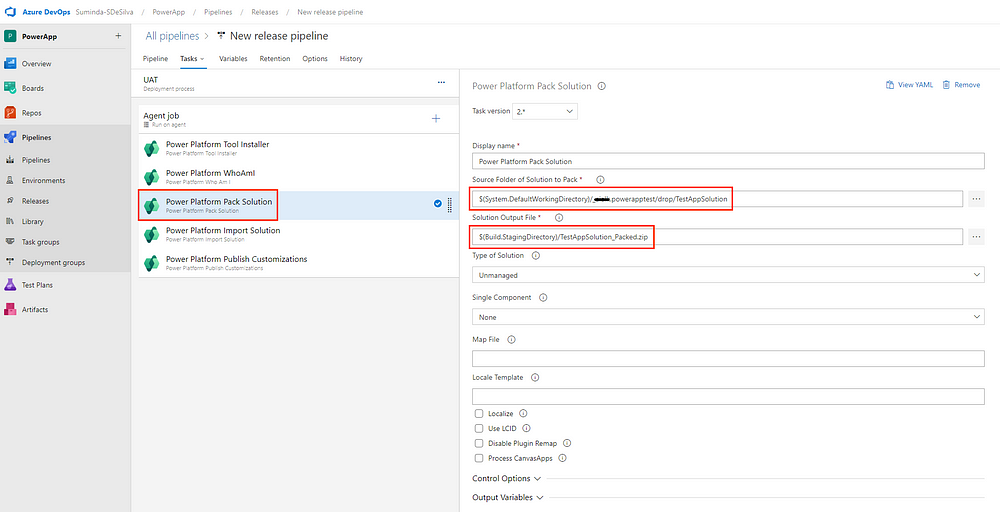
6. Add Power Platform Pack Solution and configure as below. Notice for “Source Folder of Solution to Pack” is the location of the PowerPlatformUnpackSolution@2 Task output file. Unpacked solution needs to be Packed again before deploying to Power App environment.

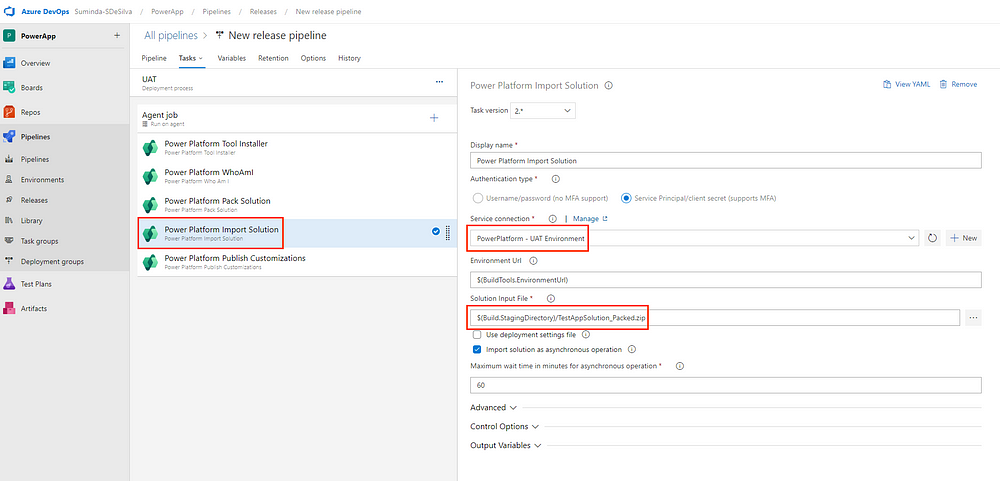
7. Add Power Platform Import Solution and configure as below. Note “Solution Input File” is the output from Power Platform Pack Solution Task.

8. Add Power Platform Publish Customizations and configure as below.

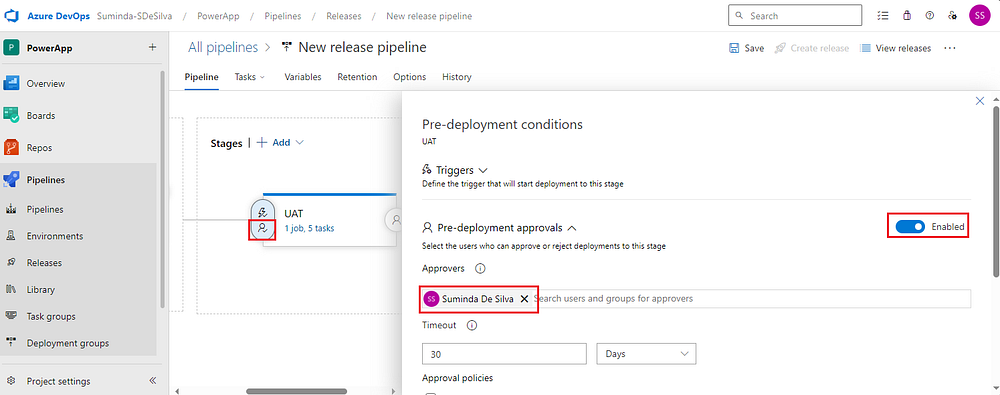
9. Add approvers for the UAT Release Pipeline.

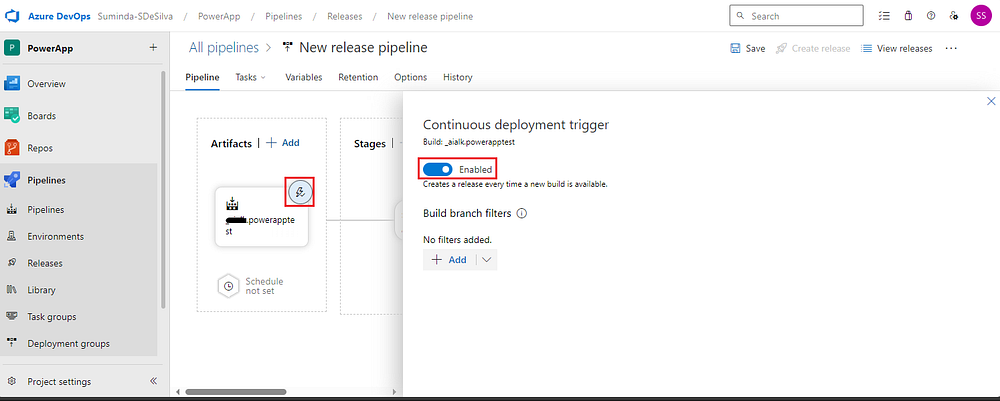
10. Enable continuous trigger to make sure Release Pipeline is automatically triggered for every new Artifact build.

11. Click Save.

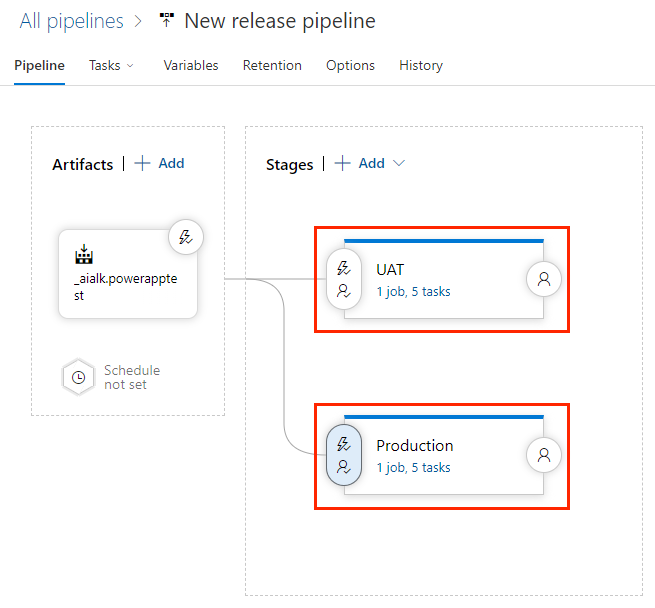
12. Similar to UAT, create another Release Stage for Production Environment as well using Production Service Principal as below.

8. Test the CI/CD Flow

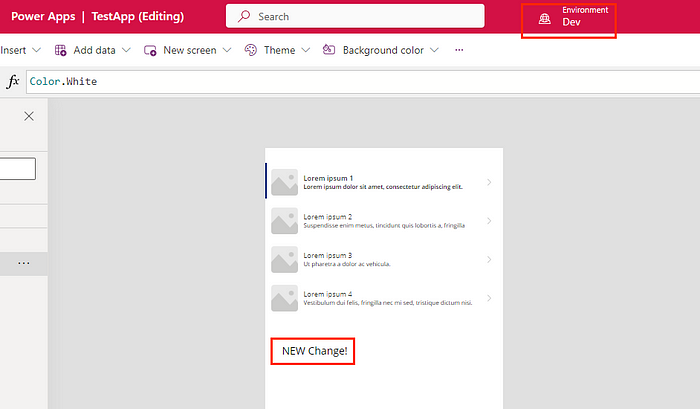
1. Go to Power App in Dev Environment and add a new label as below.

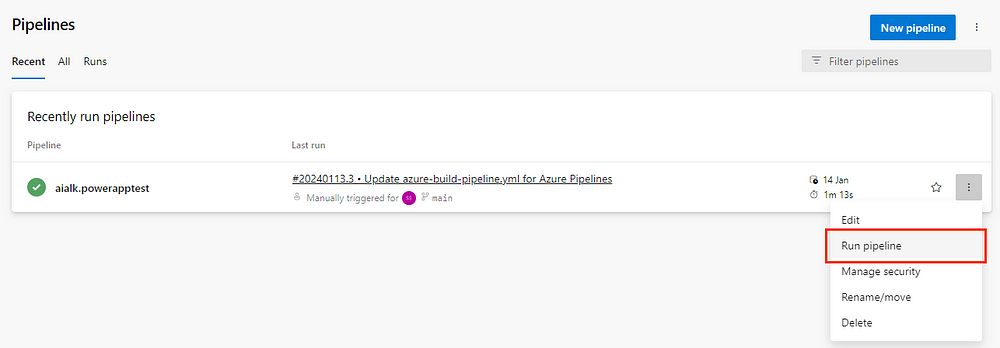
2. Go to Azure DevOps Build Pipeline and run it manually.
3. Check the Build Pipeline logs successfully completes all the tasks.

4. Check Bitbucket Repository is updated with new Build After Build Pipeline.

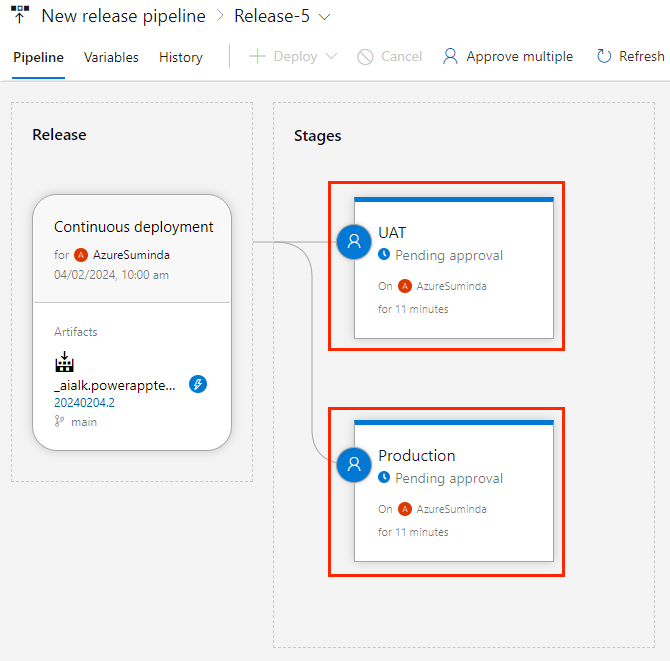
5. Check to see Production and UAT Release Pipelines are triggered with pending approval.

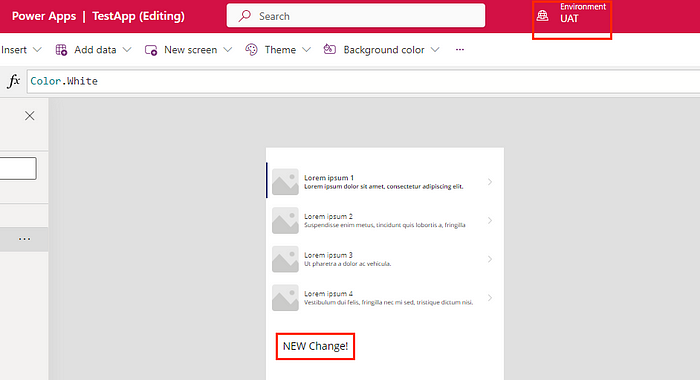
6. Approve UAT first. Once UAT Deployment is succeeded go to the PowerApp UAT environment and verify the change is there.

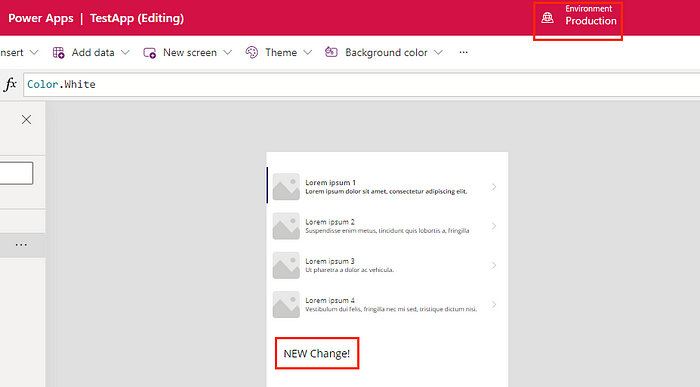
7. After UAT change verification, approve the Production Release Pipeline. Once Production Deployment is succeeded go to the PowerApp Production environment and verify the change is there.

9. Summary

Azure DevOps is extremely flexible to design a proper CI/CD flow for each requirement in a project and a organisation. The purpose of this blog is to show that flexibility.

As you can imagine this can be customised further to support more complex flows!

Cheers!

10. References