As per Microsoft Dynamics 365 V9.X release it has been advised to use Dynamics CRM WebApi for any integration with Dynamics CRM and in code written outside Plugin and Custom workflows as Microsoft has deprecated Dynamics SDK for integration purposes.
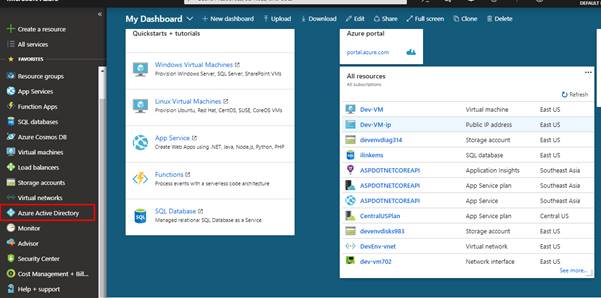
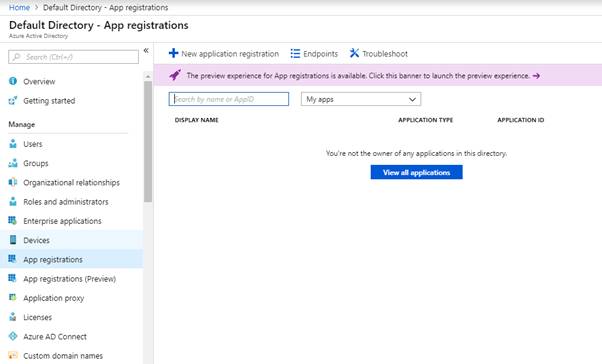
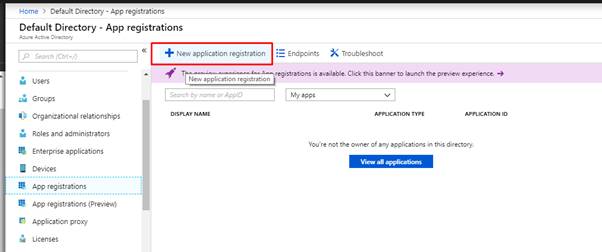
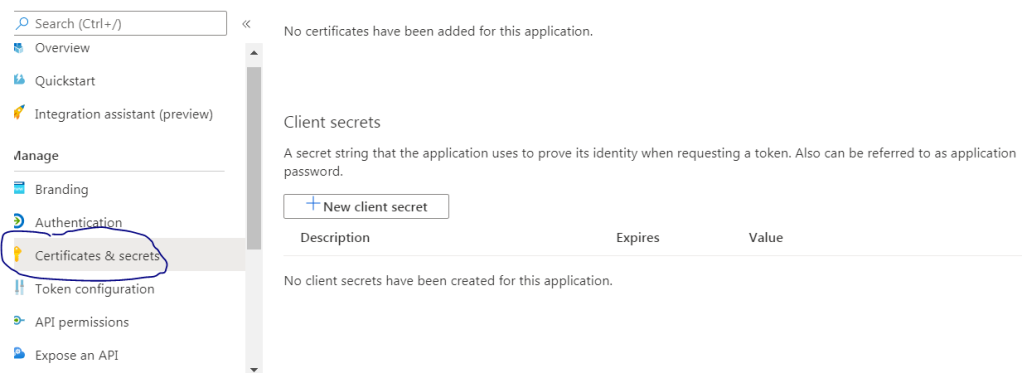
To use Dynamics web API we need to first register an application in Azure AD and get the client ID and (Secret Key or use username and password of the User instead of the secret key).
So to connect web API on any .net application you need to be ready with.
Cmponents Required
Where to Find?
Example
Client
Id (Guid)
On Register of APP
“edb0f75d-9540-****-****-259e0d289148”
Client Secret (Random Number Generator)
On Register of APP
“jVE[Ek_CPxml@****@OULHs1g7b493?=”
Username & Password of User(If secret
key is not there)
OAuth 2.0 v1 Endpoints
On Register of APP
https://login.microsoftonline.com/d245e842-b71e-42df-**** -176555cfb904/oauth2/token
Crm Api URL
From CRM Resource Center
https://4***ember2019.crm*.dynamics.com/api/data/v9.1
|
Cmponents Required |
Where to Find? |
Example |
|
Client
Id (Guid) |
On Register of APP |
“edb0f75d-9540-****-****-259e0d289148” |
|
Client Secret (Random Number Generator) |
On Register of APP |
“jVE[Ek_CPxml@****@OULHs1g7b493?=” |
|
Username & Password of User(If secret
key is not there) |
||
|
OAuth 2.0 v1 Endpoints |
On Register of APP |
https://login.microsoftonline.com/d245e842-b71e-42df-**** -176555cfb904/oauth2/token |
|
Crm Api URL |
From CRM Resource Center |
https://4***ember2019.crm*.dynamics.com/api/data/v9.1 |
References Required to Connect.
IdentityModel.Clients.ActiveDirectory (From Nuget)References Required to Connect.
- Json
Code to connect to Web API.
A basic example to Retrieve account and contact record and create contact records in CRM.
usingMicrosoft.IdentityModel.Clients.ActiveDirectory;usingSystem.Net.Http.Headers;usingNewtonsoft.Json.Linq;usingSystem;usingSystem.Collections.Generic;usingSystem.Linq;usingSystem.Net.Http;usingSystem.Web;usingSystem.Web.Http;usingSystem.Text;usingNewtonsoft.Json;namespaceMyFirstWebAPI.Controllers{publicclassCrmController : ApiController{//static string redirectUrl = "http://localhost:64884/";staticstringapiVersion ="9.1";staticstringcrmapiUrl = $"{serviceUri}/api/data/v{apiVersion}/";privatevoidGetAuthToken(){// TODO Substitute your app registration values that can be obtained after you// register the app in Active Directory on the Microsoft Azure portal.//Connect to crm API using Username and Password with oAuth 2.0 v1 Endpoints.//string clientId = "e36bb8ae-b29b-4d36-8fa8-45de01f0993b"; // Client ID after app registration//string userName = "g***@*******uk.onmicrosoft.com";//string password = "*******XHJg";//var credentials = new UserPasswordCredential(userName, password);//string authority = "https://login.microsoftonline.com/03b9cd1b-6cfc-4c45-****-1092fd6f0e26/oauth2/authorize"; //oAuth 2.0 v1 Endpoints//var context = new AuthenticationContext(authority, false);//var authResult = context.AcquireTokenAsync(resource: serviceUri, clientId, credentials).Result;//Connect to crm API using secretKey with oAuth 2.0 v1 Endpoints.stringclientId ="edb0f75d-****-****-bcce-259e0d289148";stringappKey ="jVE[Ek_****@w8Ov@OULHs1g7b493?=";//Client SecretClientCredential credentials =newClientCredential(clientId, appKey);stringauthority ="https://login.microsoftonline.com/d245e842-b71e-42df-a18e-176555cfb904/oauth2/token";varauthResult =newAuthenticationContext(authority,true).AcquireTokenAsync(serviceUri, credentials).Result;//return authResult.AccessToken;stringguid = RetrieveAccounts(authResult.AccessToken);CreateContacts(authResult.AccessToken, guid);}privatevoidCreateContacts(stringaccessToken,stringguid){try{JObject contact1 =newJObject{{"firstname","Sanket"},{"lastname","Sinha"},{"emailaddress1","nowsanket@gmail.com"}};contact1["jobtitle"] ="Junior Developer";contact1.Add("modifiedby@odata.bind","/systemusers(5ef22367-aa3f-4bbe-b490-39b332c9e6a8)");contact1.Add("gendercode", 1);HttpClient httpClient =newHttpClient();//Default Request Headers needed to be added in the HttpClient ObjecthttpClient.DefaultRequestHeaders.Add("OData-MaxVersion","4.0");httpClient.DefaultRequestHeaders.Add("OData-Version","4.0");httpClient.DefaultRequestHeaders.Accept.Add(newMediaTypeWithQualityHeaderValue("application/json"));//Set the Authorization header with the Access Token received specifying the CredentialshttpClient.DefaultRequestHeaders.Authorization =newAuthenticationHeaderValue("Bearer", accessToken);httpClient.BaseAddress =newUri(crmapiUrl);HttpRequestMessage request =newHttpRequestMessage(HttpMethod.Post,"contacts"){Content =newStringContent(contact1.ToString(), Encoding.UTF8,"application/json")};HttpResponseMessage response = httpClient.SendAsync(request).Result;if(response.IsSuccessStatusCode)//204{varentityUri = response.Headers.GetValues("OData - EntityId").FirstOrDefault();}}catch(Exception){throw;}}publicstringRetrieveAccounts(stringauthToken){stringguid =string.Empty;HttpClient httpClient =newHttpClient();//Default Request Headers needed to be added in the HttpClient ObjecthttpClient.DefaultRequestHeaders.Add("OData-MaxVersion","4.0");httpClient.DefaultRequestHeaders.Add("OData-Version","4.0");httpClient.DefaultRequestHeaders.Accept.Add(newMediaTypeWithQualityHeaderValue("application/json"));//Set the Authorization header with the Access Token received specifying the CredentialshttpClient.DefaultRequestHeaders.Authorization =newAuthenticationHeaderValue("Bearer", authToken);httpClient.BaseAddress =newUri(crmapiUrl);//Examples of different filters here.//var response = httpClient.GetAsync("accounts?$select=name&$top=1").Result;//var response = httpClient.GetAsync("accounts?$select=name&$top=1").Result;//var response = httpClient.GetAsync("contacts?$select=fullname&$expand=parentcustomerid_account($select=accountid,name,createdon,emailaddress1,address1_telephone1)&$filter=emailaddress1 eq 'nowsanket@gmail.com'&$top=1").Result;varresponse = httpClient.GetAsync("importfiles?$select=successcount,name").Result;if(response.IsSuccessStatusCode){varaccounts = response.Content.ReadAsStringAsync().Result;varjRetrieveResponse = JObject.Parse(accounts);dynamic collContacts = JsonConvert.DeserializeObject(jRetrieveResponse.ToString());foreach(vardataincollContacts.value){//You can change as per your need hereguid = data.importfileid.Value;Console.WriteLine("Contact Name – "+ data.name.Value);}}returnguid;}}}