Search This Blog

Wednesday, January 26, 2022

Power Automate Error Management and Notifications

This blog is all about setting up an error management system so that you can be notified as soon as possible when an error occurs and better handle/organize these errors.


This includes being able to send an error including a general idea of what happened or where the error occurred.


We'll also talk about the "Configure Run After" settings.

Level: Beginner - Advanced

Hello!


If you're new to Power Automate (Flow) or are an experienced pro, I hope this post can be of use to you!


Introduction - Error Management by Default

Quality management is an important part in ensuring customer satisfaction, reducing costs, and making life easier for everyone - you of course probably already know this.

The best way to ensure good quality in a product or service (in this case perhaps a process), is to manage-in and design-in quality into the process - or in this case, a flow!

But of course, errors are still going to occur, especially in the beginning rollout stages of a new flow or process. So, if you've used Power Automate at all, you know that occasionally (hopefully not often) a flow run will fail.

Now, Power Automate will eventually notify you of a flow failing through an email and it is possible to see all your flow failures in the notification bell at the top of page (see below)


This can be helpful, especially when you want to see all the failures that have occurred, but most often it is very important or perhaps vital to know that a flow failed as soon as possible or at the very least the same day.

In order to accomplish this, we will first need to understand how flow actions work when a previous flow action succeeds, fails, times out, or is skipped.


Configure Run After Settings


Every action in flow has what is called "Configure Run After" settings, although sometimes they are not customizable and are grayed out. This is because the "Configure Run After" settings cannot be changed on the action right after the trigger. (See image below).


The "Configure run after" settings can be accessed by clicking on the ellipses (or the three dots) on the far right of a flow action (see image above).

Once you've selected "Configure run after", you will see a settings screen like the one shown below:


This showing the action directly above the selected action as well as a few options: is successful, has failed, is skipped, and has timed out.

Basically, what the settings in the image above are saying is that the "Initialize variable" action will only run when the "Approval Type" variable action (the one right above the selected "Initialize variable" action) has successfully ran.

But, of course, you can always change it to run if the above action (in this case the "Approval Type" action) has either failed, skipped, has timed out, or a combination of all four of the options.

For example, if you selected "has failed" AND "is skipped" the flow would evaluate that when it's running and if ANY of those scenarios occurred (if the "Approval Type" action failed OR was skipped) then the "Initialize variable" action would run.

So, it is important to understand that flow is going to look at EVERY ACTION even if a previous action failed and evaluate what the "configure run after" settings are to see if it should still run the action or not.

Note: If the settings you select don't include "is successful", you will then see a red dotted arrow instead of the usual black one. This shows that the action will not run if the above action succeeded.

You can probably get an idea of where I'm going with this right? If not, it will make much more sense in just a moment.

Really quick, though, before we get to the exciting part, let's go over what "has failed", "is skipped", and "has timed out" really means. If you already have an idea of what these mean, feel free to skip this next section.

Tip - Try renaming your actions as you build your flow. This makes it much easier for you or someone else upon opening the flow again.


Successful, Failed, Skipped, and Timed Out Definitions

Is Successful - Don't really need to explain this one but just to be certain, "Is Successful" means the action ran without any problems.

Has Failed - This one is also quite obvious. If the flow ran into a problem with the action and was not able to be completed it will fail.

Is Skipped - This one is very important to understand. An action will be "skipped" for two reasons:


1 - The action was on the side of a condition, switch, etc. that the flow didn't "go down". For example, if the action is in the "false" side of a condition and the flow run evaluated the condition as "true", all of the actions on the "false" side will be marked as "skipped". For those of you, like me, that would much rather see an image of this, here you go:


2 - The second reason is if a PREVIOUS action failed. (See image below)


Timed Out - It is more rare that this will happen, but an action will time out when, for example, an approval has been created and no one has responded in the time limit - which is currently 30 days. It might also time out because of perhaps a connection issue. Either way, it's probably a good idea to include this as a potential "failure" of an action since the flow didn't exactly "run through" all the way and the processes wasn't completed as it should've been.

Now that we understand how the "Configure Run After" settings work, let's get into how we're going to handle any errors!

TIP - You can use the 'Scope' action to group different actions together. This can make your complicated flows much more organized and copying large groups of actions easier as well!


Error Management - Send Email/Notification on Failure


There are a few different ways to do this, so of course, handle errors the way that you think is best for your situation. But, the idea behind the two methods is the same:

Whenever a flow run fails, we're going to send an email (or you could send a notification, create an error ticket item, Teams message, or whatever else you'd like).

As I mentioned before, there are two ways of going about doing this:


1 - Send an email/notification after a specific action in the flow (meaning not necessarily at the end of the flow)


2 - Send an email/notification after an error that occurred anywhere in the flow.

The second method is actually my preferred method, as the only real advantage of the first method is that you might have a good idea of what specific action failed.

But, there is a way using the second method to be able to get a general idea on what action failed or where the error occurred in the flow without opening it. Pretty cool!

Next, we'll talk about how to implement each method


Method 1 - After a Specific Action

This method involves using a parallel branch and will NOT send an error message when ANY failure/time-out has occurred. This method is designed around the idea of getting an error message when a specific action fails/times-out.

Here are the steps to implement this method:

1 - Identify the action that you'd like to be notified about if it fails.

Then, directly under this action, click on the plus and then instead of choosing "Add an action", select "Add a parallel branch". (See below)


Tip - You'll need to have another action below the selected action before you can add a parallel branch.


2 - Now you should see that a parallel branch has been added and you can now select the action that you would like to add. This action will be your email/notification action, so go ahead and choose the one that best fits your situation/needs.

Then, go to the ellipses (3 dots on the far right) of the newly added action and click on "Configure Run After". (See below)


Tip - If you're using an email, remember you can set the email importance to "High" or at least "Normal" so that it's more likely to be noticed.

3 - Once you've got the "Configure Run After" settings open, unselect "is successful" and select "has Failed" and "has timed out".


4 - This is very important! Be sure to add the "Terminate" action after the error email/notification action and set the status field to "Failed". I will explain why in the section "Remember this!" below.


Basically, configuring the settings as shown in step three above means that if the action above the email (or notification etc.) fails or times out, then the email will be sent out and the if-no branch on the other side will not run and all the actions will be skipped (assuming none of the configure run after settings were changed).

For example (see below), the "Send an email (V2) 2" action will only be sent if the "Get file metadata" action fails or times out. All the other actions on the other side of the "branch" will be skipped.


This method works great in general, but I believe it's best suited for scenarios when, at that specific action, it is more likely to fail and the effects of the flow failing would be the more impactful or negative as well.

Next - the method I prefer and personally use most often!

Tip - Use Microsoft Teams a lot? Try using a Teams action to notify a team or specific person about the error occurring.


Method 2 - After ANY Failure or Time Out

This method is my favorite because it allows our company to know of any failures/time-outs regardless of where the error/time-out occurred.

Here are the steps to implement this method:

1 - Place your error message/email/notification etc. at the very end of the flow. This will insure that you will be notified of any error that occurs. It's also important to make sure that it's outside of any conditions, switches, or apply to each actions as those can cause the error message not to be triggered (see the "is skipped" under the definitions section above if you want to know more).


2 - You guessed it. Go to the three dots on the top right, click on "Configure run after", and select "has failed", "is skipped", and "has timed out". Unselect "is successful". (See below). Basically, as we've learned already about the "is skipped" option, if there is a failure anywhere earlier on in the flow, all actions after the failed action will be marked as skipped. So, if the action above your error email/notification failed, is skipped, or timed out, that means something at some point in your flow went wrong.


3 - IMPORTANT - be sure to use the "Terminate" action after the error email/notification action and set the status field to "Failed". (See "Remember This!" section below for more info)


Getting an idea of what went wrong in your error message (Similar to Designer Workflows)

If you want to take the time and if you think you/your company would benefit from knowing in the error message/email an idea of what error occurred or where, you can set a string variable throughout the flow and then include that variable in the error message.

For example: at the beginning of a new step or section in your flow, you could set the variable to something like, "Beginning Copying Process".

Then, at the end of the process you could set it to something like, "Copying Process Complete" or whatever you'd like.

If the flow had an error occurred before the variable was to "Copying Process Complete", the variable would still say "Beginning Copying Process" and you would see this variable in your error message and know that the error occurred during the "Copying Process".


Getting the Link to your Failed Flow Run

First off, this is such a helpful thing to include!

I would definitely recommend implementing this especially because it is easy to do, makes life easier, and allows you to be more organized in fixing/seeing flow failures.

I won't go too much into how this formula works exactly, but here is the formula for an expression that you will need to use to include the link to the flow:

concat(
    'https://emea.flow.microsoft.com/manage/environments/',
    workflow()['tags']['environmentName'],
    '/flows/',
    workflow()['name'],
    '/runs/',
    workflow()['run']['name']
)

The concat() function brings all of the text together into one string. The workflow() function can gather data from the workflow and the current flow run. If you want to take a look at everything it's grabbing, try putting the function: workflow() into a string variable to see what it returns.

Once you've created this variable, you can put it into an email as a link. Check out our blog HERE on how to do this.


Remember This!

An important note to remember when implementing either method is that Power Automate will set the status of the entire flow to "Succeeded" when an action is running after a previous actions has failed, is skipped, or timed out.


This means that you can't rely on view the flow run history and seeing that a flow run failed.


So, be sure to use the "Terminate" action after the error email/notification action and set the status field to "Failed". (See below)


GET/SET field values using JavaScript in D365 CE

Introduction: In this blog, you’ll learn how to GET and SET field values of different data types in D365 CE(CRM) using JavaScript.

Single Line of Text and Multiple Lines of Text

GET

var name = formContext.getAttribute("vv_name").getValue();

Return Type is string

SET

formContext.getAttribute("vv_name").setValue("Vaishali");

NOTE: “vv_name” is the field Schema Name

Two Options

GET

var intrested = formContext.getAttribute("vv_interested").getValue();

Return Type is boolean

SET

formContext.getAttribute("vv_interested").setValue(true);

Note: Yes: true and No: false

Option Set

GET

To get option set value:
var topic = formContext.getAttribute("vv_topic").getValue();

To get option set Text:
var topicText= formContext.getAttribute("vv_topic").getText();

Return Type is Number for getValue() and String for getText()

SET

Set Option set using value
formContext.getAttribute("vv_topic").setValue(772500003);

Set Option set using Text

 var text = "Power Automate";
      var optionSetValues = formContext.getAttribute("vv_topic").getOptions();
      for (i = 0; i < optionSetValues.length; i++) {
           if (optionSetValues[i].text == text) {
            formContext.getAttribute("vv_topic").setValue(optionSetValues[i].value);
       }
    }

Whole Number

GET

var age = formContext.getAttribute("vv_age").getValue();

Return Type is Number

SET

formContext.getAttribute("vv_age").setValue(24);

Decimal Number

GET

var dn = formContext.getAttribute("vv_dn").getValue();

Return Type is Number

SET

formContext.getAttribute("vv_dn").setValue(45.6);

Floating Point Number

GET

var fpn = formContext.getAttribute("vv_fpn").getValue();

Return Type is Number

SET

formContext.getAttribute("vv_fpn").setValue(0.00008);

Date

GET

formContext.getAttribute("vv_date").getValue();

Return Type is Date

SET

formContext.getAttribute("vv_date").setValue(d);

Currency

GET

var amount = formContext.getAttribute("vv_amount").getValue();

Return Type is Number

SET

formContext.getAttribute("vv_amount").setValue(876.78);

Multi Select Option set

GET

To get Multi select option set values:
formContext.getAttribute("vv_country").getValue();

To get Multi select option set Text:
formContext.getAttribute("vv_country").getText();

Return Type is an array of numbers for getValue() and array of string for getText()

SET

Set Multi Select Option set using value
formContext.getAttribute("vv_country").setValue([772500000,772500002,772500005]);

Set Multi-Select Option set using Text

  var common=[];
        var optionText = ["India","Brazil","Canada"];
        var optionSetValues = formContext.getAttribute("vv_country").getOptions(); 
        for (i = 0; i < optionText.length; i++) {
            for (j = 0; j < optionSetValues.length; j++) {
                if (optionText[i] === optionSetValues[j].text) {
                    common.push(optionSetValues[j].value);
                    formContext.getAttribute("vv_country").setValue(common);
             }
         }
      }

Lookup and Customer

GET

var authorGuid = formContext.getAttribute("vv_author").getValue()[0].id;  
//to get the Guid of lookup record
var authorEntityType = formContext.getAttribute("vv_author").getValue()[0].entityType; 
// to get the entity name 
var authorName = formContext.getAttribute("vv_author").getValue()[0].name; 
// to get the name of the record

Return type is an array of lookup objects.

SET

 var authorLookup =new Array();
           authorLookup[0]= new Object();
           authorLookup[0].id = "0d849e72-362b-eb11-a813-000d3af010d0";  
           authorLookup[0].entityType = "contact";            
           authorLookup[0].name = "vaishali vyas";            

formContext.getAttribute("vv_author").setValue(authorLookup); 

Sunday, January 23, 2022

Step By Step Creating a Simple Plugin/Whole Concept Of Plugin

 So before creating a plugin, You need to understand two things.

  1. What is a Plugin?
  2. When to use the Plugins?

1. What is a Plugin?

A plug-in is custom business logic(code) that you can integrate with Dynamics CRM to modify or augment the standard behavior of the platform.

In simple word, it is a piece of code used to enhance the ability to perform the task which we can not do by of box customization.

Plugins are event handlers for the events fired by Microsoft Dynamics CRM.

You can register plug-in against events using Plugin registration tool or using Solutions.

The plug-in runs in CRM server synchronous(in real time) or asynchronously(in the background) depends upon how they are registered with CRM server.

2. When to use the Plugins?

Plugins Vs JavaScript

  • When Server Side execution of business logic is needed.

Plugins Vs Workflows

  • Workflows can be used to trigger for a limited number of messages(events). A plugin can be executed for all of the messages of the CRM system and can be synchronous and asynchronous.
  • When the performance is considered.

Let’s Begin with An Example:

A plug-in is a custom business logic that integrates with Microsoft Dynamics CRM to modify or extend the standard behavior of the platform. Plug-ins act as event handlers and are registered to execute on a particular event in CRM. Plugins are written in either C# or VB and can run either in synchronous or asynchronous mode.

Some scenarios where you would write a plugin are −

  • You want to execute some business logic such as updating certain fields of a record or updating related records, etc. when you create or update a CRM record.
  • You want to call an external web service on certain events such as saving or updating a record.
  • You want to dynamically calculate the field values when any record is opened.
  • You want to automate processes such as sending e-mails to your customers on certain events in CRM.

Event Framework

The Event Processing Framework in CRM processes the synchronous and asynchronous plugin requests by passing it to the event execution pipeline. Whenever an event triggers a plugin logic, a message is sent to the CRM Organization Web Service where it can be read or modified by other plugins or any core operations of the platform.

Plugin Pipeline Stages

The entire plugin pipeline is divided into multiple stages on which you can register your custom business logic. The pipeline stage specified indicates at which stage of the plugin execution cycle, your plugin code runs. Out of all the specified pipeline stages in the following table, you can register your custom plugins only on Pre- and Post-events. You can’t register plugins on Platform Core Main Operations.

EventStage NameStage Name
Pre-EventPre-validationStage in the pipeline for plug-ins that are to execute before the main system operation. Plug-ins registered in this stage may execute outside the database transaction.
Pre-EventPre-operationStage in the pipeline for plug-ins that are to executed before the main system operation. Plugins registered in this stage are executed within the database transaction.
Platform Core OperationMainOperationIntransaction,the main operation of the system, such as create, update, delete, and so on. No custom plug-ins can be registered in this stage. For internal use only.
Post-EventPost-operationStage in the pipeline for plug-ins which are to executed after the main operation. Plug-ins registered in this stage are executed within the database transaction.

Whenever the CRM application invokes an event (like saving or updating a record), the following sequence of actions takes place −

  • The event triggers a Web service call and the execution is passed through the event pipeline stages (pre-event, platform core operations, post-event).
  • The information is internally packaged as an OrganizationRequest message and finally sent to the internal CRM Web service methods and platform core operations.
  • The OrganizationRequest message is first received by pre-event plugins, which can modify the information before passing it to platform core operations. After the platform core operations, the message is packaged as OrganizationResponse and passed to the post-operation plugins. The post operations plugins can optionally modify this information before passing it to the async plugin.
  • The plugins receive this information in the form of context object that is passed to the Execute method after which the further processing happens.
  • After all the plugin processing completes, the execution is passed back to the application which triggered the event.

Plugin Messages

Messages are the events on which the plugin (or business logic) is registered. For example, you can register a plugin on Create Message of Contact entity. This would fire the business logic whenever a new Contact record is created.

For custom entities, following are the supported messages based on whether the entity is user-owned or organization-owned.

Message NameOwnership Type
AssignUser-owned entities only
CreateUser-owned and organization-owned entities
DeleteUser-owned and organization-owned entities
GrantAccessUser-owned entities only
ModifyAccessUser-owned entities only
RetrieveUser-owned and organization-owned entities
RetrieveMultipleUser-owned and organization-owned entities
RetrievePrincipalAccessUser-owned entities only
RetrieveSharedPrincipalsAndAccessUser-owned entities only
RevokeAccessUser-owned entities only
SetStateUser-owned and organization-owned entities
SetStateDynamicEntityUser-owned and organization-owned entities
UpdateUser-owned and organization-owned entities

For default out-of-the-box entities, there are more than 100 supported messages. Some of these messages are applicable to all the entities while some of them are specific to certain entities. You can find the complete list of supported message in an excel file inside the SDK: SDK\Message-entity support for plug-ins.xlsx

Writing Plugin

In this section, we will learn the basics of writing a plugin. We will be creating a simple plugin that creates a Task activity to follow-up with the customer whenever a new customer is added to the system, i.e. whenever a new Contact record is created in CRM.

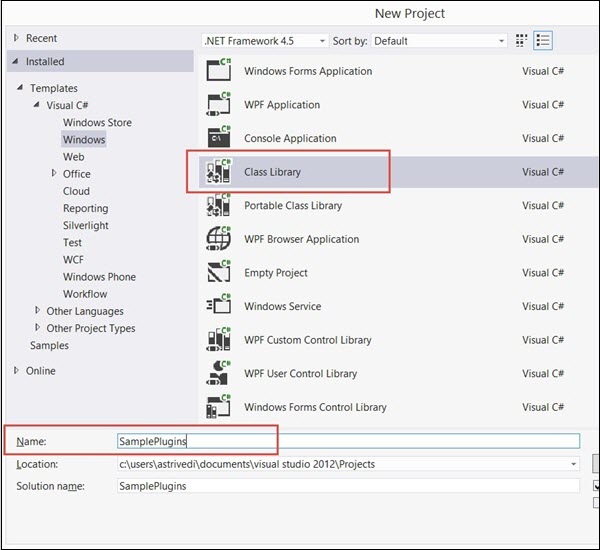
First of all, you would need to include the references to Microsoft.Xrm.Sdknamespace. The CRM SDK contains all the required SDK assemblies. Assuming that you have already downloaded and installed the SDK in Chapter 2, open Visual Studio. Create a new project of type Class Library. You can name the project as SamplePlugins and click OK.

Mscrm Plugin Create vs Solution

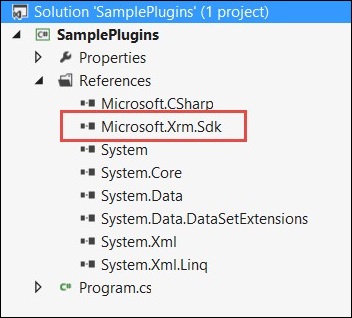
Add the reference of Microsoft.Xrm.Sdk assembly to your project. The assembly is present in SDK/Bin.

Mscrm Plugin Add Solution Reference

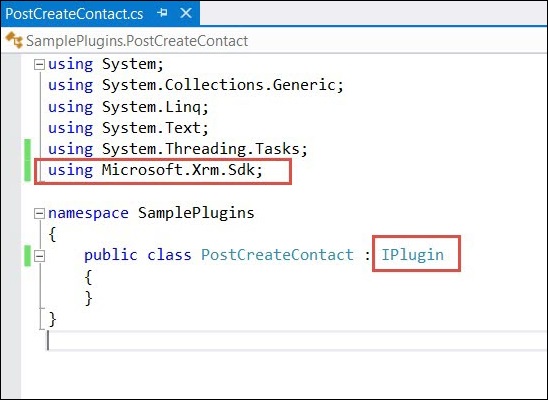
Now, create a class named PostCreateContact.cs and extend the class from IPlugin. Till now, your code will look something like the following.

Mscrm Plugin Sample Code

You will also need to add reference to System.Runtime.Serialization. Once you have added the required references, copy the following code inside the PostCreateContact class.

using System;
using System.Collections.Generic;
using System.Linq;
using System.Text;
using System.Threading.Tasks;
using Microsoft.Xrm.Sdk;

namespace SamplePlugins {
   public class PostCreateContact:IPlugin {
      /// A plug-in that creates a follow-up task activity when a new account is created.
      /// Register this plug-in on the Create message, account entity,
      /// and asynchronous mode.

      public void Execute(IServiceProviderserviceProvider) {
         // Obtain the execution context from the service provider.
         IPluginExecutionContext context =(IPluginExecutionContext)
            serviceProvider.GetService(typeof(IPluginExecutionContext));

         // The InputParameters collection contains all the data
            passed in the message request.

         if(context.InputParameters.Contains("Target")&&
            context.InputParameters["Target"]isEntity) {
            
            // Obtain the target entity from the input parameters.
            Entity entity = (Entity)context.InputParameters["Target"];
            try {
               
               // Create a task activity to follow up with the account customer in 7 days
               Entity followup = new Entity("task");
               followup["subject"] = "Send e-mail to the new customer.";
               followup["description"] =
                  "Follow up with the customer. Check if there are any new issues
                  that need resolution.";
               
               followup["scheduledstart"] = DateTime.Now;
               followup["scheduledend"] = DateTime.Now.AddDays(2);
               followup["category"] = context.PrimaryEntityName;

               // Refer to the contact in the task activity.
               if(context.OutputParameters.Contains("id")) {
                  Guid regardingobjectid = new Guid(context.OutputParameter
                     s["id"].ToString());
                  string regardingobjectidType = "contact";
                  followup["regardingobjectid"] = 
                     new EntityReference(rega rdingobjectidType,regardingobjectid);
               }
               
               // Obtain the organization service reference.
               IOrganizationServiceFactory serviceFactory =
                  (IOrganizationSer viceFactory)serviceProvider.GetService
                  (typeof(IOrganizationServiceFactory));
               IOrganizationService service = 
                  serviceFactory.CreateOrganizationService(context.UserId);

               // Create the followup activity
               service.Create(followup);
            } catch(Exception ex) {
               throw new InvalidPluginExecutionException(ex.Message);
            }
         }
      }
   }
}

Following is a step-by-step explanation of what this code does −

Step 1 − Implements the Execute method by taking IServiceProvider object as its parameter. The service provider contains references to many useful objects that you are going to use within a plugin.

Step 2 − Obtains the IPluginExecutionContext object using the GetService method of IServiceProvider.

Step 3 − Gets the target entity’s object from the context object’s InputParameters collection. This Entity class object refers to the Contact entity record on which our plugin would be registered.

Step 4 − It then creates an object of Task entity and sets a proper subject, description, dates, category, and regardingobjectid. The regardingobjectid indicates for which contact record this activity record is being created. You can see that the code gets the id of the parent Contact record using context.OutputParameters and associates it with the Task entity record which you have created.

Step 5 − Create an object of IOrganizationServiceFactory using the IServiceProvider object.

Step 6 − Create an object of IOrganizationService using the IOrganizationServiceFactory object.

Step 7 − Finally, using the Create method of this service object. It creates the follow-up activity which gets saved in CRM.

Signing the Plugin Assembly

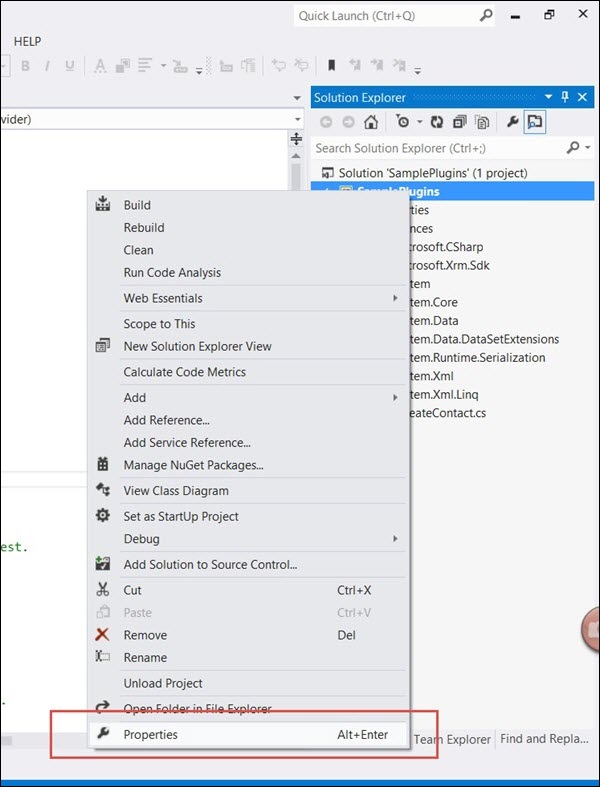
This section is applicable only if you are registering your plugin assembly for the first time. You need to sign in the assembly with a key to be able to deploy the plugin. Rightclick the solution and click Properties.

Mscrm Plugin Solution Properties

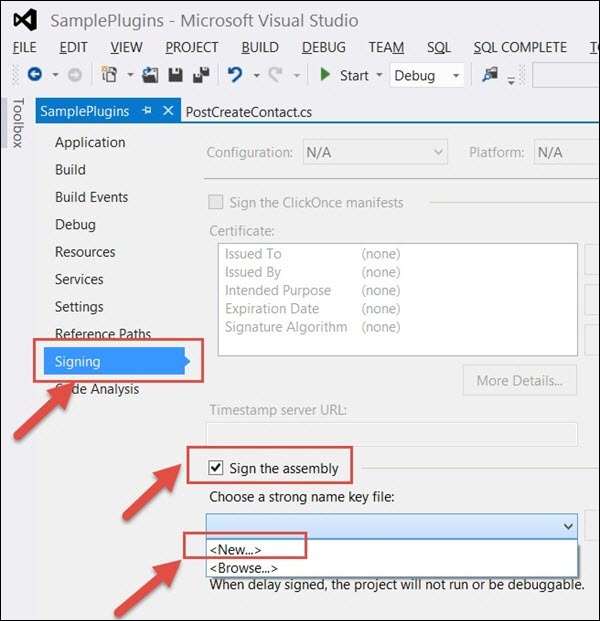
Select the Signing tab from the left options and check the ‘Sign the assembly’ option. Then, select New from Choose a strong name key file option.

Mscrm Plugin Sign Assembly

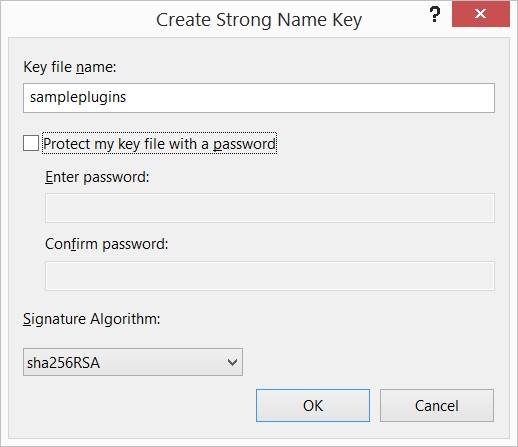
Enter the Key file name as sampleplugins (This can be any other name you want). Uncheck the Protect my key file with a password option and click OK. Click Save.

Mscrm Plugin Sign Assembly Add Key

Finally, build the solution. Right Click → Build. Building the solution will generate assembly DLL, which we will use in the next chapter to register this plugin.

Exception Handling in Plugin

More often than not, your plugin logic will need to handle run-time exceptions. For synchronous plugins, you can return an InvalidPluginExecutionException exception, which will show an error dialog box to the user. The error dialog will contain the custom error message that you pass to the Message object of the exception object.

If you look at our code, we are throwing the InvalidPluginExecutionException exception in our catch block.

throw new InvalidPluginExecutionException(ex.Message);