Search This Blog

Saturday, April 16, 2022

Dynamics 365 CRM Entity Relationships Understandings

 Entity relationship defines how a specific entity record is related to another entity record. In this post we will discuss what is entity relations and details about this topic. We will learn below points in this article,

  • Fundamentals of entity relationship
  • Relationship V/s Connections
  • Types of Entity Relationships
  • Relationship Behaviors
  • How to create Relationships

Fundamentals of Entity Relationship

Entity relationships define how records can be related to each other in the database. When you are adding a lookup field to an entity the system creates a new 1:N (one-to-many) relationship between the two entities and lets you put that lookup field in a form. Using lookup field you can associate an entity record with another entity record.

Relationship V/s Connections

Although these two word looks like similar we have to understand when to use connections and when to use Relationships. The below grid speaks about it.

RelationshipsConnections
1.    This is a formal relationship between entities1.    This is less formal relationship betwwen entities
2.    We can configure Relationship behaviors using Entity Relationship2.    We can configure Connection Role in connections creation.
3.    E.g. : An opportunity without a customer is not accepted so we have an entity relationship between Opportunity and Contact so that we can query and report data efficiently.3.    E.g.: If one contact is spouse of another contact, or one contact is an employer of another contact, so for such type of relationship we define Connections.
4.    Relationships are defined as 1:N, N:N with additional relationship behavior.4.    Two entity records are connected by a connection Role such as , Employer, Spouse etc.

Types of Entity Relationship

There are two types of Relationships while customizing entities using relationships. They are given below.

  • 1:N (One-to-Many)

An entity relationship where one entity record for the Primary Entity can be associated to many other Related Entity records because of a lookup field on the related entity.

When viewing a primary entity record you can see a list of the related entity records that are associated with it.

  • N:N (Many-to-Many)

An entity relationship that depends on a special Relationship Entity, sometimes called an Intersect entity, so that many records of one entity can be related to many records of another entity.

When viewing records of either entity in a N:N relationship you can see a list of any records of the other entity that are related to it.

Relationship Behavior

When a one-to-many entity relationship exists there are cascading behaviors that can be configured to preserve data integrity and automate business processes. This topic will explain some key concepts and describe how you can configure these cascading behaviors.

We have 4 types of relationship behavior as given below.

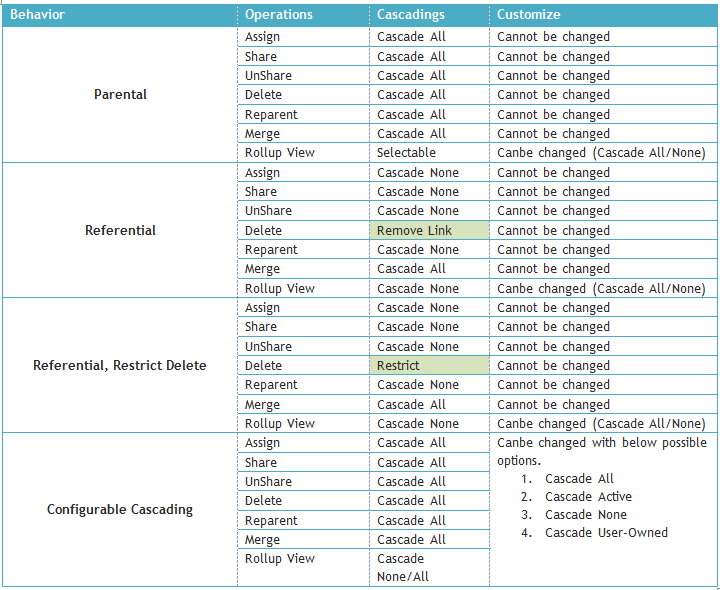
  1. Parental

In a parental relationship between two entities, any action taken on a record of the parent entity is also taken on any child entity records that are related to the parent entity record. if you delete a record in the parent entity, the related child entity records are also deleted; or if you share a parent entity record, the related records from the child entity are also shared. All option are disable for Parental relationship.

  1. Referential

In a referential relationship between two entities, you can navigate to any related records, but actions taken on one will not affect the other

  1. Referential, Restrict Delete

Actions taken on parent will not affect child record but parent record cannot be deleted till the child record exists. i.e you cannot delete a record when related records exist.

  1. Configurable Cascading

You need to specify your setting here.

We can set the cascading behavior for the operations like, Assign, Share, Unshare,Reparent,Delete & Merge. We can have one of the below cascading options while configuring relationship.

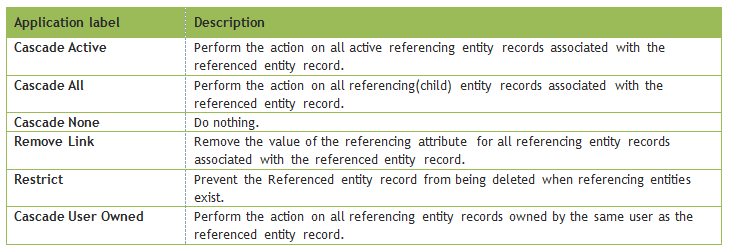
The type we are interested here is “Configurable Cascading”. It allows you to decide what type of behavior we need to apply.The useful details of different cascading rules are (note here me is referred to the user on whom you will perform actions)
• Cascade All: Perform action on all of my child records. Like if assigned my account to another user then all my activities, orders, invoices etc are assign to new user including open, completed and other user owned records
• Cascade Active: Perform action on only my active child records
• Cascade User-Owned: Perform action on all my child records which is owned by me
• Cascade None: do nothing to my child records
• Remove Link: remove link from child record
• Restrict: Applies to Delete. The delete is not allowed if there are other entity instances that reference the ID of the entity instance being deleted.

As per Microsoft the definitions of the cascading concept is given below.
The below matrix is specifies the default relationship behavior cascading concept. In the below matrix wherever we have “cannot be changed” means we can not select to choose other option the value is pre-populated by system and can not be changed.This means for example if the behavior is parental then if we assign a record to a new user then all the child entity records will also be assigned to the user automatically due to “Cascade All” behavior.
 

How to create Relationship
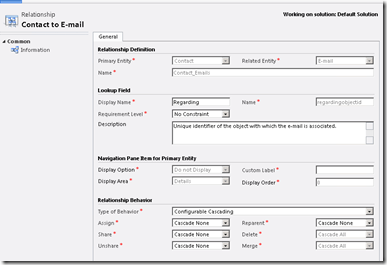
In this section we will understand how we can create a relationship behavior for a 1:N relationship type.

Step-1: Open Dynamics 365 -> Goto Settings Area -> Select Customization->Open Customize the System

Step-2: In the default solution ->Expand the Entity option and select the entity to add relationship

Step-3: In entity -> Select 1: N relationship and add new relationship a sample snapshot given below.

 Step-4: Choose the mandatory fields and also the cascading behaviors.

Step-5: Now save it and check a lookup field in referencing entity.


Business Rules In Dynamics 365

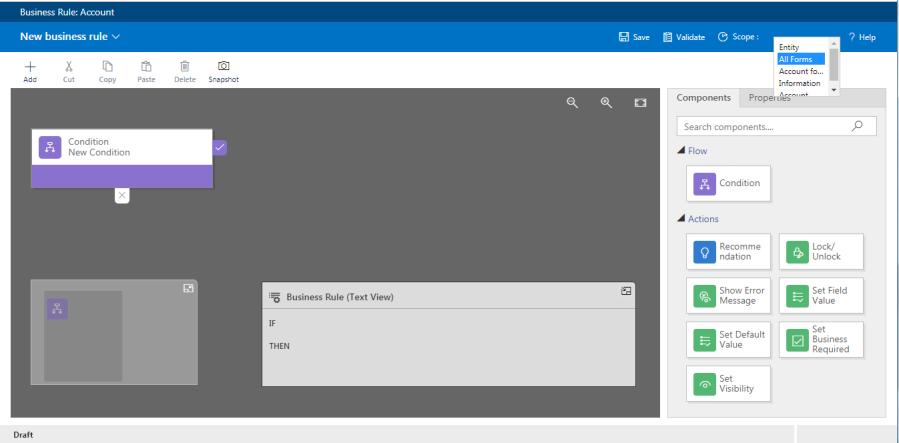
 Business rule core function is to enable business analysts and power users to configure Microsoft Dynamics entity forms and perform actions without writing a single line of client-side code (JavaScript). Business Rules can be set up using the graphical interface, and in the back end Dynamics 365 automatically generates the client-script to perform the configured action. The automatically generated code is not available to users, so from their perspective, there are only point-and-click configurations.Business rule was introduced by Microsoft in CRM 2013. Dynamics 365 business rule UI will be different from previous version. In the UI component that can be dragged and dropped in the design area.

As we said business rule will perform the action like client side code. The action can be run only when the form loads and when field values change. They do not run when a record is saved, unless the scope for the rule is set at an entity level.

2

Actions Used In Business Rule:

  • Show error message: This action will display an error message if the specified condition is not met. For example, if the data entered in a field does not meet certain validation criteria then Business Rules can be configured to display an error message to the user and restrict them from saving invalid data in CRM.
  • Set field value: This action can be consumed to set a field’s value based on the condition. International business could use the country field value to automatically fill the country’s dialing code.
  • Set business required: By choosing this action, the mandatory field can be marked as non-mandatory and vice versa.
  • Set visibility: This action can hide and show fields on the entity forms. It enables the power users or customizers to change the visibility of the fields dynamically based on the specified condition.
  • Lock or unlock field: This action can be consumed to lock or unlock (enable or disable) fields dynamically. Unlocked or Enabled fields are editable and Locked or Disabled fields are read-only.
  • Set default value: Setting a default value should be used when you want a field to appear with a set value on load. Being able to set a default value is a standard feature for option sets. Using the Set default value feature allows you to set default values for numeric, text, and lookup fields as well. Set your condition and under actions select Set default value.
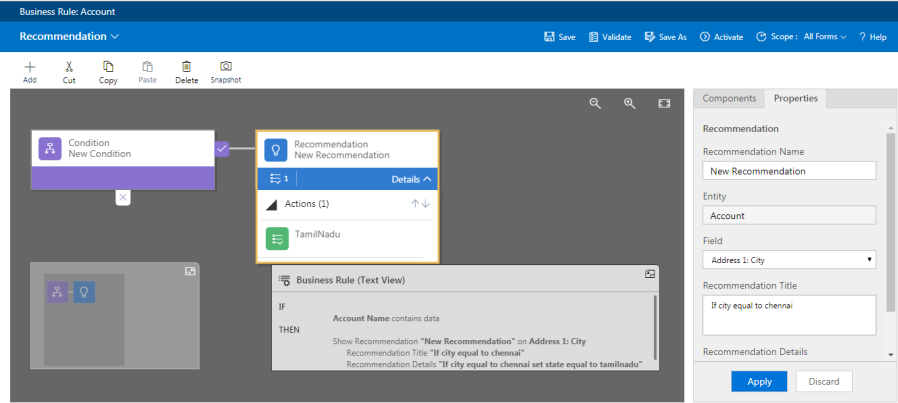
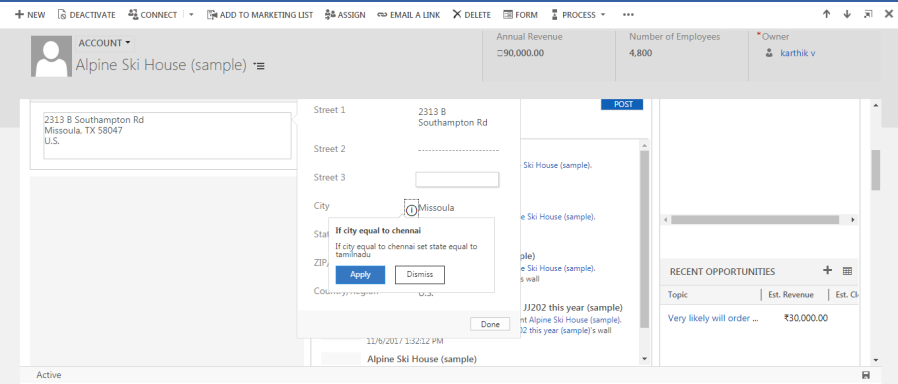
  • Recommendation: This feature is added in dynamics 365 previous version will not have this feature.With this action, an icon will be added next to a field that will provide some information and show a message that the user can take action upon.  During definition of the Show Recommendation action, you provide the message to display along with the action that will occur if the user clicks on “Accept” on the recommendation.Recommendation is an action added in Business rules in addition to existing actions like: set business required, clear field, set value, set visible etc.

Flow Used In Business Rule:

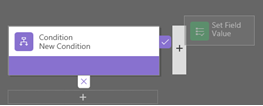
  • Condition: This is used for checking condition to execute the action. We can create multi branching condition. Up to 10 conditional branch can be used for single business rule.

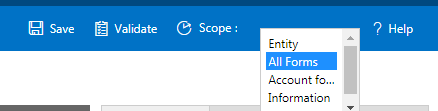
Scope Of Business Rule:

  • Specific Form: Business rule will only work for selected form.
  • All forms: Business rule will be applied to all the Main forms and the Quick Create form, as long as the form includes all the fields referenced by the rule.
  • Entity:Business rule will work in all form and server side. Server side means while importing the data business rule will work.

1

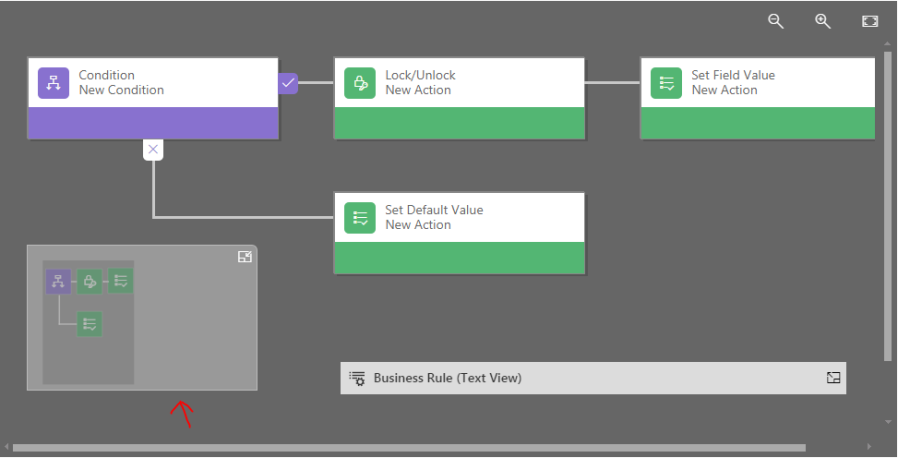
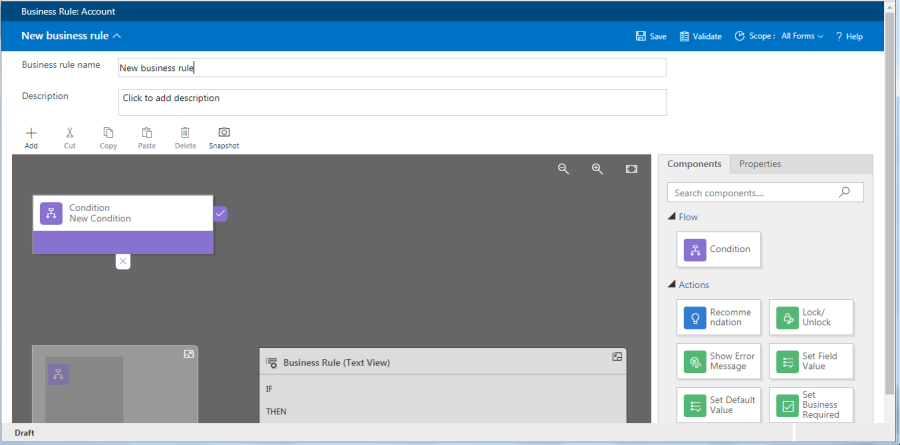
Minimap: Minimap can be used to navigate to the components of the business rule.It will show miniature model of the business rule.

3

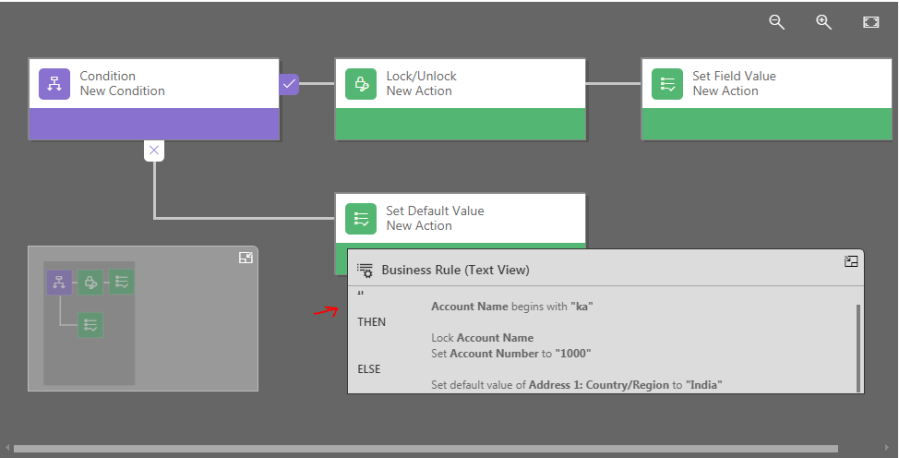
Business Rule (Text View): This will automatically build the code for the business rule based on the steps added. Text view is a quick and easy way to read through your business rule.

4

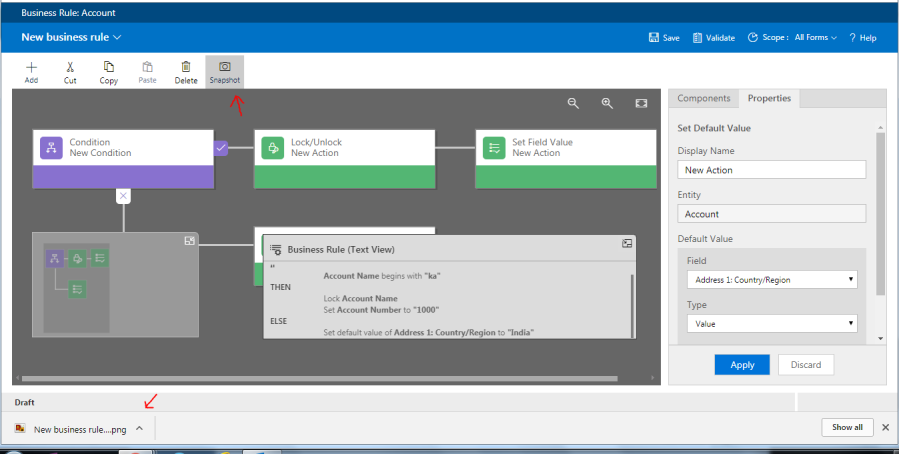
Snapshot: Snapshot is a great way to quickly take a picture of your Business Rule to review.Once the snapshot is clicked our business rule will be downloaded as image file with png format.\ to our lock system.

5

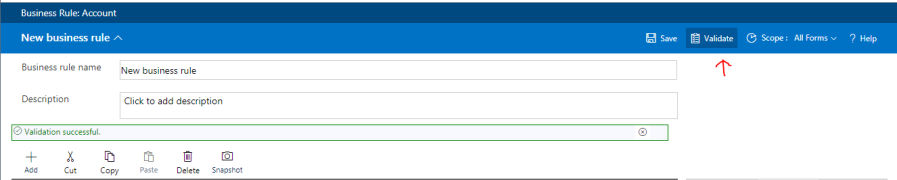
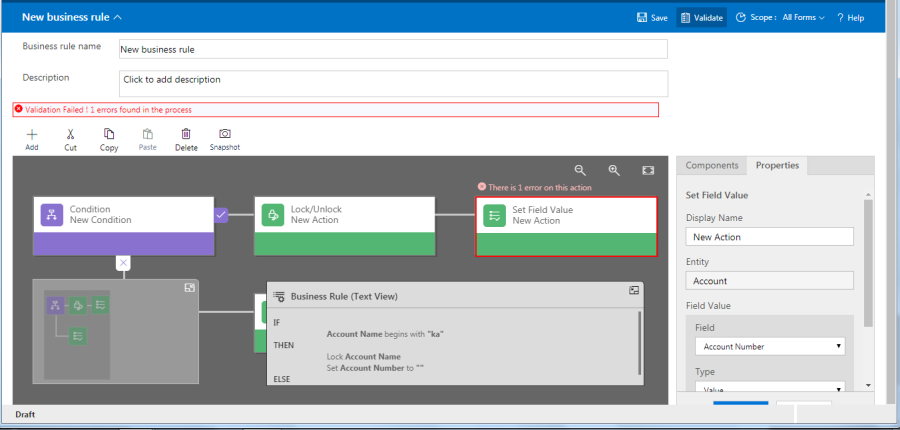
Validate:Validate feature will help you validate your business rule against any errors prior to activating the Business Rule and show where the error is occurred.If the business rule is success then success message will be displayed.

6

7


How To Create Business Rule:

To create user should have  System Administrator or System Customizer security role or equivalent permissions.

  • Go to Settings>Customizations.
  • Click Customize the System.
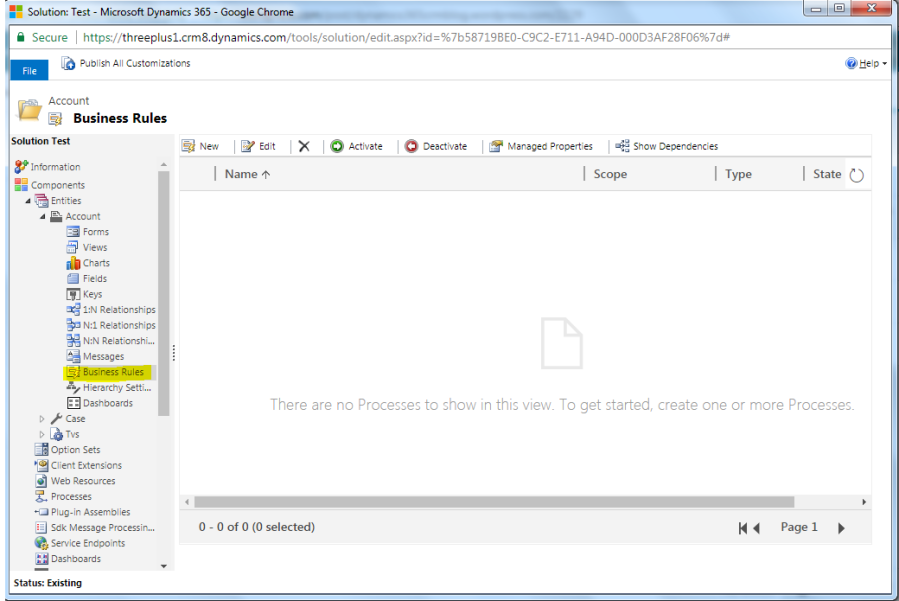
  • Open the entity you want to create the business rule for (for example, open the Account entity), and then double-click Business Rules.

8

  • Click NEW,this will take us to new business rule design window.By default one condition will be appear in the screen. business rule will not get created without even single condition. Based on the condition one or more action will be executed.

9

  • Add name in the business rule name column.
  • Add description about the business rule in description column.
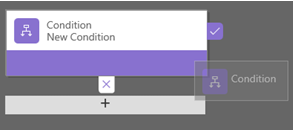
  • We can add more than on condition.
  • Drag the Condition component from the Components tab to a plus sign in the designer.

10

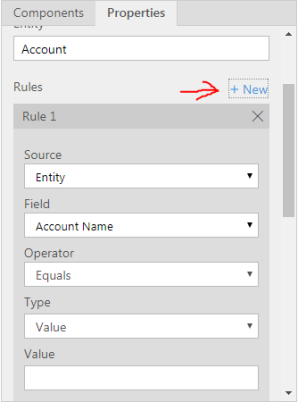
  • To set properties for condition by clicking the condition components in designer window properties tab will be visible on right side of the window and we can set conditions.
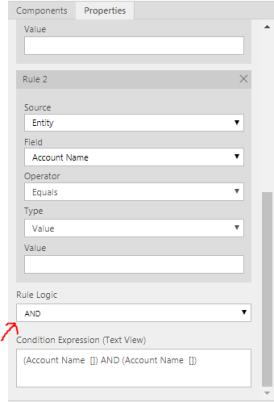
  • We can add additional clause to the condition,click New in the Properties tab to create a new rule, and then set the properties for that rule. In the Rule Logic field, you can specify whether to add the new rule as an AND or an OR.
  • Once the properties is set,user has to click apply button or else the properties wont set.
  • Adding Actions,
  • Drag one of the action click components from the Components tab to a plus sign next to Condition component. Place the action next to the plus mark if the condition is true.If condition is false place the action next to the ‘X’ mark.

13

  • Am Adding recommendation:
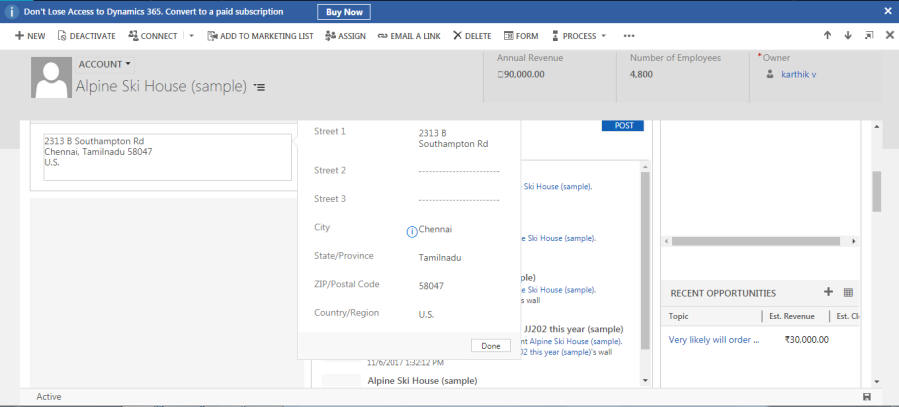
    • In this example if account name contains data and if city equal to chennai set state equal to tamilnadu. This will show message “if city is equal to chennai” if user think it match then click apply state field value automatically get filled.

This feature is available only in dynamics 365.

14

  • To validate the business rule, click Validate on the action bar.
  • To save the business rule, click Save on the action bar.
  • To activate the business rule, click the activate button.

15

16

Limitation:

  • Business rules work only with fields. If you need to interact with other visible elements, such as tabs and sections, within the form you need use form scripts.
  • When you set a field value by using a business rule, any OnChange event handlers for that field will not run. This is to reduce the potential for a circular reference, which could lead to an infinite loop.
  • If a business rule references a field that is not present on a form, the rule will simply not run. There will be no error message.
  • Whole Number fields that use the formats for TimeZone, Duration, or Language will not appear in the rule editor for the conditions or actions, so they cannot be used with business rules.
  • You can’t add more than ten if-else conditions in a business rule.
  • For Microsoft Dynamics 365 for tablets, the definition of the business rules are downloaded and cached when Dynamics 365 for tablets opens. Changes made to business rules are not applied until Dynamics 365 for tablets is closed and re-opened.
  • When you set the value of a lookup field, the text of the primary field value that is set in the form will always match the text that is visible in the rule definition. If the text representing the primary field value of the record you are setting in the lookup changes, the value set by your rule will continue to use the text portion of the primary field value defined by the rule. To fix this, update the rule definition to use the current primary name field value.

Business Process Flows in Dynamics 365

We should use Business Process Flows, if we want Users to follow same set of activities while executing a sales or service process (or may be a defined type of sales or service) while interacting with clients.

What’s new??

  • Designer
  • Trigger a workflow

Designer

Major UI Changes in the Business process flow designer. Much simpler, visio like experience and that’s why its lot easier for non-technical people to design and understand.

16

Finally, drag and drop is here in the process designer. It’s as quick as a MS Visio diagram; once you understand it J

You can drag & drop conditions, stages, steps and workflows

Take note of the points mentioned in the below URL, while designing:

https://technet.microsoft.com/en-us/library/dn887193.aspx?f=255&MSPPError=-2147217396#Points

You can connect a condition to a stage

You can take a screenshot by clicking on ‘snapshot’

You can cut, copy and paste; the steps, stages and conditions. how cool is that? J


A workflow can be triggered on entry or exit of any stage. The workflow must be on the entity, for which this stage is created.

Enough of blabbering, now let’s see how we can create a Business process flow, with all the above mentioned charms.

Scenario: We will create a flow for Sales Team; working on both Implementation and Support Projects. I am going to include 4 unique entities in my flow (max. limit is 5)

  • 2 Stages on Lead
  • 1 on Opportunity
  • 1 on Quote
  • 1 on Order

Go to settings>>Processes>>New

1

As you can see, it can also be run as a ‘Task flow’ for mobile clients. For more info, check this https://rajeevpentyala.com/2016/04/16/task-flow-crm-2016/

As soon as you hit ‘OK’, following screen will pop up:

2

On your right, you have drag & drop options:

As you can see in the screenshot below, there are four components-

3

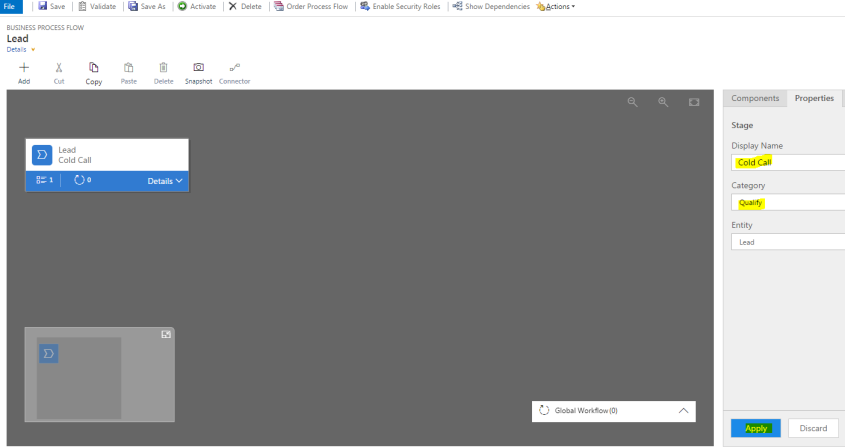
Let’s start with adding stages, drag stage to the designer

Give it a name and click apply

4

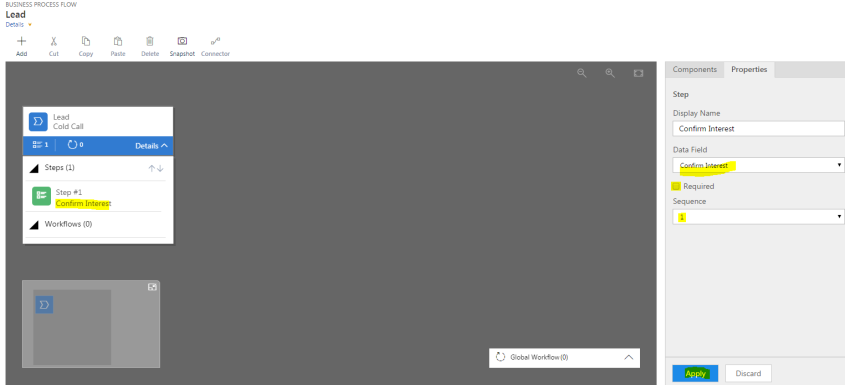
Add steps to this stage, by clicking either on ‘details’ or ‘+Add’ button

On your right, you will see filed options to select from (make them required on your wish)

you can also define the sequence, from the Properties panel on the right

7

Add the second stage of Lead, I have custom field on Lead, ‘Project type’ having options; Implementation and support

8

It is mandatory to have your condition field on the stage from where you want conditions to evolve.

So now, I am going to add conditions (You can add Yes/No conditions as well); these are very similar to ‘Branch’ which we used to have in the previous versions of CRM


If ‘Project Type’ equals Implementation

9

If ‘Project Type’ equals Support

10

What I want to achieve here is, If ‘Project type’ is implementation, next stage must be DEMO otherwise, it should be TAILOR SUPPORT PLAN

11

Adding another stage now and merging the two opportunity stages to the next one

12

Click on stage ‘Test Support Plan’ and then click on connector

13

Click on ‘connect’ to see first and second point of this condition

14

Now click on 2nd point, to establish a branch

15

Adding the last stage ‘Place Order’, my process flow looks like:

16

Workflows can be added at any stage entry or exit. Keep in mind that the workflow must be related to the stage entity and an on-demand workflow:

17