Search This Blog

Thursday, September 29, 2022

Authenticate Dataverse connector using Service Principal in a Power Automate Flow

Many times, users/admins are not comfortable using their credentials being used as Connections. Some connectors do provide the ability to authenticate using Service Principal.

Let’s jump into this! ðŸ˜Š

Setting Up App Registration for Dynamics 365 CRM

Here’s how you setup an App Service to be used as a Service Principal for Dataverse connector in Power Automate –

  1. Go to the Azure Portal (https://portal.azure.com/) and the look for Azure Active Directory.

  2. In Azure Active Directory, look for App Registrations in the menu.

  3. Now, create a + New registration record.

  4. Now, give this App Registration a suitable name. And you can select your preferences on how the tenant type should be. I’ve left it to Single tenant or simplicity of the example.

  5. Now, once this is created, go to the API Permissions section.

  6. Now, look for a button to Add a permission.

  7. Then, select Dynamics CRM and select it.

  8. Once this is selected, you’ll get to select user_impersonation. Then, clicked Add permissions.
  9. Once added, you’ll see that the Status column is blank. Then, click on Grant admin consent for <TenantName>.

  10. Once you click on Grant admin consent button, you’ll be asked for confirmation. Confirm the same.

  11. Once you confirm, you’ll see the status as Granted as shown below.

  12. Then, go to Certificates and secrets. Once in that, click on + New client secret.

  13. You’ll be asked the the Description, do so and Save it.

  14. Now, you need to copy the value onto Notepad.

  15. Now, let’s move to adding this App Registration to the Power Platform Admin Center so that you can then give appropriate permissions so that it can be used for Authentication into Dataverse.

Add Application User in Power Platform Admin Center

Go to the Power Platform Admin Center (https://admin.powerplatform.microsoft.com/) and the to the Environments section and select the correct Dataverse environment –

  1. Select the environment which will have your Flow that will use the Dataverse connection in question.
    And click Settings.

  2. Now, expand Users + permissions section and look for Application Users.

  3. Now, in Application Users, you’ll need to add the App Registration as a User and give Roles. Now, click on + New app user.

  4. Now, click on + Add an app.

  5. Now, any App Registration that has not yet been created in the current environment as user will automatically appear. Select the one you created – “Dataverse Service Principal” in this case and click on Add.

  6. Now, select the BU.

  7. Next, click on Security Roles’ pencil to give roles.

  8. I’m just giving System Administrator for simplicity of example.

  9. Now, you should be good to create this user. Click on Create.

  10. Finally, your Application Record will look like this –

  11. Now that your Application User is set in Dynamics / Power Platform Admin Center, you are all set to add this to authenticate the Dataverse Connector in Power Automate. Let’s do that!

Advertisements
REPORT THIS AD

Authenticating using Service Principle in Dataverse action

Now, let’s say you are starting a Flow with the Dataverse connector –

  1. Select the Dataverse trigger you want to use. I’ll pick a common one.

  2. Now, click on the three dots and look to add a new Connection if it already authenticated using the logged in user which is the default behavior.

  3. Now, you’ll see the option to select –

  4. Now, you’ll see these fields to fill in.

  5. Now, first give the connection itself a suitable name.

  6. Now, for Client ID – Go to the App Registration in Azure and look for the Client ID in the information section. It’ll look like this –


    Paste it in the Client ID field and it’ll look like this –

  7. Now, look for Client Secret – open the Notepad where you saved the Secret we copied while creating the Client Secret record in Azure.

  8. Now, finally – Go to the App Registration record and you’ll find the Tenant ID here –


    And paste is where it says Tenant. Now, Create this connection!
  9. Ensure that the Connection is selected.

  10. I’ll just add an extra variable in order to save this simple Flow and then we’ll create an Account (simple example if you see the screenshot below) in order to Run this Flow.
    My Flow looks ready to be tested.

  11. Now, I’ll create an Account in my Dynamics 365 CRM.

  12. And the Flow would have Run already.

Validate

In order to ensure the connection is run by the Service Principal itself, you can do this –

  1. In advanced options, you can choose to “Run as” as “Flow owner


  2. And when you check the details in the Flow Run, you can check the attribute in the trigger “RunAsSystemUserId

  3. And if you check this GUID, it belongs to the Dataverse Service Principal user we set up.


    And that’s how you can setup to run the Dataverse action to use Service Principal instead of user credentials!

Clone Solution vs Clone Patch in Dynamics 365 – Release management capabilities in Dynamics 365

Moving the developed solutions from dev environment to other environments is as critical (or more critical) as developing solutions without defects. Often dev team focuses more on building solutions in the dev without bugs and tend to make mistakes in the deployment (mostly depends on the pressure during the deployment, time available for pre-deployment activities and also smaller release window for deployment if CRM is already mission critical).

 Microsoft CRM has few features to help you with the release management and this post would be helpful if you are unaware of the features or not making the right usage of the features – Clone Patch and Clone Solution.

A usual release management process in an agile [or similar] delivery mode would be:

 Dev team develops the deliverables in Dev environment

  1. To release defect fixes / new changes every day or every week as patches to QA environment
  2. Move the stable solution [with all the patches] to production in a monthly / bi weekly production release cycle.

CRM solution management features Clone Solution & Clone Patch would help the team in enabling continuous delivery [CI/CD] of the software packages to production.

Multiple Environments

Consider there are three environments [ Dev, UAT and Prod]

Dev:  http://<server>/devdemo/main.aspx

UAT:  http://<server>/uatdemo/main.aspx

Prod: http://<server>/proddemo/main.aspx

 Base Solution

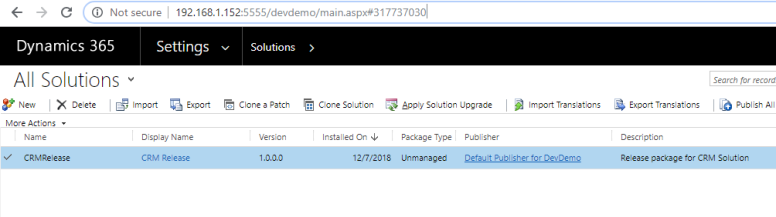
  1. Create a solution in CRM Dev with all the changes [ Entities/Web resources/Plugins etc.]. For the demo, I have added only the Account entity in the base solution

  1. Export the solution as a managed solution from dev and import to the UAT environment

 Dev:

UAT:

Patch (1.0.1.0) on Base Solution – 1st set of changes from UAT

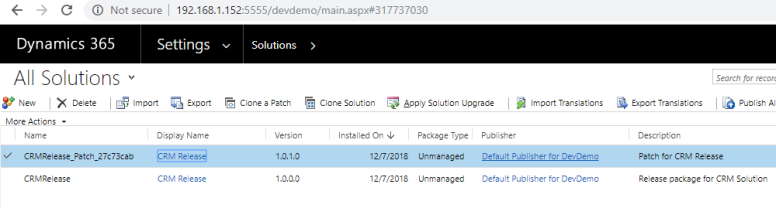
Imagine there is an issue raised in UAT and you need to add the contact entity also to the managed solution, all we need to do is to clone a patch and add Contact entity to the solution.

 Let’s clone the patch for exporting only the new change(s)


Now open the patch solution and add the additional components to be moved to UAT


Once the components are added, export the patch solution in ‘Managed’ mode

 Import the ‘Managed’ patch solution package in to UAT environment

Once a Patch is created, base solution becomes parent solution and components cannot be added or removed from the base solution now. This lock would be released when either the patches are deleted or the solution itself is cloned [we are coming to the ‘Solution Clone’ topic next]

Patch (1.0.2.0) on Base Solution – 2nd Set of changes from UAT

Now imagine if UAT team raises another issue related to Lead entity and we need to release the Lead entity changes to UAT.

Let’s create a patch update of the base solution package by using the Clone Patch feature again and add the Lead entity in the new patch [v1.0.2.0]

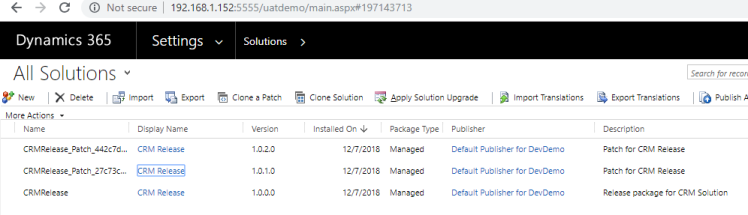
 Add the Lead entity in the new patch created and export the Patch as a managed solution and import in to UAT. After the Patch is deployed in UAT, there will be 3 solutions [ Base packages and 2 Patch solutions]

 Production Release – Finalize the production release package

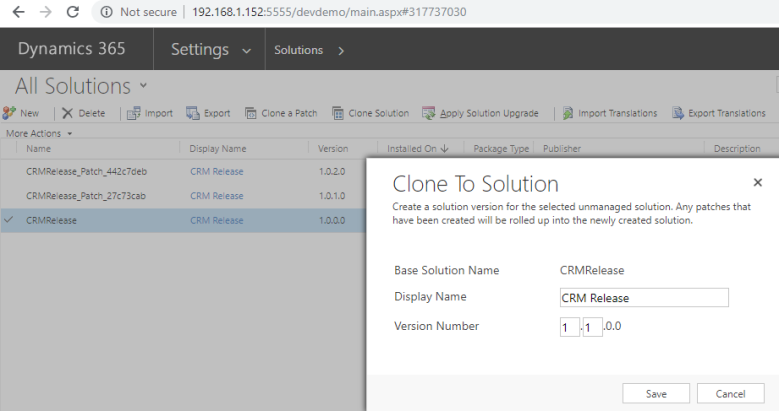
Now we got the UAT signoff for the sprint and it’s time for moving the release package with all changes to production. Let’s ‘Clone the Solution’ and make the production package ready with all the patches [remove any patch if not required from the source before cloning the solution if need to remove any changes]

 When solution is cloned, Minor version would be incremented by 1 by default and build and revision would be non-editable

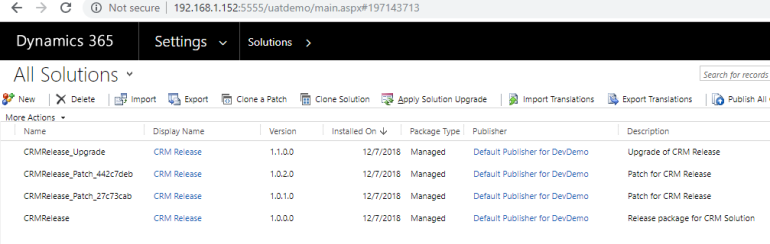
Once the solution is cloned, all the patches are merged in to the new Upgrade solution [ Minor version updated]

  Let’s move the solution to UAT


 Apply Solution Upgrade – On demand Solution Upgrade if Patches exist in the environment

When an upgraded solution is imported in to the environment which has the patches already deployed [ in our case UAT has the patches and Prod doesn’t have patches] applying the solution upgrade is a manual activity and can be on demand.

Before Solution Upgrade [ Solution packages are not merged until the Solution Upgrade is applied]

  • After Solution Upgrade [Solutions would be merged once the Solution Upgrade is applied]

Let’s move the solution to Prod


Solution Upgrade is applied by default since there was no patch deployed already in the environment

Hope this helps you to understand the different usages of Solution Patch and Solution Clone.

Below image shows the CRM release management strategy [using Clone Solution & Clone Patch] explained in this post in a nutshell:

 Please let us know if you have a different view for managing the Solutions/Patches better.

 References:

https://docs.microsoft.com/en-us/dynamics365/customer-engagement/developer/create-patches-simplify-solution-updates

https://docs.microsoft.com/en-us/dynamics365/customer-engagement/developer/create-install-update-managed-solution

https://docs.microsoft.com/en-us/dynamics365/customer-engagement/developer/work-solutions