Search This Blog

Saturday, November 5, 2022

PCF - PowerApp Control Framework, a step by step in Dynamic 365 CRM

 What is PCF?

PCF Tutorial Dynamics 365 : PCF (PowerApps component framework) empowers professional developers and app makers to create code components for model-driven apps and canvas apps (experimental preview) to provide an enhanced user experience for the users to view and work with data in forms, views, and dashboards. For example:

  • Replace a field that displays a numeric text value with a dial or slider code component.
  • Transform a list into an entirely different visual experience bound to the data set like a Calendar or Map.

Developing a custom control

PowerApps component framework to create code components that can be used across the full breadth of PowerApps capabilities. Unlike HTML web resources, code components are rendered as a part of the same context, load at the same time as any other components, providing a seamless experience for the users. Developers can bundle all the HTML, CSS, and TypeScript or JavaScript files into a single solution package file. Code components can be reused many times across different entities and forms.

Code components have access to a rich set of framework APIs that expose capabilities like component lifecycle management, contextual data and metadata access, seamless server access via Web API, utility and data formatting methods, device features like camera, location and microphone, along with easy-to-invoke UX elements like dialogs, lookups, and full-page rendering.

Developers and app makers can use modern web practices and also harness the power of external libraries to create advanced user interactions. The framework automatically handles the component lifecycle, retains application business logic, and optimizes for performance (no more async IFrames). Component definition, dependencies, and configurations can all be packaged into a solution and moved across environments and can be shipped via AppSource.

Your first control

Prerequisites

First you will need to install the following:

Initialize the project

Open a command prompt and go to the folder where you want to create the PCF solution. Launch the following command:

 pac pcf init  --namespace <namespace for the component> --name <name of the component> --template <component type

Currently, PowerApps CLI supports two types of components: field and dataset for model-driven apps. For canvas apps, only the field type is supported for this experimental preview.

Let’s create a field type. The project is created.
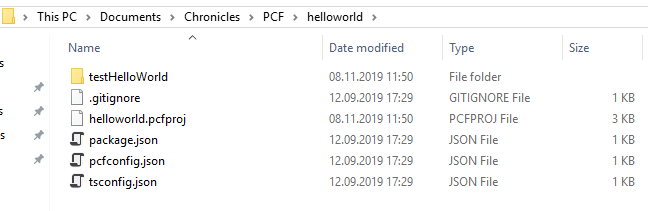
PCF Tutorial Dynamics 365

To install the project dependencies, you have to run this command : npm install 

The node_module folder is created containing all the dependencies.
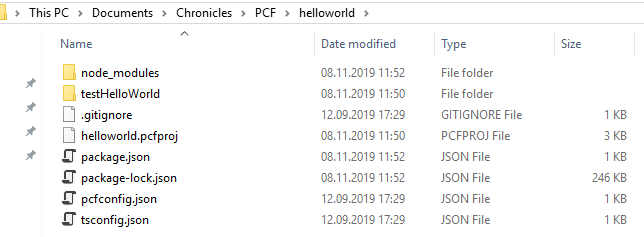
PCF Tutorial Dynamics 365

Develop your component

Open Visual Studio. Create a new project -> create a blank solution.

PCF Tutorial Dynamics 365

Right click on the solution -> Add -> Existing Web Site
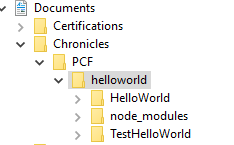
PCF Tutorial Dynamics 365

In this example, we will display the id of the current object. You then will need to access the Xrm object to use the CRM function.

Right-click on the project -> Client-Side library

Add the @types/xrm@9.0.7 library
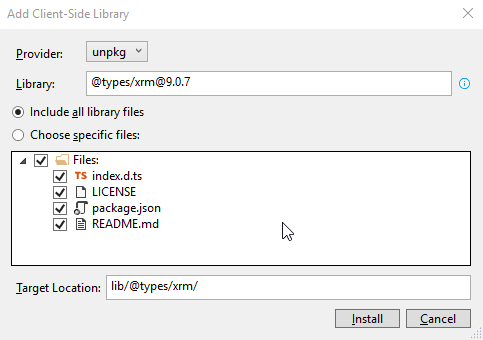
PCF Tutorial Dynamics 365

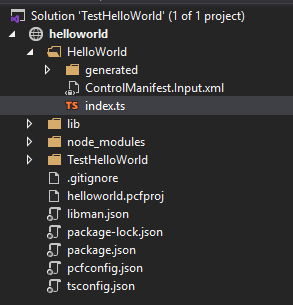
Open index.ts located in the folder project created. It’s in this file that the main code is located.
PCF Tutorial Dynamics 365

For our example, we first need to add some global variables below the class definition.

private _labelElement: HTMLLabelElement;¨
private _container: HTMLDivElement;
private _context: ComponentFramework.Context<IInputs>;

In the Init() method, add the following code:

this._context = context;
this._container = container;
this._labelElement = document.createElement("label");
this._labelElement.setAttribute("id", "labelID");
this._labelElement.innerHTML = "NA";
this._container.appendChild(this._labelElement);

and in the in the UpdateView() method, add the following code:

this._context = context;
this._labelElement.innerHTML = Xrm.Page.data.entity.getId();

Build and run

From the command prompt, run npm run build to build your project. If everything’s fine, it will create a “out” folder with the controls.

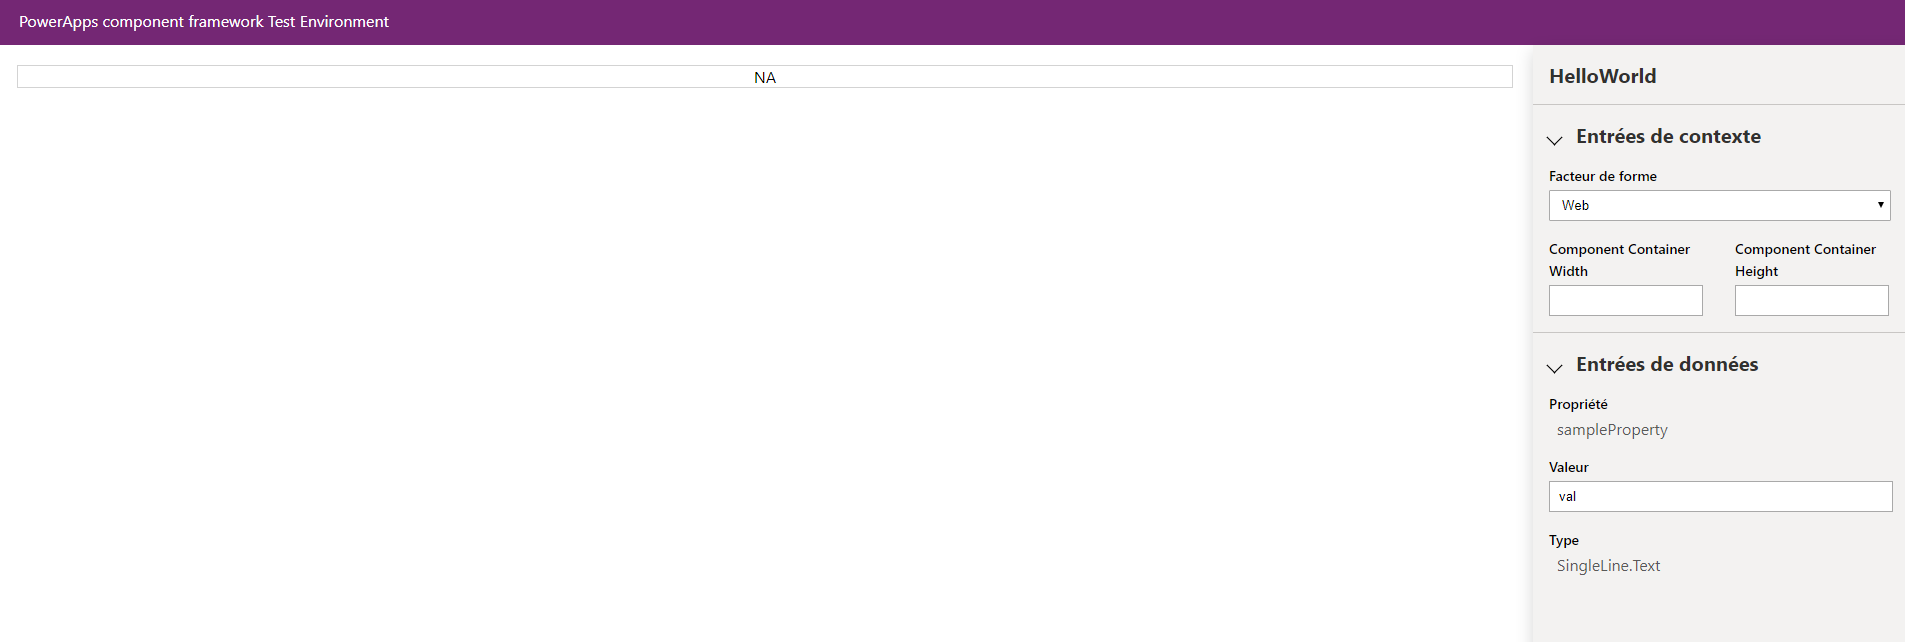
To test your control, run npm start. The controls will be opened in your favourite browser.
PCF Tutorial Dynamics 365

You can notice that NA is displayed in the field. Indeed, the UpdateView using the getId function of Xrm, it will display the Id only when the control will be deployed in the CRM. Let’s do that.

Deploy the controls

First you need to create a folder “SolutionPackage” in order to hold the solution and go in it:cd SolutionPackage

If you downloaded an existing PCF, this folder sometimes already exists.
You can easily check if there is a folder with a .cdsproj file inside. 
If so, then go directly to the step below to generate the zip file with the MSBUILD command.

Then run the following in the command prompt to define the publisher name and prefix and initialize the solution files creation:
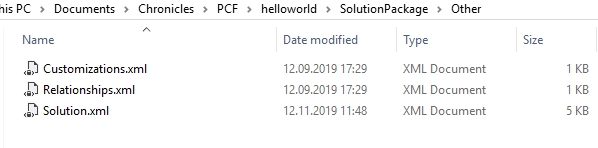
pac solution init --publisher-name [publisher name] --publisher-prefix [publisher prefix]

PCF Tutorial Dynamics 365

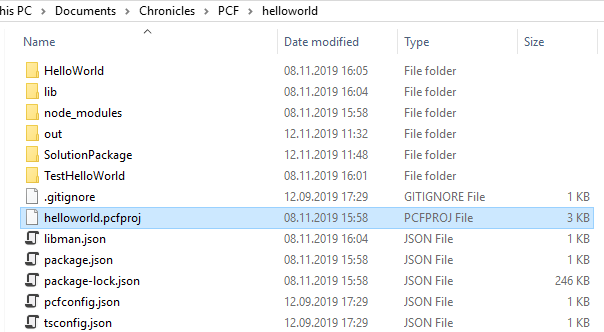
pac solution add-reference --path [path to pcfproj file]

path to pcfproj file = reference of the below path:
PCF Tutorial Dynamics 365

You should have something like:

PCF Tutorial Dynamics 365

It should have update the .cdsproj in the SolutionPackage folder:
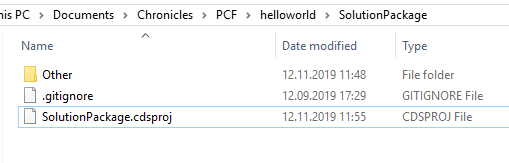
PCF Tutorial Dynamics 365

Once again, If you downloaded an existing PCF, you have to check if the folder node_modules exists in the root folder (the one with the the .cdsproj file).
If not, open your console on this folder and run the command: npm install
This will install all required modules and their dependencies into a folder called node_modules.

To generate Zip File, open the Developer Command Prompt for Visual Studio and go to SolutionPackage folder.
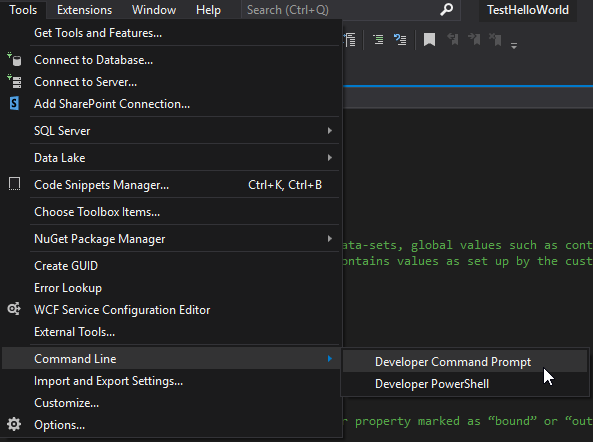
PCF Tutorial Dynamics 365

Then run the below command:

  • MSBUILD /t:restore
  • MSBUILD

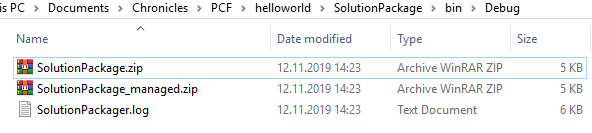
This adds the Solution zip in the bin Debug folder.

PCF Tutorial Dynamics 365

By updating the cdsproj file, you can generate both managed and unmanaged solution
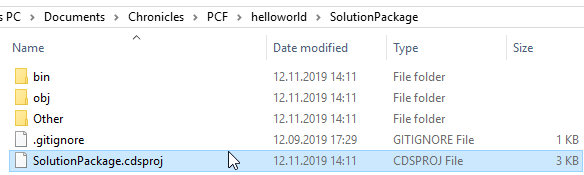
PCF Tutorial Dynamics 365

Uncomment and modify the node below to “Both” and relaunch MSBUILD.

  <PropertyGroup>
    <SolutionPackageType>Both</SolutionPackageType>
  </PropertyGroup> 

You can see the both solutions:

PCF Tutorial Dynamics 365

Import and use your control

Now you can import the solution into dynamics. Don’t forget to publish the customization.

Then just open a form and the field you want to apply. Go to controls tab -> Add control.

Choose your new control in the list -> Select it -> Add.
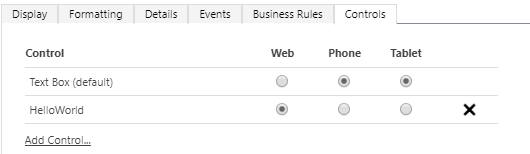
PCF Tutorial Dynamics 365

Now you can choose on which device you want it to be displayed. Once again, publish the customization and normally, you should see your controls on the chosen form.

PCF Tutorial Dynamics 365

To update the control, change the version for it in the ControlManifest.Input.xml.

PCF Tutorial Dynamics 365


Configure Manifest file

This is a very important file. It contains your component’s definition. Open this file to start customizing your component.

The control node

This node contains the definition of the control. Here is an example:

<control namespace="ELCAComponents" constructor="PhoneParser" version="1.0.0" display-name-key="PhoneParser" description-key="PhoneParser description" control-type="standard">

The following are the attributes of control tag:

  • namespace: this was provided earlier in the pac command
  • constructor: this is the name of your control that you had provided in the pac command
  • version: change it if needed. If you want to update your component, wou will need to change the version.
  • display-name-key: change it to be the display name (no spaces) of your custom control
  • description-key: change it to be the description of your custom control that you want to show in D365
  • control-type: do not change this

The property nodes

The property nodes, as its name says, contains the properties of your control.

Following are the attributes of property tag:

  • name: change it to be the name of the property
  • display-name-key: change it to be the display name (no spaces) of your property
  • description-key: change it to be the description of your property that you want to show in D365
  • of-type: if your control is going to support only single data-type then use of-type attribute. Valid values are:
    • Currency
    • DateAndTime.DateAndTime
    • DateAndTime.DateOnly
    • Decimal
    • Enum
    • FP
    • Multiple
    • Optionset
    • SingleLine.Email
    • SingleLine.Phone
    • SingleLine.Text
    • SingleLine.TextArea
    • SingleLine.Ticker
    • SingleLine.URL
    • TwoOptions
    • Whole.None
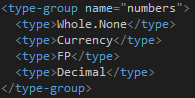
  • of-type-group: if your control is going to support multiple data-type then use of-type-group attribute. If you use this attribute, then you must define the type-group tag and the name of that type-group should be mentioned here. Below is a sample for defining a type-group.
PCF Tutorial Dynamics 365

  • usage: This fields can have three values: bound, input or output. The usage attribute identifies if the property is meant to represent an entity attribute that the component can change (bound) or read-only values (input) 
  • required: If the property is required or not

Quick example

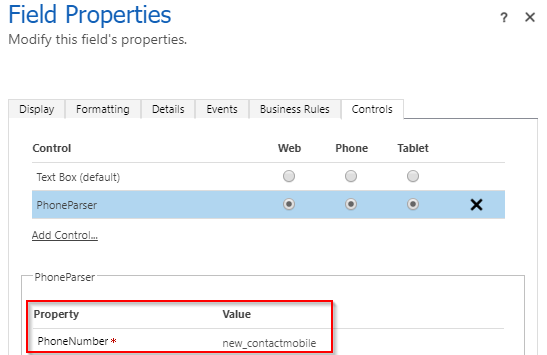
In any case, you will need at least one property. It will represent the control you want to affect. Let’s take a component which aims to change the phone number field format.

<property name="PhoneNumber" display-name-key="PhoneNumber" description-key="Property_Desc_Key" of-type="SingleLine.Text" usage="bound" required="true" />

This above node represents the text field where we want to apply the control. When you will set a textfield with the component, this property will automatically be filled in with the selected field.
PCF Tutorial Dynamics 365

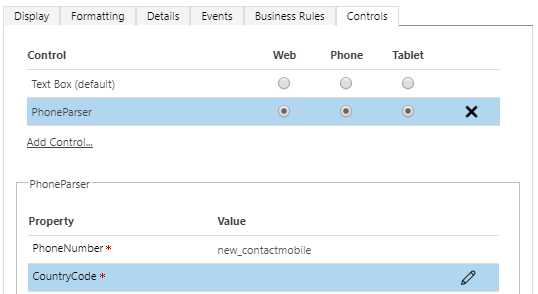
Then, we want to change the phone format following another field containing the country code. The idea is to define another property which will contain the name of the country property.

<property name="Country" display-name-key="CountryCode" description-key="Property_Desc_Key" of-type="SingleLine.Text" usage="input" required="true" />

You can notice the use of usage=”input”. When applying the component, a required string will be then required.
PCF Tutorial Dynamics 365

TypeScript side, you can access the value through the context using the name of the property.

var countryFieldname = this._context.parameters.Country.raw;

The resources node

To implement your control, you may need to add other file like css. By default, a code node pointing to the index.ts file is present.

The resources node lists three type of child tags; code, css & resx.

  • code: it contains the relative path to the typescript file that will contain the code for our custom control
  • css: it contains the relative path of the css file that our custom control will use while rendering the controls
  • resx: it contains the relative path of resx file that will contain localized string
<code path="index.ts" order="1"/>
<css path="css/index.css" order="1" />
<resx path="strings/Tags.1033.resx" version="1.0.0" />

The TypeScript file

The index.ts contains all the implement logic. You can open it with your favourite development tool. By default, the file contains 4 main methods:

  • init: this will be the first method that system will invoke. All your design should happen in this method
  • updateView: this method is invoked when property bag is changed; which includes fields, data-sets, global variables such as height and/or width
  • getOutputs: this method is called prior to receiving any data
  • destroy: add your cleanup code here

Here is a brief description of the params you can find in the init method for example:

  • Context: The entire property bag available to control via Context Object; It contains values as set up by the customizer mapped to property names defined in the manifest, as well as utility functions.
  • NotifyOutputChanged: A callback method to alert the framework that the control has new outputs ready to be retrieved asynchronously.
  • State: A piece of data that persists in one session for a single user. Can be set at any point in a controls life cycle by calling 'setControlState' in the Mode interface.
  • Container: If a control is marked control-type='standard', it will receive an empty div element within which it can render its content.

If you need to import a specific js library, you will need to install it with npm

npm install libphonenumber-js

and then add a reference on the top of the TypeScript page

import { parsePhoneNumber } from 'libphonenumber-js';

Conclusion

Personal advantages / disadvantages

Following my personal short experience with PCF, I noticed the next advantages:

  • As the use of Visual Studio is recommended, it is really easy to import any library directly with this tool.
  • Thanks to the Microsoft PowerApps Command Line Interface CLI, we can generate managed and unmanaged solution ready to be imported.
  • We have the possibility to test our component locally.

But also some disadvantages:

  • It is hard to debug when you need to access CRM element through your control. I had to import the solution each time I wanted to test.
  • Visual Studio detects ghost errors during dev.

Limitations

With the release of PowerApps component framework, you can now create your own code components to improve the user experience in model-driven apps and canvas apps. Even though you can create your own components, there are some limitations that restrict developers implementing some features in the code components. Below are some of the limitations:

  • Only the field type of components is supported in the experimental preview for canvas apps and not the dataset type components.
  • Common Data Service dependent APIs, including WebAPI along with few other APIs, are not available for this experimental preview. For individual API availability for this experimental preview release, see PowerApps component framework API reference.
  • Code components should bundle all the code including external library content into the primary code bundle. To see an example of how the PowerApps command line interface can help with bundling your external library content into a component-specific bundle, see Angular flip component example.

Note

  • Defining multiple components in a single manifest file is not yet supported. 
  • Calling out processes and actions are not supported yet. You can only call dialog boxes using the Navigation method. 
  • Calling one component from another code component is not yet supported.
  • Currently font resource (.tff) is not yet supported.


Thanks


Microsoft Dynamics 365 CRM Configuration Migration Tool

Dataverse development tools

There are a number of developer tools that are needed for different aspects of Microsoft Dataverse code development. These tools are listed and described briefly below.

ToolDescriptionDocumentation
Configuration Migration tool (CMT)Transport configuration and test data from one environment to anotherConfiguration Migraton tool
Package Deployer (PD)Deploy packages to Dataverse environments where the packages contain solutions, custom code, HTML files, and moreDeploy a package
Plug-in Registration tool (PRT)Registers custom code (plug-ins, custom workflow activities), service endpoints, and moreRegister a plug-in
SolutionPackager tool (SP)A tool that can reversibly decompose a Dataverse compressed solution file into multiple XML files and other files so that these files can be easily managed by a source control systemSolutionPackager tool
Code Generation tool (CG)A command-line code generation tool that generates early-bound (strong-typed) .NET classes that represent the Entity Data Model (EDM) used by DataverseGenerate early-bound classes for the Organization service

What is configuration data?

Configuration data is a type of meta data. Meta data can be thought of as data about data. The values within an Option Set are an example of meta data that will migrate with the movement of solution files. Entities containing data about data, such as a custom entity containing values for a standardized lookup field or Owner Teams, are another type of meta data.

Solutions exported from CRM do not contain data stored within Entities. So how do we move the configuration data stored in an entity across environments? Fortunately, there are an array of options to choose from when determining how to move the configuration data across environments.

Methods and Tools for Migrating Configuration Data (non-exhaustive list)

Why use the Microsoft Dynamics 365 CRM Configuration Migration Tool?

This utility is particularity helpful when there are multiple entities containing configuration data and you want to move the data in a repeatable and efficient method, without leveraging ETL tools or custom code. With this tool, one can move entity configuration data from Development to Test. Or, Test to Production. Or, ….so many possibilities! When the underlying data schemas are synchronized (this can be done by exporting/importing the CRM solution file), one can move onto migrating the configuration data with the Configuration Migration Tool.

What does it do?

The tool creates a schema file which is used to export and import data as specified in the schema file. The utility allows the user to:

  • Specify which entities to include
  • Disable plug-ins on all entities before importing
  • Enable plug-ins after importing the data
  • Specify record uniqueness conditions to avoid duplicate records
  • Export Data
  • Import Data

What does it look like?

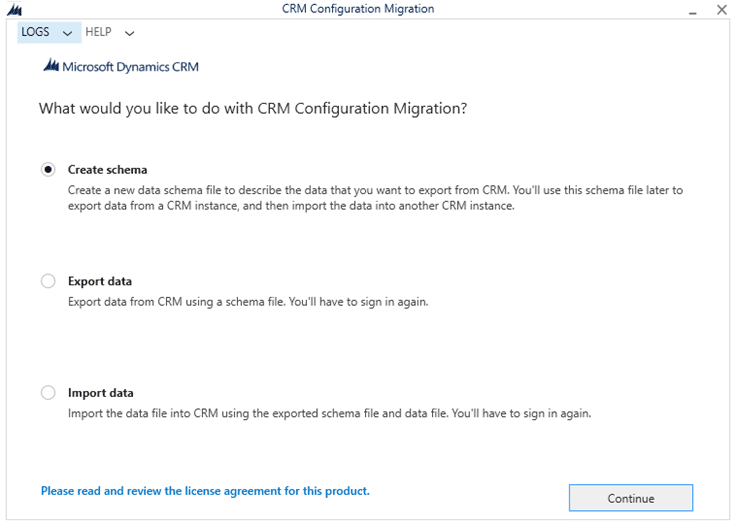
1. Upon launching the CRM Configuration Migration Tool, this form appears allowing the user to select the desired action. For this example, we have specified "Create Schema" and selected Continue.

configuration migration tool

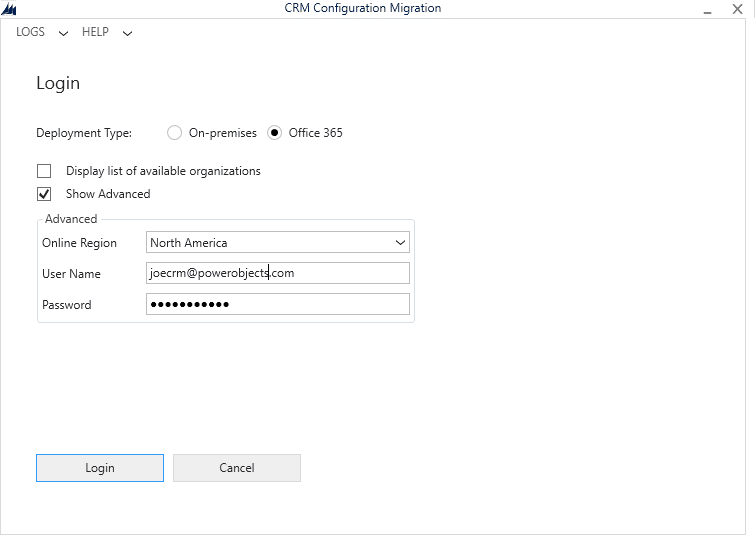
2. Enter login credentials.

configuration migration tool

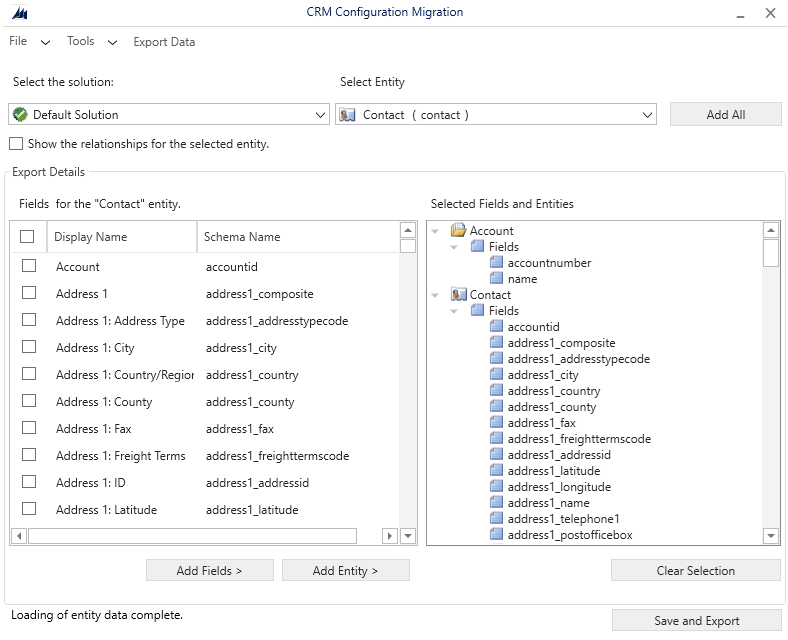
3. After logging in, the user is prompted to select a Solution and Entity.

4. Select the fields to be added for each entity and/or select Add Entity to add all fields in the selected entity. We chose two account fields and the entire Contact entity. Items selected appear on the right and can be expanded as shown here.

configuration migration tool

5. Next, select Save and Export.

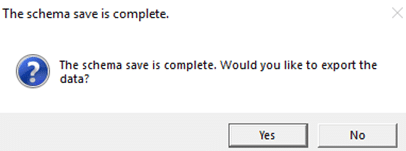
6. Upon saving the file, the user is asked if the data should be exported.

configuration migration tool

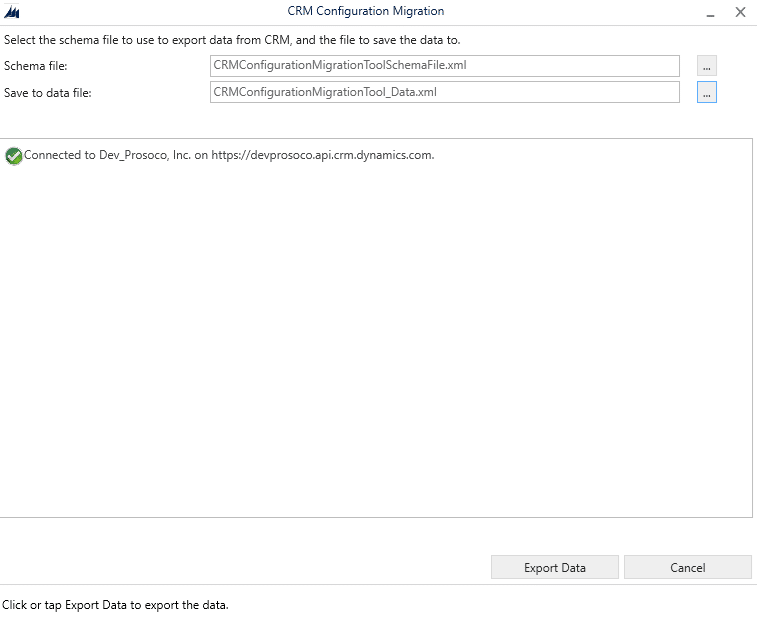
7. Choose to export the data.

configuration migration tool

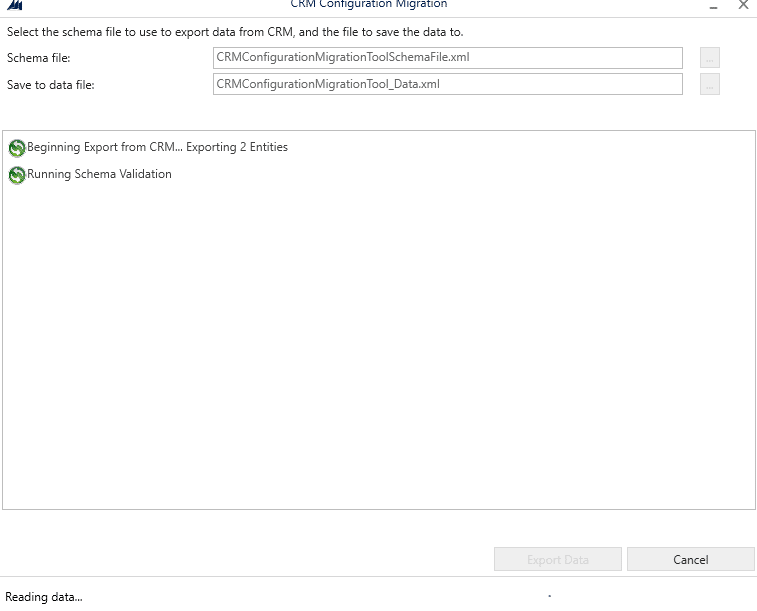
8. After specifying the data file name and location select Export Data. The progress of the file generation process is shown.

configuration migration tool

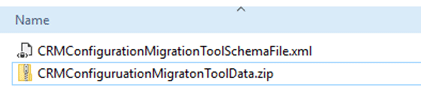
9. When processing has completed the files generated by the tool are available to review and import. The result of the export looks like this:

configuration migration tool

And there you have it! Schema and data ready to import into another environment!


Wednesday, November 2, 2022

About Project Service Automation (PSA) && PSA Process Flow

 About PSA

  • Project Service Automation (PSA) provides an end-to-end project management capabilities to teams who are execution projects.
  • PSA is built on Microsoft Dynamics 365 Framework.
  • Almost all kind of projects can be managed using PSA.
  • You can access PSA from Unified Interface.
  • With PSA solution installation, Resource Scheduling is also installed. PSA lets you define the projects, opportunities, quotations, orders and contracts whereas Resource Scheduling helps you define resource skills, resource roles and pricing.

Important Terms In PSA

  • Customers

    A customer is an organization. This includes

    • Customer
    • Vendor
    • Partner
    • Affiliate or Other
  • Contacts

    A Contact is an individual.

    • Associated with maximum one Account (through Contact form)
  • Project Opportunities

    Opportunities are warm leads who are interested in you project services (similar to sales)

    There is a separate form for Project Opportunities.

  • Project Quotes

    When a potential customer asks for more information about project such as product, pricing, etc., a quote is sent.

    You can create one or more quotes for a project opportunity.

  • Project

    Under Project you can define scope, estimates, timelines and resources required to meet an objective.

    Alternatively, you can quickly create a project using Project Templates.

  • Project Contract

    When you win a quote, you create a project contract to make it official.

    You can create one or more project contracts for a quote.

  • Invoices

    An invoice is used to bill customer for the project.

    When you create a project contract, you set the frequency to generate invoices.

    You can modify the created invoice before confirming.

  • Schedule Board

    Schedule Board shows all resources, their availability and allows you to book resources for a project.

    Multiple views are available like Hours, Days, Weeks and Months.

  • Resources

    You can book resources against a project for scheduling and invoicing.

    Resources can include users, contacts, accounts or equipment.

  • Time Entries

    Resources working on a project can enter their timesheet (time entries) explaining how much time they spent working on a project.

    Users enter duration in minutes, hours or days.

  • Expenses

    Expenses against a project can be entered by resources so you can be invoicing your client.

    Frequency of entering expenses may vary based on project requirements.


PSA Process Flow 

Following is the process flow that you can follow in Project Service Automation:

ProJe 
Opportunity 
Pro] 
Quotes 
p rOJ 
Proje 
Planning 
Contracts 
Alloca e 
Resources

Project Opportunity

  • Here you register warm leads that are interested in your project services.
  • Here you define product and project related information.
  • For example if you are implementing Business Central, you would specify the licenses and implementation fees related information or maybe the expenses that you want to quote.

Project Quotes

  • You can create quotation from the opportunity and send it to the customer.
  • It will copy all the information, that you have captured in opportunity, and put it in the quotes.

Project Planning

  • In project planning you go into details of planning, for example the number of activities involved, number of resources  and man days required, scheduling and project planning.

Project Contracts

  • When you mark the project quote as “Won”, it automatically creates a project contract.
  • It is also considered as statement of work , like what kind of things will you deliver to the customer and also define the invoice frequency for each of the component.

Allocate Resources

  • Once your project contract is defined, you are going to allocate resources to the project.
  • The resource allocation is done based on the requirements.
  • The resources then start working on the project.

Time and Expense Booking

  • When resources are working on a project they start booking their time against the project.
  • The resources start entering their time daily/weekly and also start registering the expenses that are incurred in the process. These expenses are monitored by the project manager and once approved can be billed to the customer.

Project Monitoring

  • Project monitoring is not a single step, but a continuous process.
  • So the moment you do planning you start performing project monitoring as well.

Project Invoicing

  • Once you have reached the project contract milestone, you create an invoice and send it to the customer for billing.

Project Analytics

  • Finally you perform project analysis where you can make use of the graphs, charts to identify how you are doing in the project.
  • Based on the information, you can make necessary adjustments.


D365 – Architecture Overview

 Following is an overview of D265 CRM architecture.

Understanding the architecture is important to understand the entire ecosystem of development tools here.

  • So the first dotted line separates the client side components from the server side components.
  • Wherever you see the gear icon, those components are customizable. So you can write some custom code where you see the gear icons and these components are available on client side as well as on the server side.
  • Every D365 CRM instance has Metadata database and Data database. We don’t need to do much with it as the platform takes care of these databases.
  • Also, you cannot directly access or make changes to the database with any code.

What Custom Code can you Write?

You can broadly categorize the custom components into following types:

  • Server Side
  • Client Side

How does Custom Code access CRM data?

Custom code cannot access data directly from D365 CRM database.

It can access data though API (Webservices) only. The connection between webservices and database is taken care by the platform.


D365 – Understanding Plug-in Pipeline

 What is a Plugin?

  • Plug-in is a class library or set of classes. And when you compile a set of classes you get something called DLL file or Assembly file. This assembly file has some custom code and we register these assemblies in some server side event.
  • You can run plug-in code on common events such as Create, Update, Delete, Assign, etc . Of specific record type. In dynamics terminology event and message are same thing.
  • For example: On entering revenue field of a Contact, you would like to perform some tax related calculation automatically. So here the event is “On Update” and the entity “Contact”. This means the trigger is on update of a Contact record, where we can register the event.

What happens on server?

Scenario:

  • Let us say the client creates a contact record.
  • The information goes to the Main Event (say Create event) on the server. This even creates a record and pushes the data into the database.
  • A response will be sent back from the database through the main event back to the Client where the page will be reloaded / refreshed. Now you will see the contact record as saved contact.
  • Now again the Client updates the Revenue details on that contact.
  • The information goes to the Main Event (which is now Update event).
  • The platform takes care of the data and response comes back to the Client where the page is reloaded / refreshed.

So every time a client changes something, there is a round trip happening. In this case there is no custom code involved. Also, you cannot modify the main event and is handled by the platform.

The system, however, gives to the ability to write custom code before the Main Event and after the Main Event.

Let us say you want to run a custom code before the Contact record is created. You can write your custom code as class library, upload it to the server and register before the Main Event (i.e. Contact Create).

Similarly if you want to run your custom code after the creation of the Contact record, you can register after the Main Event.

Remember, the main event does not change. But you can have Pre validation stage and Pre Operation stage before the main event and Post operation stage after the main event.

So if you want to make changes to the data before it is inserted or updated in the database, you can use the Pre-Validation and Pre-Operation stage. If you want to perform changes to the data after the record is inserted or updated in the database and before it reaches to the Client, you can use the Post-Operation stage.

This is called as plugin pipeline.


D365 – Configure Cascading Rules

Cascading Rules define what should happen to the related entity records when an operation is performed on primary entity record.

For example, if you delete an Account record, all the related reservations get deleted!

Types of Cascading Rules

  • Cascade All: Same action is performed on the related entity records.
  • Cascade Active: Perform the cation on all related entity records if they are in Active or equivalent state.
  • Cascade User-Owned: Perform the action on all related entity records (if the owner of the related and parent entity records is same).
  • Cascade None: No effect on the related entity records.

Cascading Operations

Following are the operations impacted by the cascading rules:

  • AssignCascade All, Cascade Active, Cascade User-Owned, Cascade None
  • ShareCascade All, Cascade Active, Cascade User-Owned, Cascade None
  • Un-shareCascade All, Cascade Active, Cascade User-Owned, Cascade None
  • ReparentCascade All, Cascade Active, Cascade User-Owned, Cascade None
  • Delete: Cascade All, Remove Link, Restrict Delete
  • Rollup View: Available only for Activities type entity (for users to view activities of related record from its parent record) Cascade All, Cascade None

Predefined Behaviour of Cascading

Following are the predefined behaviour of cascading:

  • Parental: Same action is performed on the related entity record.
  • Referential: No changes on the related entity record (Delete: Remove Link,, Merge: Cascade All)
  • Referential, Restrict Delete: Same as Referential (except it restrict deletion).
  • Configurable Cascading: Manually configure Cascading.

Scenario

So we have primary entity Accounts and related entity Hotel Reservation:

  • Open the N: 1 relationship in Hotel Reservation (in this example).
  • On the Relationship page, under Relationship Behaviour, try changing the Type of Behaviour and notice the predefined cascading for various operations. You can also configure the cascading manually by selecting Configurable Cascading in the Type of Behaviour.
  • Once you have selected the option, save and publish the customisation.
  • Try performing an operation on primary record and notice the effect on the related record.

You can also check the following video to understand how to Configure Cascading Rules: