Search This Blog

Saturday, January 14, 2023

Get Logged in User’s Security Roles using JavaScript

Many times we come across requirements such as show/hide ribbon buttons based on logged in user’s security role.

Earlier, we used to get security roles of logged in user at client side using Xrm.Utility.getGlobalContext().userSettings.securityRoles which used to return array of GUID value of each security role.

Now that it’s deprecated, we can use Xrm.Utility.getGlobalContext().userSettings.roles which returns collection of objects with GUID and name of each security role that is assigned to the user directly or through the teams.

Below is the script which checks if the user has certain security roles based on names and hides the ribbon button if the user doesn’t have any of those security roles:

1
2
3
4
5
6
7
8
9
10
11
12
13
14
SAB.ShowHideReopenButton = function () {
    var roles = Xrm.Utility.getGlobalContext().userSettings.roles;
 
    if (roles === null) return false;
 
    var hasRole = false;
    roles.forEach(function (item) {
        if (item.name.toLowerCase() === "cs manager" || item.name.toLowerCase() === "cs administrator") {
            hasRole = true;
        }
    });
 
    return hasRole;
}

Difference between QueryExpress, QueryByAttribute, FetchXml and LINQ

The main query expressions used to query MSD CRM data


  1. QueryExpression
  2. QueryByAttribute
  3. FetchExpression
  4. Linq
Below are the main differences

PropertyQueryExpressionQueryByAttributeFetchExpressionLinq
DistinctYesNoYesYes
NoLockYesNoYesYes
TopCountYesYesYesYes
LinkEntitiesYesYesYesYes

Calling Custom Actions/Plugin from JavaScript

 Overview

Actions in processes are a way to create custom messages in CRM for an entity.  For example, let’s say you have an entity record that needs escalation or approval.  You could create a custom action that performs the steps needed for this process.  Then you could add a button to the form that the user clicks to initiate the process.  Out of the box for most entities, you have Create, Update, Delete, Assign, and SetState messages and you have the option of writing custom business logic in the form of Plugins or Workflows on these.  With custom actions, you have the ability to create whatever message you need to fulfil your requirements.  Then you can attach plugin code to that message and perform any operations you need without restrictions.  In this post, I am going to explain how to create a custom action, pass input and output parameters, and call that action from JavaScript.  With these basic building blocks, you can create whatever you need.
 
Overall Process
 
The example I am going to document here will involve a button on the ribbon that, when clicked, will display a notification on the form, call the custom action, will run a plugin, will call a web service to get the temperature for the account's zip code, will return that information, and will display it in a notification on the form.  In this case, we are going to have a plugin that will do all the real work. There will be JavaScript that will handle the form notifications and calling the action.
 
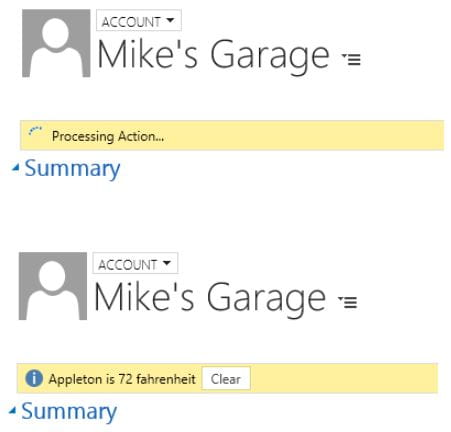
The result will look like this:
160810-CRMBlog

To make all this happen, I will be using a couple of JavaScript libraries that make working with custom Actions and Notifications much easier.  The first one is called Notify.js and can be found here.  This library makes it easy to display form notifications and adds some functionality to the standard CRM notifications.  The second one is called Process.js and can be found here.  This library simplifies calling custom actions from JavaScript.  Calling custom actions involves creating rather lengthy XML Http Requests and this library simplifies that down to a function call with a couple of parameters.  It also provides callbacks for success and errors.
 
The process looks something like this.

 

160810-CRMBlog1

 
 The components needed for this are:


  1. A Custom Action
  2. JavaScript Web Resource (to call the custom action)
  3. Custom Ribbon button (to call the JavaScript)
  4. Plugin to call the weather web service
  5. Notify.js library
  6. Process.js library

Components 

The Custom Action
 
In this example, the custom action is fairly simple.  We just need a couple of parameters.  The custom action gives us a way to pass the parameters to and from the plugin.  It also allows us to register the plugin step against the custom action message.
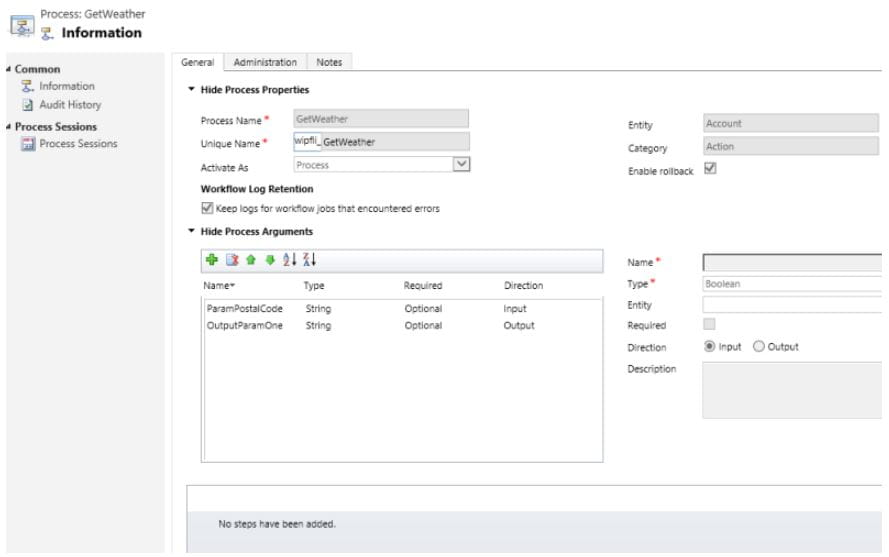
 

160810-CRMBlog2

 
JavaScript Web Resource
 
The JavaScript manages the notifications and calling the custom action.  It will validate that we have a Zip Code, load the input parameters, and then call the custom action.  When the action completes, it will call the success callback and display the information on the form as a notification.  While the action is working, there will be a notification on the form letting the user know that something is happening.
 
function CallAction() {
     //Verify that we have a Zip Code 
   if (Xrm.Page.getAttribute("address1_postalcode").getValue() == null) {
      Notify.add("Zip code is missing", "ERROR", "nozip", null, 5);
   }                               
   else {
     //Display the notification that we are working on something
     Notify.add("Processing Action...", "LOADING", "myProcessing");
     //Load the input parameters
     var inputParams = [
     { key: "ParamPostalCode", type: Process.Type.String, value: Xrm.Page.getAttribute("address1_postalcode").getValue() },
     { key: "Target", type: Process.Type.EntityReference, value: new Process.EntityReference(Xrm.Page.data.entity.getEntityName(), Xrm.Page.data.entity.getId()) }
     ];
     //Call the custom action
     Process.callAction("wipfli_GetWeather", inputParams, successCallback, errorCallback);
   }
}
function successCallback(params) {
   //Get the result from the plugin and display the information in a notification
   var outputParamOne = params["OutputParamOne"];
   Notify.add(outputParamOne, "INFO", "mySuccess", [{ type: "button", text: "Clear", callback: function () { Notify.remove("mySuccess"); } }]);
   Notify.remove("myProcessing");
}
function errorCallback(error, trace) {
   Notify.remove("myProcessing");
   Notify.add("Error: " + error, "ERROR", "myError");
}
 
Custom Ribbon Button
 
The ribbon button just has to call the "CallAction" function from the above JavaScript.  Use the Ribbon Workbench for CRM to create a custom button that points to a web resource and calls the CallAction function.
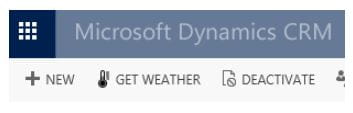
 

160810-CRMBlog3

 
Plugin
 
The plugin will read the input parameters and then call the weather web service.  Using the response from the web service, it will format the output information and then return it in the output parameter.  Don’t forget to register the plugin using the Plugin Registration Tool in the CRM SDK.  Then register a step on the GetWeather message.
 
protected override void ExecuteCrmPlugin(LocalPluginContext localContext)
{
   if (localContext == null)
   {
     throw new ArgumentNullException("localContext");
   }
   //Get the parameters from the Action call
EntityReference accountRef =      (EntityReference)localContext.PluginExecutionContext.InputParameters["Target"];
string paramPostalCode = (string)localContext.PluginExecutionContext.InputParameters["ParamPostalCode"];
string webAddress = @"http://api.openweathermap.org/data/2.5/weather?zip=" +       paramPostalCode + ",us&mode=xml&units=imperial&appid={your specific APPID}";
       string output = "";
   try
   {
     using (WebClient client = new WebClient())
     {
       Byte[] responseBytes = client.DownloadData(webAddress);
       String response = Encoding.UTF8.GetString(responseBytes);
       localContext.TracingService.Trace("Response is: " + response);
       XmlDocument xmlDoc = new XmlDocument();
       xmlDoc.LoadXml(response);
       XmlNodeList current = xmlDoc.SelectNodes("/current");
       foreach (XmlNode xn in current)
      {
output = xn["city"].Attributes["name"].Value + " is " + Math.Round(Double.Parse(xn["temperature"].Attributes["value"].Value), 0) + " " + xn["temperature"].Attributes["unit"].Value;
      }
 
      localContext.TracingService.Trace("OUTPUT IS: " + output);
    }
  }
  catch (WebException exception)
  {
    string str = string.Empty;
    if (exception.Response != null)
   {
     using (StreamReader reader =
       new StreamReader(exception.Response.GetResponseStream()))
    {
       str = reader.ReadToEnd();
    }
    exception.Response.Close();
  }
  if (exception.Status == WebExceptionStatus.Timeout)
  {
     throw new InvalidPluginExecutionException(
       "The timeout elapsed while attempting to issue the request.", exception);
  }
throw new InvalidPluginExecutionException(String.Format(CultureInfo.InvariantCulture,
       "A Web exception occurred while attempting to issue the request. {0}: {1}",
       exception.Message, str), exception);
  }
  localContext.PluginExecutionContext.OutputParameters["OutputParamOne"] = output;
}
 
 
Additional Libraries
 
The Notifiy.js and Process.js libraries will need to be loaded on the form.  To do this, include them as form libraries in the Form Properties.
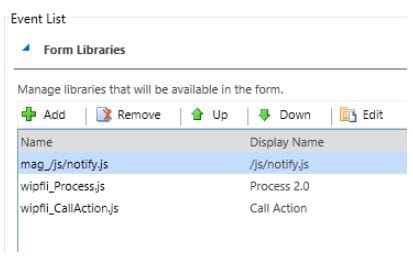
 

160810-CRMBlog4

 Conclusion

 
With all the components in place, clicking the button should produce the weather notification.  While this example may not be very useful in the real world, the purpose was to demonstrate some of the basic concepts of custom actions.  It shows you how to call a custom action from JavaScript and pass input and output parameters.  It also demonstrates triggering a Plugin from a custom action.
 
As always, please reach out to the Wipfli CRM team at crmteam@wipfli.com if you have any questions specific to customizing, upgrading, or anything else CRM!


References :

Dynamics 365: How to call a plugin from a JavaScript or a ribbon button? (sacconsulting.blogspot.com)

Calling Custom Actions from JavaScript - Wipfli

Call Custom Action from JavaScript and Run Plugin for custom message in Dynamics 365 or Power Apps | Softchief Learn


Tuesday, January 10, 2023

Microsoft Dynamics 365 for Sales – Goals

As I prepare for my Dynamics 365 certification in sales (MB 210), I’m creating blog posts based on my revision. I hope that collectively these posts may prove useful to anyone also preparing for the MB 210 exam. This time I will cover the concepts around goals.

You will see that goals are mentioned in the skills measured statement within the section headed “Perform Configuration”.

A goal is simply a target that you wish to measure performance against. Thinking specifically about sales, example goals might include the value of won opportunities per quarter or the number of qualified leads per week. Goals can be defined for each person and rolled into a larger parent goal, using a concept of parent and child goals.

When monitoring goals, we look at in progress and actual values. In terms of sales, in progress might be defined as the value of open opportunities whilst the actual target might reflect the value of won opportunities.

A goal is made of several parts (or components);

  • Goal metric – a numeric value you wish to measure from a specific record type. Some metrics come predefined but others can be added as required. (Revenue for example is a preconfigured goal metric type.)
  • Goal target and Goal Period, a target is the value for a specific goal metric to be achieved in a defined period. Actual and in progress values are calculated and compared against the goal target.
  • Goal owner, each goal is owned by an individual or team.
  • Parent Goals, these are used to arrogate child goals into one larger goal.
  • Rollup Queries are used to define how actual and in progress amounts are rolled up against the goal.

Goals could be created and maintained from either the Sales or Service areas of Dynamics 365. This is because goals connected with service can be just as important as those connected with sales. Actually goals can be related to any system or custom entity.

You can see below that from within my sales App I can access the maintenance goal options. Including goals, goal metrics and rollup queries.

Goal Metrics

The Goal metrics option allows a user to define how a goal is measured.

For example: counting the number of opportunities, totaling revenue etc.

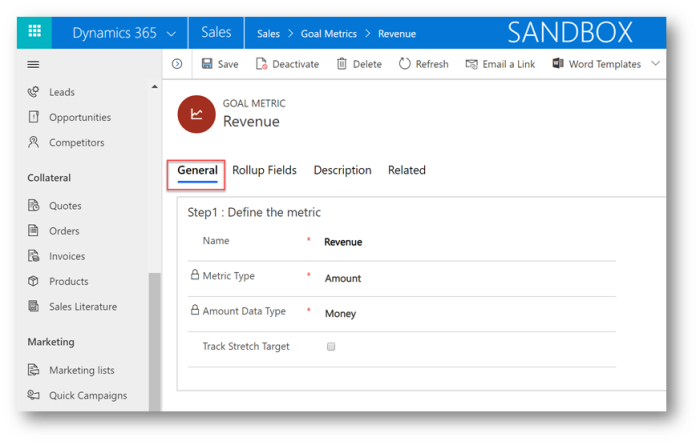
Dynamics 365 comes with a number of out of the box goal metrics, but you can also define others. Below you can see that out of the box I have goal metrics for both sales and service. From a sales point of view the revenue target will be important.

In the new Unified Interface form layout the goal metric information is spread over 3 tabs. First we have the general tab. Here the goal is given a name and we define the metric type.

The two metric types are count and amount. Counts will be used when you want to measure things like the number of leads created or count the number of new accounts created. Amount metrics will have a further data type of decimal, money or integer. We’d use an amount type for goals connected with measuring total revenue or total invoiced values etc.

Notice that in the goal metric we have a field that allows us to enable to stretch target. This is an optional concept. Maybe you have a target win £100,000 per month. But at a stretch you might be able to achieve £120,000. The stretch target logic would allow me to define both of these targets and monitor progress towards them within one goal.

Rollup fields form part of the goal metric, these contain the calculated fields that are used to derive the actual and in-progress values. When defining the in-progress and actual fields, the user not only says how the field will be calculated but also decides on which date the field will apply. For example: in-progress opportunities might get counted based on their estimated close date but actual revenue will get counted based on date the opportunity was won.

The final tab “description” is simply used to allow you to give a text description of the goal metric. Assuming that some goal metrics could be complicated entering this might help users know which metrics to use for what purposes.

Goals

Information for each goal is spread over multiple tabs.

In the general tab we define the parent goal (if required) and which goal metric to use.

Goal Owner – Every goal is tied to a user or team that owns the goal. This is the person or team responsible for achieving the goal.

Goal Manager – This is the person who manages the goal.

Parent Goals – A parent goal is used to group goals. A manager might (for example) have twenty direct reports. Each of these people would have a goal that they own. But all are grouped under the parent goal to see how the group collectively performs. Meaning the parent role becomes an aggregated version of the child goals.


Next, we have the time period tab. This is important as all goals are time bound and must be linked to a fiscal period or custom period. I have described the creation of fiscal periods in another post!

Goal Time Period – All goals are time bound, whenever a goal is created you need to identify the time period it will “run” for. E.g. Week, month, year or a fiscal period. Fiscal periods, each goal can be linked to a fiscal period. If a fiscal period is selected you must select the year, linking the goal to a specific period. Fiscal periods might refer to a year that starts on a different basis, for example for many companies their fiscal year runs April to March. So period 1 is April. (Rather than January!) Alternatively, a custom period can be entered, for this the user must enter a specific start and end date.

Targets – The target is simply what you’re shooting for. For example: To win £100,000 worth of opportunities in a quarter. A goal target is typically measured against actual and in-progress values. The actual target might be to sell £100k between Jan and March, the in-progress figure would reflect the value of opportunities likely to close between Jan and March. All goals must have a target value and a time period.

Each Goal will have goal criteria, defined on the “Goal Criteria” tab;

Roll Up Only from Child Goals – This option may often be used on a parent goal when you want the goal to simply be an aggregate from all of the child goals. For example: Each sales person might have an individual goal. The parent goal may then simply be a sum of all the sales people that work in a given territory / team.

Record set for Rollup – Typically each goal will represent cases, sales, etc. that apply to an individual (or team) that owns the records. However, this option can be used to create an organization wide goal.

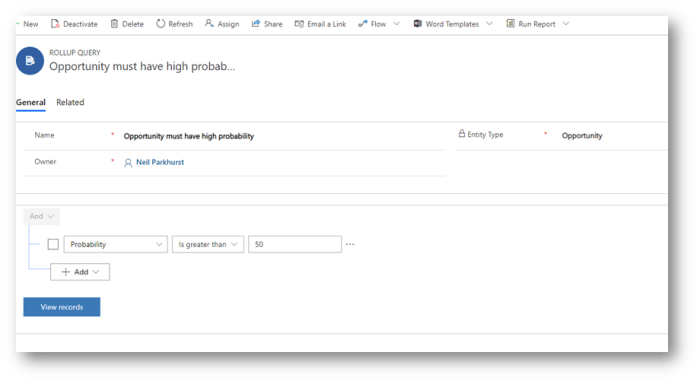
Rollup Queries – In some situations you’ll need to fine tune the data sets. For example: To only count opportunities with a high probability of conversion in my in-progress target. In these circumstance rollup queries are used to articulate the records to be counted. You can define and add rollup queries for in-progress and actual targets. A rollup query is essentially an advanced find used to further filter the data. It is important to notice that the entity type MUST be the same as the entity selected for the goal.


Calculating / Recalculating Goals

Goals will be automatically recalculated periodically but users with correct permissions can also select the “Recalculate” button to force a calculation on demand. Sometimes useful when a new goal is first created as actual values will not be updated when the goal is first saved. (Unless you do a recalculate.)

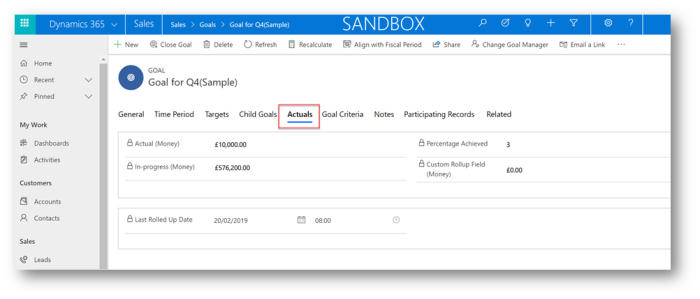
Once the calculation has run automatically or by selecting the Recalculate button the actuals (and in-progress values) can be seen on the goal form. (In the actuals tab.)

System Settings

Below you can see that the administrator can decide the frequency to roll-up (recalculate) goals. And for how long after the end date has been reached to continue this roll-up. (You probably don’t want to roll-up a goal indefinitely, but you might want to continue recalculating for a defined period to allow for any late revisions.)


Goal Charts

When viewing charts, you have a number of charts to represent goals.

Including;

  • Percentage Achieved
  • Goal Progress (Counts)
  • Goal Progress (Money)
  • Today’s Target Vs. Actuals (Count)
  • Today’s Target Vs. Actuals (Money)

The “today’s target chart” derives a target based on where you should be at relative to your goal. Say I have a target of 100 by end of March but as I am at the end of Feb today’s target chart would show a lower value of 65. In the example below my target was something like 300,000 but the today target is showing as 200,000 (ish).


Notice that on a goal progress chart there are four pieces of information represented;

  • The ultimate target
  • Today’s target
  • The in-progress total
  • The actual amount achieved


I hope you got all of that! Goals have quite a few concepts to remember. It is worth making sure you have some hands-on experience with these. I suggest creating several combinations, including examples that use child / parent goals.

Tip:
If you have used goals previously in the classic web interface you will find that the overall logic is unchanged, but the screen navigation “feels” quite different. So, I do encourage you to get some hands on time with the new Unified Interface.

 References :

MB 210: Microsoft Dynamics 365 for Sales – Goals | Microsoft Dynamics 365 (neilparkhurst.com)

Goal Management in Dynamics 365 for Sales (CRM) | Stoneridge Software

Rollup Queries & Goal Management in Dynamics 365 Sales (CRM) - Encore Business Solutions