Search This Blog

Wednesday, August 31, 2016

SharePoint 2013 working with file: How to upload attachments to SharePoint list item using REST services

You just need to provide item id to which you want to attach file and attachment file name. Rest of the things are similar to how to upload the file.

Following is the complete code to upload the attachments:

<html>
<head>
<script src="/Site%20Assets/js/jquery-1.11.1.min.js"></script>
<script>
function AddAttachments()
{
var digest = "";
$.ajax(
{
                url: "/_api/contextinfo",
                method: "POST",
                headers: {
                                "ACCEPT": "application/json;odata=verbose",
                                "content-type": "application/json;odata=verbose"
                },
                success: function (data) {
                digest = data.d.GetContextWebInformation.FormDigestValue;
                },
                error: function (data) {
                               
                }
}).done(function() {
                var fileInput = $('#uploadFile');
                var fileName = fileInput[0].files[0].name;
                var reader = new FileReader();
                reader.onload = function (e) {
                var fileData = e.target.result;
                                var res11 = $.ajax(
                                {                             
                                                url: "/_api/web/lists/getbytitle('testlist')/items(1)/AttachmentFiles/ add(FileName='" + fileName + "')",                                       
                                                method: "POST",
                                                binaryStringRequestBody: true,
                                                data: fileData,
                                                processData: false,
                                                headers: {
                                                                "ACCEPT": "application/json;odata=verbose",                                                                                                                                   
                                                                "X-RequestDigest": digest,
                                                                "content-length": fileData.byteLength
                                                },                                                                                                                            
                                                success: function (data) {                                            
                                                                                                               
                                                },
                                                error: function (data) {
                                                                alert("Error occured." + data.responseText);
                                                }
                                });                          
                };
                reader.readAsArrayBuffer(fileInput[0].files[0]);

});                                          
}
</script>
</head>
<body>
<div>
                <input id="uploadFile" type="file">
</div>

<div>
                <input type="submit" onclick="AddAttachments()" value="Add Attachments"> </input>
</div>
</body>
</html>

Loop through user profiles using console app


Use the following code to loop through all user profiles using a c# console app:
var siteUrl = "http://yoursite";

SPSecurity.RunWithElevatedPrivileges(delegate()
{
  using (SPSite site = new SPSite(siteUrl))
  {
    try{
      SPServiceContext serviceContext = SPServiceContext.GetContext(site);
      UserProfileManager upMananger = new UserProfileManager(serviceContext);

      foreach (UserProfile profile in upMananger)
      {
        //Add your logic here..
        Console.WriteLine("Found: " + profile["AccountName"]);
      }
    }
    //Catch exceptions here, ex. NullReferenceException
    catch (System.Exception ex){
      //Handle exceptions
    }
  }
});

Some useful tips to avoid errors:
- Run the console application as Administrator
- Grant your account full control to User Profile Service Application (Fix NullReferenceException)


SharePoint JS: Upload a file using javascript, jQuery, HTML5

To upload a file using jquery, i used this code:


//Function attached to the html fileupload tag (<input type="file">)
function uploadFile(){
    if (document.getElementById("inputFile").files.length === 0) {
        alert('No file was selected');
        return;
    }
    var parts = document.getElementById("inputFile").value.split("\\");
    var filename = parts[parts.length - 1];
    var file = document.getElementById("inputFile").files[0];
    uploadFileSync("http://ngo.com", "libraryname", filename, file);
}

//Upload file synchronously
function uploadFileSync(spWebUrl , library, filename, file) 
{
    var reader = new FileReader();
    reader.onloadend = function(evt) 
    {
      if (evt.target.readyState == FileReader.DONE) 
      {
         var buffer = evt.target.result;
         var completeUrl = spWebUrl
           + "/_api/web/lists/getByTitle('"+ library + "')"
           + "/RootFolder/Files/add(url='"+ filename +"',overwrite='true')?"
           + "@TargetLibrary='"+library+"'&@TargetFileName='"+ filename +"'";

          $.ajax({
                url: completeUrl,
                type: "POST",
                data: buffer,
                async: false,
                processData: false,
                headers: {
                    "accept": "application/json;odata=verbose",
                    "X-RequestDigest": $("#__REQUESTDIGEST").val(),
                    "content-length": buffer.byteLength
                },
                complete: function (data) {
                    alert('succes');
                },
                error: function (err) {
                     alert('failed');
                }
        });
      }
    };
    reader.readAsArrayBuffer(file);
}

Resources

  • jQuery
  • HTML5 - FileReader
  • Note- If Validation Setting on Library This Code is Not Working
  • Request failed. List data validation failed.undefined

  • Error Message:

    Request failed. List data validation failed.undefined

    Problem Description:

    I wrote JavaScript function to add item into SharePoint List but I getting below error shown in following figure.


    I got above error because I kept column validation in my one of the Date Column,


    I remove column level validation from my List, I wrote validation in JavaScript function only.


    That’s all and finally my Item created using JavaScript…


Saturday, August 20, 2016

Using Content Deployment to Copy One Site Collection to Another in SharePoint 2010

In simple terms, Content Deployment in SharePoint 2010 is used to deploy the content from one site to another site. We can set the content deployment jobs (incoming and outgoing) using SharePoint Central Administration 2010.
The two-farm topology is a standard Internet site topology and is typical of topologies that are used to publish an Internet site. It is usually composed of two server farms: one to host the authoring site collection and the other to host the production site collection.
It is important to be aware that content deployment is a one-way process. The content deployment feature does not support round-trip synchronization from source to destination and vice versa. Creating new content or changing existing content on the destination site collection can cause content deployment jobs to fail. Because of this, it is usually recommended to restrict permissions on the destination site collection so that only specific users can make direct changes to content that is stored within that site collection.
We will now go through a typical process that will copy one site collection to another with content deployment.
PROCESS OVERVIEW
Content Deployment in SharePoint 2010 is composed of the following three processes.
  1. Create two Web Applications in separate content databases and create site collections in the web applications.
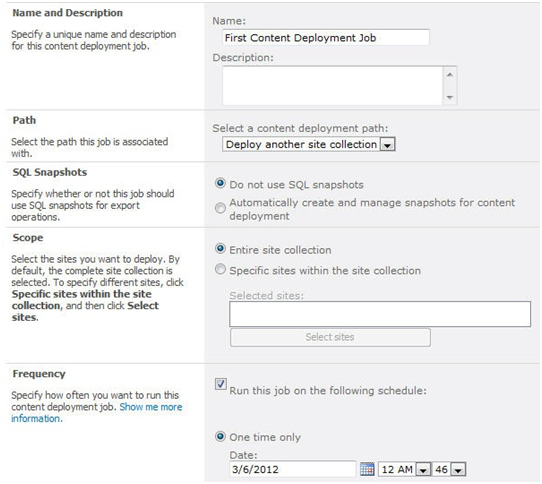
  2. Configure Content deployment, paths and jobs -> Run jobs.
  3. Check the deployment status and the destination site collection’s content.
I. CREATING THE WEB APPLICATIONS AND SITE COLLECTIONS
1. First, create two web apps and ensure the two are in separate content databases.
  • http://spy2010
  • http://spy2010:1111
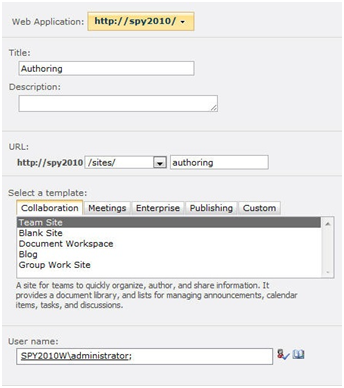
2. Second, create site collection http://spy2010/sites/authoring and select the “Team Site” template.
3. The initial content deployment destination must be a blank site collection.
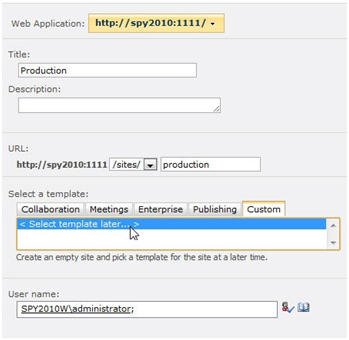
4. Create a site collection and ensure that you select “<Select template later>.”
NoteDO NOT create a site collection using “Blank Site” template, as this does not count as an empty site collection and content deployment will fail.
5. The site collection in port 1111 is just http://spy2010:1111/sites/production.
II. Configure Content deployment, paths and jobs in CA
1. Navigate to Central Administration -> General Application Settings -> Content Deployment -> Configure Content Deployment.
2. Configure new deployment path
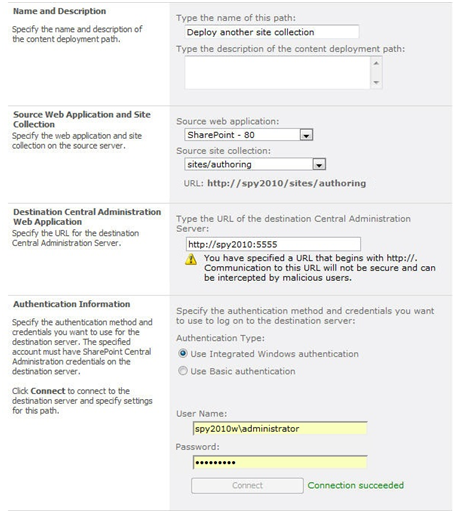
Note: A content deployment path is required to define a one-to-one relationship between a source and destination site collection for the purposes of content deployment. Once you have created a path, jobs can be scheduled and run on an ad-hoc basis to deploy additional content as required.
3. Select your “authoring” site collection as the source and “production” site collection as the destination.
4. Enter the current central administration address, including the port number.
Note: We will need to test the connection to make sure the destination site collection list populated correctly.
Create a deployment job and run it
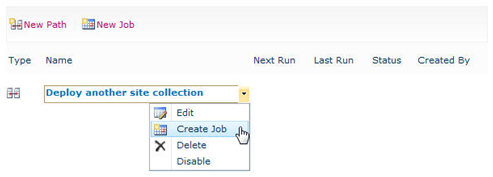
5. We will need to create a deployment job. Jobs and deployment paths have a one-to-one relationship, so we will need to create at least one job for each path that we have specified.
6. Select the “One time only” radio button to kick the job off immediately.
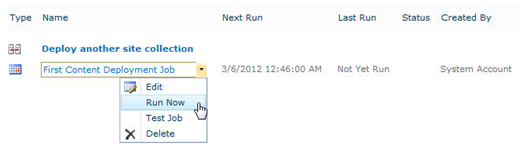
7. Create a schedule or run the job now using the “One time only” option to test your new deployment path.
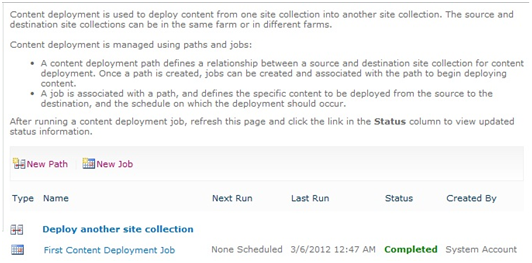
8. You can view current job status on the “Manage Content Deployment Paths and Jobs” page.
9. Once the job status becomes “Completed,” the “Production” site collection’s content has been copied successfully.
III. Check deployment status and destination site collection’s content
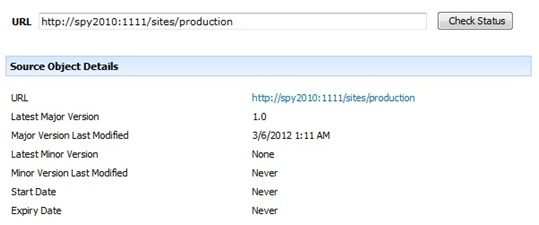
1. Navigate to Central Administration -> General Application Settings ->Content Deployment -> Check deployment of specific content.
2. We can check the “production” status on the following page.
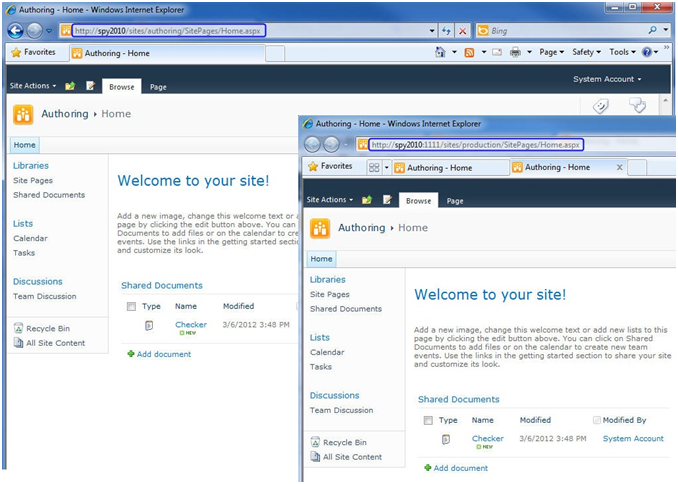
3. When we login to “production,” we can see that the content is now same as the content in “authoring.”

Cross site publishing and anonymous access in Share Point 2013

With cross site publishing feature in SharePoint 2013 you may make your content stored in some list or document library in one site collection, available via search index in other site collection (it is the most frequent use case mentioned in the documentation, although cross site publishing works also within single site collection and across different web applications in the same farm). What if you develop public site and you need to enable the content from e.g. authoring site, which is accessible only for content editors, also for anonymous users?

When you enable document library as catalog (Doc lib settings > Catalog settings) there is possibility to specify whether or not anonymous access should be enabled:
image
When you leave it off like shown on the picture above, list.AnonymousPermMask64 property will contain default flag SPBasePermissions.AnonymousSearchAccessWebLists, which according to documentation means the following:
Content of lists and document libraries in the Web site will be retrieveable for anonymous users through SharePoint search if the list or document library has AnonymousSearchAccessList set.
I.e. if list or doclib contains only this flag, it doesn’t have anonymous access enabled. When you will enable anonymous access from UI:
image
AnonymousPermMask64 property will contain the following mask: AnonymousSearchAccessList | AnonymousSearchAccessWebLists. AnonymousSearchAccessList flag means the following:
Make content of a list or document library retrieveable for anonymous users through SharePoint search. The list permissions in the site do not change.
I.e. when it is set, content will be available for anonymous users (as our experience shows it will be available even if AnonymousSearchAccessWebLists flag is not explicitly set for the list).
Setting anonymous access for the list when it is published as catalog is done in PublishingCatalogUtility.EnableAnonymousAccess() method:
   1:  internal static bool EnableAnonymousAccess(SPWeb parentWeb, SPList list)
   2:  {
   3:      CommonUtilities.ConfirmNotNull(parentWeb, "parentWeb");
   4:      CommonUtilities.ConfirmNotNull(list, "list");
   5:      if (GetIsAnonAccessEnabled(list))
   6:      {
   7:          return false;
   8:      }
   9:      SPWeb firstUniqueAncestorWeb = parentWeb.FirstUniqueAncestorWeb;
  10:      firstUniqueAncestorWeb.AnonymousPermMask64 |=
  11:  SPBasePermissions.AnonymousSearchAccessWebLists;
  12:      list.BreakRoleInheritance(true);
  13:      list.AnonymousPermMask64 |= SPBasePermissions.EmptyMask |
  14:  SPBasePermissions.AnonymousSearchAccessList;
  15:      return true;
  16:  }
And the last note: if you connect to catalog programmatically using CatalogConnectionManager class (see example here), it will also set anonymous access, i.e. list will have AnonymousPermMask64 = AnonymousSearchAccessList even though there is no explicit option for that in the example above.

Tuesday, August 16, 2016

SharePoint Hosted App Using REST API From Client Side Script

Here are the steps:
Step 1: SHA Project folder structure.

Step 2: App Web List Creation Steps.
Firstly add simple list into SHA project. Here are the steps to create List into SHA project.
In this example I created custom list named “Customers” as in the following,
Elements.xml File code- it adds data into List.
  1. <?xml version="1.0" encoding="utf-8"?>    
  2. <Elements xmlns="http://schemas.microsoft.com/sharepoint/">    
  3.   <ListInstance Title="Customers" OnQuickLaunch="TRUE" TemplateType="105" FeatureId="00bfea71-7e6d-4186-9ba8-c047ac750105" Url="Lists/Customers" Description="My List Instance">    
  4.     <Data>    
  5.       <Rows>    
  6.         <Row>    
  7.           <Field Name="FirstName">Rupali</Field>    
  8.           <Field Name="Title">Shinde</Field>    
  9.           <Field Name="WorkPhone">(123)456-6789</Field>    
  10.         </Row>    
  11.         <Row>    
  12.           <Field Name="FirstName">Vishnu</Field>    
  13.           <Field Name="Title">Jadhav</Field>    
  14.           <Field Name="WorkPhone">(143)867-5309</Field>    
  15.         </Row>    
  16.         <Row>    
  17.           <Field Name="FirstName">DJ</Field>    
  18.           <Field Name="Title">Jadhav</Field>    
  19.           <Field Name="WorkPhone">(800)LUV-AZUR</Field>    
  20.         </Row>    
  21.         <Row>    
  22.           <Field Name="FirstName">Summit</Field>    
  23.           <Field Name="Title">Jadhav</Field>    
  24.           <Field Name="WorkPhone">(888)123-5677</Field>    
  25.         </Row>    
  26.         <Row>    
  27.           <Field Name="FirstName">Kiran</Field>    
  28.           <Field Name="Title">Jadhav</Field>    
  29.           <Field Name="WorkPhone">(888)GOT-OAUTH</Field>    
  30.         </Row>    
  31.         <Row>    
  32.           <Field Name="FirstName">Shrikant</Field>    
  33.           <Field Name="Title">Shinde</Field>    
  34.           <Field Name="WorkPhone">(813)813-8133</Field>    
  35.         </Row>    
  36.         <Row>    
  37.           <Field Name="FirstName">Seema</Field>    
  38.           <Field Name="Title">Jadhav</Field>    
  39.           <Field Name="WorkPhone">(800)BIG-TULS</Field>    
  40.         </Row>    
  41.       </Rows>    
  42.     </Data>    
  43.   </ListInstance>    
  44. </Elements>    
Step 3: User Interface designing steps.
Home page of application is having “Add New Customer “ button, which shows user entry form to fill user details.
User Details Grid – this grid will show user details with Edit, Delete and Display button into it.
  1. <%@ Page Language="C#" MasterPageFile="~masterurl/default.master" Inherits="Microsoft.SharePoint.WebPartPages.WebPartPage, Microsoft.SharePoint, Version=15.0.0.0, Culture=neutral, PublicKeyToken=71e9bce111e9429c" %>    
  2.     
  3. <%@ Register TagPrefix="SharePoint" Namespace="Microsoft.SharePoint.WebControls" Assembly="Microsoft.SharePoint, Version=15.0.0.0, Culture=neutral, PublicKeyToken=71e9bce111e9429c" %>    
  4. <%@ Register TagPrefix="Utilities" Namespace="Microsoft.SharePoint.Utilities" Assembly="Microsoft.SharePoint, Version=15.0.0.0, Culture=neutral, PublicKeyToken=71e9bce111e9429c" %>    
  5. <%@ Register TagPrefix="WebPartPages" Namespace="Microsoft.SharePoint.WebPartPages" Assembly="Microsoft.SharePoint, Version=15.0.0.0, Culture=neutral, PublicKeyToken=71e9bce111e9429c" %>    
  6.     
  7. <asp:Content ID="Content1" ContentPlaceHolderID="PlaceHolderPageTitle" runat="server">    
  8.     SharePoint-hosted App REST API Demo     
  9. </asp:Content>    
  10.     
  11. <asp:Content ID="Content2" ContentPlaceHolderID="PlaceHolderPageTitleInTitleArea" runat="server">    
  12.     Using the REST API from Client-side JavaScript    
  13. </asp:Content>    
  14.     
  15. <asp:Content ContentPlaceHolderID="PlaceHolderAdditionalPageHead" runat="server">    
  16.     
  17.     <link rel="Stylesheet" type="text/css" href="../Content/App.css" />       
  18.     
  19.     <script type="text/javascript" src="../Scripts/jquery-1.6.2.min.js"></script>    
  20.     <script type="text/javascript" src="../Scripts/jsrender.js"></script>    
  21.     
  22.     <script type="text/javascript" src="../Scripts/App.js"></script>    
  23.     
  24. </asp:Content>    
  25.     
  26. <asp:Content ContentPlaceHolderID="PlaceHolderMain" runat="server">    
  27.     
  28.     <div id="toolbar">    
  29.         <input type="button" id="cmdAddNewCustomer" value="Add New Customer" class="ms-ButtonHeightWidth" />    
  30.     </div>    
  31.     
  32.     <div id="results" />    
  33.     
  34. </asp:Content>    
Output
Step 4: Grid Data filling steps – the following code is used to fill GridView.
  1. var hostweburl;    
  2. var appweburl;    
  3.     
  4. $(function () {    
  5.     
  6.     // register event handlers on page    
  7.     $("#cmdAddNewCustomer").click(onAddCustomer);    
  8.     $("#results").append($("<img>", { src: "_layouts/images/gears_anv4.gif" }));    
  9.     
  10.     // Get the URI decoded URLs.     
  11.     hostweburl = decodeURIComponent(getQueryStringParameter("SPHostUrl"));    
  12.     appweburl = decodeURIComponent(getQueryStringParameter("SPAppWebUrl"));    
  13.     
  14.     var scriptbase = hostweburl + "/_layouts/15/";    
  15.     $.getScript(scriptbase + "SP.RequestExecutor.js", getCustomers);    
  16. });    
  17.     
  18. function getCustomers() {    
  19.      
  20.     $("#results").empty();    
  21.     $("<img>", { "src""/_layouts/images/GEARS_AN.GIF" }).appendTo("#results");    
  22.         
  23.     var executor = new SP.RequestExecutor(appweburl);    
  24.     var FullURL = appweburl + "/_api/web/lists/getbytitle('Customers')/items";         
  25.        
  26.     executor.executeAsync(    
  27.        {    
  28.            url: FullURL,    
  29.            method: "GET",    
  30.     
  31.            headers: {    
  32.                "accept""application/json;odata=verbose",    
  33.                "content-type""application/json;odata=verbose",    
  34.                "X-RequestDigest": $("#__REQUESTDIGEST").val()    
  35.            },    
  36.            success: onDataReturned,    
  37.            error: errorHandler    
  38.        }    
  39.    );    
  40. }    
  41.     
  42. function errorHandler(data, errorCode, errorMessage) {    
  43.     document.getElementById("results").innerText = "Could not complete cross-domain call: " + errorMessage;    
  44. }    
  45.     
  46. function onDataReturned(data) {    
  47.     
  48.     $("#results").empty();    
  49.     
  50.     var jsonObject = JSON.parse(data.body);    
  51.     var odataResults = jsonObject.d.results;    
  52.     
  53.     // set rendering template    
  54.     var tableHeader = "<thead>" +    
  55.                       "<td>Last Name</td>" +    
  56.                       "<td>First Name</td>" +    
  57.                       "<td>Work Phone</td>" +    
  58.                       "<td> </td>" +    
  59.                       "<td> </td>" +    
  60.                       "<td> </td>" +    
  61.                     "</thead>";    
  62.     
  63.     var table = $("<table>", { id: "customersTable" }).append($(tableHeader));    
  64.     
  65.     var renderingTemplate = "<tr>" +    
  66.                               "<td>{{>Title}}</td>" +    
  67.                               "<td>{{>FirstName}}</td>" +    
  68.                               "<td>{{>WorkPhone}}</td>" +    
  69.                               "<td><a href='javascript: onShowCustomerDetail({{>Id}});'><img src='_layouts/images/DETAIL.gif' alt='Show Detail' /></a></td>" +    
  70.                               "<td><a href='javascript: onUpdateCustomer({{>Id}});'><img src='_layouts/images/EDITITEM.gif' alt='Edit' /></a></td>" +    
  71.                               "<td><a href='javascript: onDeleteCustomer({{>Id}});'><img src='_layouts/images/DELITEM.gif' alt='Delete' /></a></td>" +    
  72.                             "</tr>";    
  73.     
  74.     
  75.     $.templates({ "tmplTable": renderingTemplate });    
  76.     table.append($.render.tmplTable(odataResults));    
  77.     
  78.     $("#results").append(table);    
  79. }   
Step 5: Add new customer
EditCustomer.aspx file contains code for New Customer Popup.
  1. <%@ Page Language="C#" MasterPageFile="~masterurl/default.master" Inherits="Microsoft.SharePoint.WebPartPages.WebPartPage, Microsoft.SharePoint, Version=15.0.0.0, Culture=neutral, PublicKeyToken=71e9bce111e9429c" %>    
  2.     
  3. <%@ Register TagPrefix="SharePoint" Namespace="Microsoft.SharePoint.WebControls" Assembly="Microsoft.SharePoint, Version=15.0.0.0, Culture=neutral, PublicKeyToken=71e9bce111e9429c" %>    
  4. <%@ Register TagPrefix="Utilities" Namespace="Microsoft.SharePoint.Utilities" Assembly="Microsoft.SharePoint, Version=15.0.0.0, Culture=neutral, PublicKeyToken=71e9bce111e9429c" %>    
  5. <%@ Register TagPrefix="WebPartPages" Namespace="Microsoft.SharePoint.WebPartPages" Assembly="Microsoft.SharePoint, Version=15.0.0.0, Culture=neutral, PublicKeyToken=71e9bce111e9429c" %>    
  6.     
  7. <asp:Content ContentPlaceHolderID="PlaceHolderAdditionalPageHead" runat="server">    
  8.     <link rel="Stylesheet" type="text/css" href="../Content/App.css" />    
  9.     <SharePoint:ScriptLink name="SP.UI.Dialog.js" runat="server" Defer="false" LoadAfterUI="true" Localizable="false" />    
  10.     <SharePoint:ScriptLink name="sp.js" runat="server" Defer="false" LoadAfterUI="true" Localizable="false" />    
  11.     
  12.     <script type="text/javascript" src="../Scripts/jquery-1.6.2.js"></script>    
  13.     <script type="text/javascript" src="../Scripts/EditCustomer.js"></script>    
  14. </asp:Content>    
  15.     
  16. <asp:Content ContentPlaceHolderID="PlaceHolderMain" runat="server">    
  17.     
  18.     <div class="dialog_input_section">    
  19.     
  20.         <table id="customerEditTable">    
  21.             <tr>    
  22.                 <td>First Name:</td>    
  23.                 <td>    
  24.                     <input id="txtFirstName" /></td>    
  25.             </tr>    
  26.             <tr>    
  27.                 <td>Last Name:</td>    
  28.                 <td>    
  29.                     <input id="txtLastName" /></td>    
  30.             </tr>    
  31.             <tr>    
  32.                 <td>Work Phone:</td>    
  33.                 <td>    
  34.                     <input id="txtWorkPhone" /></td>    
  35.             </tr>    
  36.         </table>    
  37.     
  38.     </div>    
  39.     
  40.     <div class="dialog_button_section">    
  41.         <input type="button" id="cmdOK" value="Save" class="ms-ButtonHeightWidth" />    
  42.         <input type="button" id="cmdCancel" value="Cancel" class="ms-ButtonHeightWidth" />    
  43.     </div>    
  44.     
  45. </asp:Content>     
App.JS file contains the following code to open popup.
  1. $("#cmdAddNewCustomer").click(onAddCustomer);  
Above click internally calls EditCustomer.aspx file and render it on screen.
Step 6: Update Customer
Inside GridView, edit button is provided to update existing customer details.
Code:
  1. function onUpdateCustomer(customer) {        
  2.        
  3.     var executor = new SP.RequestExecutor(appweburl);    
  4.     var FullURL = appweburl + "/_api/web/lists/getbytitle('Customers')/items(" + customer + ")";    
  5.     
  6.     executor.executeAsync(    
  7.        {    
  8.            url: FullURL,    
  9.            method: "GET",    
  10.     
  11.            headers: {    
  12.                "accept""application/json;odata=verbose",    
  13.                "content-type""application/json;odata=verbose",    
  14.                "X-RequestDigest": $("#__REQUESTDIGEST").val()    
  15.            },    
  16.            success: onCustomerReturned,    
  17.            error: errorHandler    
  18.        }    
  19.    );    
  20. }   
Output
Step 7Delete Customer
Inside GridView, delete button is provided to delete existing customer details.
Code
  1. function onDeleteCustomer(customer) {    
  2.     
  3.     var requestUri = _spPageContextInfo.webAbsoluteUrl + "/_api/Web/Lists/getByTitle('Customers')/items(" + customer + ")";    
  4.     
  5.     var requestHeaders = {    
  6.         "accept""application/json",    
  7.         "X-RequestDigest": $("#__REQUESTDIGEST").val(),    
  8.         "If-Match""*"    
  9.     }    
  10.     
  11.     $.ajax({    
  12.         url: requestUri,    
  13.         type: "DELETE",    
  14.         contentType: "application/json",    
  15.         headers: requestHeaders,    
  16.         success: onSuccess,    
  17.         error: onError    
  18.     });    
  19. }  
Step 8: View Customer Details.
Inside GridView, view button is provided to view existing customer details.
  1. function onShowCustomerDetail(customer) {    
  2.     
  3.     var customerItemEditUrl = _spPageContextInfo.webAbsoluteUrl +    
  4.                             "/Lists/Customers/DispForm.aspx?ID=" + customer;    
  5.     
  6.     var dialogOptions = {    
  7.         url: customerItemEditUrl,    
  8.         title: "Customer Detail",    
  9.         dialogReturnValueCallback: getCustomers    
  10.     };    
  11.     
  12.     SP.UI.ModalDialog.showModalDialog(dialogOptions);    
  13. }     
Output
When view form is open in browser and if you change user details there itself it gets updated and final result get rendered on screen.
Full Source Code
  1. var hostweburl;    
  2. var appweburl;    
  3.     
  4. $(function () {    
  5.     
  6.     // register event handlers on page    
  7.     $("#cmdAddNewCustomer").click(onAddCustomer);    
  8.     $("#results").append($("<img>", { src: "_layouts/images/gears_anv4.gif" }));    
  9.     
  10.     // Get the URI decoded URLs.     
  11.     hostweburl = decodeURIComponent(getQueryStringParameter("SPHostUrl"));    
  12.     appweburl = decodeURIComponent(getQueryStringParameter("SPAppWebUrl"));    
  13.     
  14.     var scriptbase = hostweburl + "/_layouts/15/";    
  15.     $.getScript(scriptbase + "SP.RequestExecutor.js", getCustomers);    
  16. });    
  17.     
  18. function getCustomers() {    
  19.      
  20.     $("#results").empty();    
  21.     $("<img>", { "src""/_layouts/images/GEARS_AN.GIF" }).appendTo("#results");    
  22.         
  23.     var executor = new SP.RequestExecutor(appweburl);    
  24.     var FullURL = appweburl + "/_api/web/lists/getbytitle('Customers')/items";         
  25.        
  26.     executor.executeAsync(    
  27.        {    
  28.            url: FullURL,    
  29.            method: "GET",    
  30.     
  31.            headers: {    
  32.                "accept""application/json;odata=verbose",    
  33.                "content-type""application/json;odata=verbose",    
  34.                "X-RequestDigest": $("#__REQUESTDIGEST").val()    
  35.            },    
  36.            success: onDataReturned,    
  37.            error: errorHandler    
  38.        }    
  39.    );    
  40. }    
  41.     
  42. function errorHandler(data, errorCode, errorMessage) {    
  43.     document.getElementById("results").innerText = "Could not complete cross-domain call: " + errorMessage;    
  44. }    
  45.     
  46. function onDataReturned(data) {    
  47.     
  48.     $("#results").empty();    
  49.     
  50.     var jsonObject = JSON.parse(data.body);    
  51.     var odataResults = jsonObject.d.results;    
  52.     
  53.     // set rendering template    
  54.     var tableHeader = "<thead>" +    
  55.                       "<td>Last Name</td>" +    
  56.                       "<td>First Name</td>" +    
  57.                       "<td>Work Phone</td>" +    
  58.                       "<td> </td>" +    
  59.                       "<td> </td>" +    
  60.                       "<td> </td>" +    
  61.                     "</thead>";    
  62.     
  63.     var table = $("<table>", { id: "customersTable" }).append($(tableHeader));    
  64.     
  65.     var renderingTemplate = "<tr>" +    
  66.                               "<td>{{>Title}}</td>" +    
  67.                               "<td>{{>FirstName}}</td>" +    
  68.                               "<td>{{>WorkPhone}}</td>" +    
  69.                               "<td><a href='javascript: onShowCustomerDetail({{>Id}});'><img src='_layouts/images/DETAIL.gif' alt='Show Detail' /></a></td>" +    
  70.                               "<td><a href='javascript: onUpdateCustomer({{>Id}});'><img src='_layouts/images/EDITITEM.gif' alt='Edit' /></a></td>" +    
  71.                               "<td><a href='javascript: onDeleteCustomer({{>Id}});'><img src='_layouts/images/DELITEM.gif' alt='Delete' /></a></td>" +    
  72.                             "</tr>";    
  73.     
  74.     
  75.     $.templates({ "tmplTable": renderingTemplate });    
  76.     table.append($.render.tmplTable(odataResults));    
  77.     
  78.     $("#results").append(table);    
  79. }    
  80.     
  81. function onShowCustomerDetail(customer) {    
  82.     
  83.     var customerItemEditUrl = _spPageContextInfo.webAbsoluteUrl +    
  84.                             "/Lists/Customers/DispForm.aspx?ID=" + customer;    
  85.     
  86.     var dialogOptions = {    
  87.         url: customerItemEditUrl,    
  88.         title: "Customer Detail",    
  89.         dialogReturnValueCallback: getCustomers    
  90.     };    
  91.     
  92.     SP.UI.ModalDialog.showModalDialog(dialogOptions);    
  93. }    
  94.     
  95. function onAddCustomer(event) {    
  96.     
  97.     var dialogArgs = {    
  98.         command: "Add"    
  99.     };    
  100.     
  101.     var dialogOptions = {    
  102.         url: "EditCustomer.aspx",    
  103.         title: "Add New Customer",    
  104.         width: "480px",    
  105.         args: dialogArgs,    
  106.         dialogReturnValueCallback: saveNewCustomer    
  107.     };    
  108.     
  109.     SP.UI.ModalDialog.showModalDialog(dialogOptions);    
  110. }    
  111.     
  112. function saveNewCustomer(dialogResult, returnValue) {    
  113.        
  114.     if (dialogResult == SP.UI.DialogResult.OK) {    
  115.     
  116.         // get data from dialog for new customer    
  117.         var LastName = returnValue.LastName;    
  118.         var FirstName = returnValue.FirstName;    
  119.         var WorkPhone = returnValue.WorkPhone;    
  120.     
  121.         var requestUri = _spPageContextInfo.webAbsoluteUrl +    
  122.                   "/_api/Web/Lists/getByTitle('Customers')/items/";    
  123.     
  124.         var requestHeaders = {    
  125.             "accept""application/json",    
  126.             "X-RequestDigest": $("#__REQUESTDIGEST").val(),    
  127.         }    
  128.     
  129.         var customerData = {                
  130.             Title: LastName,    
  131.             FirstName: FirstName,    
  132.             WorkPhone: WorkPhone    
  133.         };    
  134.     
  135.         requestBody = JSON.stringify(customerData);    
  136.     
  137.         $.ajax({    
  138.             url: requestUri,    
  139.             type: "Post",    
  140.             contentType: "application/json",    
  141.             headers: requestHeaders,    
  142.             data: requestBody,    
  143.             success: onSuccess,    
  144.             error: onError    
  145.         });    
  146.     }    
  147. }    
  148.     
  149. function onDeleteCustomer(customer) {    
  150.     
  151.     var requestUri = _spPageContextInfo.webAbsoluteUrl + "/_api/Web/Lists/getByTitle('Customers')/items(" + customer + ")";    
  152.     
  153.     var requestHeaders = {    
  154.         "accept""application/json",    
  155.         "X-RequestDigest": $("#__REQUESTDIGEST").val(),    
  156.         "If-Match""*"    
  157.     }    
  158.     
  159.     $.ajax({    
  160.         url: requestUri,    
  161.         type: "DELETE",    
  162.         contentType: "application/json",    
  163.         headers: requestHeaders,    
  164.         success: onSuccess,    
  165.         error: onError    
  166.     });    
  167. }    
  168.     
  169. function onUpdateCustomer(customer) {        
  170.        
  171.     var executor = new SP.RequestExecutor(appweburl);    
  172.     var FullURL = appweburl + "/_api/web/lists/getbytitle('Customers')/items(" + customer + ")";    
  173.     
  174.     executor.executeAsync(    
  175.        {    
  176.            url: FullURL,    
  177.            method: "GET",    
  178.     
  179.            headers: {    
  180.                "accept""application/json;odata=verbose",    
  181.                "content-type""application/json;odata=verbose",    
  182.                "X-RequestDigest": $("#__REQUESTDIGEST").val()    
  183.            },    
  184.            success: onCustomerReturned,    
  185.            error: errorHandler    
  186.        }    
  187.    );    
  188. }    
  189.     
  190. function onCustomerReturned(data) {    
  191.     
  192.     var jsonObject = JSON.parse(data.body);     
  193.        
  194.     var dialogArgs = {    
  195.     
  196.         command:    "Update",    
  197.         Id:         jsonObject.d.Id,    
  198.         LastName:   jsonObject.d.Title,    
  199.         FirstName:  jsonObject.d.FirstName,    
  200.         WorkPhone:  jsonObject.d.WorkPhone,    
  201.         etag:       jsonObject.d.__metadata.etag    
  202.     };    
  203.     
  204.     var dialogOptions = {    
  205.         url: "EditCustomer.aspx",    
  206.         title: "Update Customer",    
  207.         width: "480px",    
  208.         args: dialogArgs,    
  209.         dialogReturnValueCallback: updateCustomer    
  210.     };    
  211.     
  212.     SP.UI.ModalDialog.showModalDialog(dialogOptions);    
  213. }    
  214.     
  215. function updateCustomer(dialogResult, returnValue) {    
  216.     
  217.     if (dialogResult == SP.UI.DialogResult.OK) {    
  218.     
  219.         var Id = returnValue.Id;    
  220.         var FirstName = returnValue.FirstName;    
  221.         var LastName = returnValue.LastName;    
  222.         var WorkPhone = returnValue.WorkPhone;    
  223.         var etag = returnValue.etag;    
  224.                   
  225.         var requestUri = appweburl + "/_api/web/lists/getbytitle('Customers')/items(" + Id + ")";    
  226.     
  227.         var requestHeaders = {    
  228.             "accept""application/json",    
  229.             "X-RequestDigest": $("#__REQUESTDIGEST").val(),    
  230.             "X-HTTP-Method""MERGE",    
  231.             "If-Match": etag    
  232.         }    
  233.     
  234.         var customerData = {               
  235.             Title: LastName,    
  236.             FirstName: FirstName,    
  237.             WorkPhone: WorkPhone    
  238.         };    
  239.     
  240.         requestBody = JSON.stringify(customerData);    
  241.             
  242.         $.ajax({    
  243.             url: requestUri,    
  244.             type: "POST",    
  245.             contentType: "application/json",    
  246.             headers: requestHeaders,    
  247.             data: requestBody,    
  248.             success: onSuccess,    
  249.             error: onError    
  250.         });    
  251.     }    
  252. }    
  253.     
  254. function onSuccess(data, request) {    
  255.     getCustomers();    
  256. }    
  257.     
  258. function onError(error) {    
  259.     $("#results").empty();    
  260.     $("#results").text("ADD ERROR: " + JSON.stringify(error));    
  261. }    
  262.     
  263. function getQueryStringParameter(paramToRetrieve) {    
  264.     
  265.     var strParams = "";    
  266.     var params = document.URL.split("?")[1].split("&");    
  267.     
  268.     for (var i = 0; i < params.length; i = i + 1) {    
  269.         var singleParam = params[i].split("=");    
  270.     
  271.         if (singleParam[0] == paramToRetrieve)    
  272.             return singleParam[1];    
  273.     }    
  274. }   
App.css
  1. .ms-siteicon-a {    
  2.   background-imageurl(images/SiteIcon.gif);    
  3.   background-repeatno-repeat;    
  4.   width75px;    
  5.   height75px;    
  6. }    
  7.     
  8. .ms-siteicon-img {    
  9.   displaynone;    
  10. }    
  11.     
  12. .ms-core-siteTitle span a {    
  13.   font-size18px;    
  14. }    
  15.    
  16. #customersTable {    
  17.   background-color#999;    
  18.   border-collapsecollapse;    
  19. }    
  20.    
  21. #customersTable thead td {    
  22.   background-color#333;    
  23.   color: White;    
  24. }    
  25.    
  26. #customersTable td {    
  27.   color#222;    
  28.   border1px black solid;    
  29.   padding4px;    
  30.   background-color: White;    
  31.   border-collapsecollapse;    
  32. }    
  33.    
  34. #resultsTable tr td {    
  35.   color#333;    
  36.   padding4px;    
  37.   border-collapsecollapse;    
  38.   border1px solid black;    
  39.   background-color: White;    
  40.     font-size32px;    
  41. }    
  42.    
  43.    
  44. #toolbar {    
  45.     margin4px;    
  46.     padding8px;    
  47.     background-color#ccc;    
  48. }    
  49.    
  50.    
  51. #results {    
  52.     padding8px;    
  53.     font-size12px;    
  54. }    
  55.    
  56. #results table {    
  57.   margin8px    
  58. }    
  59.    
  60. #results table, #results table td {    
  61.     border-collapsecollapse;    
  62.     border1px #444 solid;    
  63.     padding2px 8px 2px 4px;    
  64.     font-size20px;    
  65. }    
  66.    
  67. #results h2 {    
  68.     font-size18px;    
  69.     color#999;    
  70.     border-bottom1px solid #999;    
  71.     margin-top8px;    
  72.     margin-bottom4px;    
  73. }    
  74.     
  75. .ms-dialog #s4-ribbonrow {    
  76.   displaynone;    
  77. }    
  78.     
  79. .ms-dlgTitle {    
  80.   background-imageurl("images/logo16.gif");    
  81.   background-repeatno-repeat;    
  82.   background-position8px4px;    
  83.   background-colorblack;    
  84.   padding1px;    
  85. }    
  86.     
  87. h1.ms-dlgTitleText {    
  88.   margin-left28px;    
  89.   margin-top4px;    
  90. }    
  91.     
  92. .ms-dlgTitle h1 {    
  93.     font-size1.4em;    
  94.   color:  white;    
  95. }    
  96.    
  97. #dlgTitleBtns {    
  98.   margin-top4px;    
  99.   margin-right8px;    
  100. }    
  101.     
  102. .ms-dlgTitle {    
  103.     padding-bottom4px;    
  104.     padding-left8px;    
  105. }    
  106.     
  107. .ms-dlgTitle h1 {    
  108.     font-size1.8em;    
  109. }    
  110.     
  111.     
  112. .dialog_input_section {    
  113.     padding-top4px;    
  114. }    
  115.     
  116. .dialog_input_section_title {    
  117.     margin-top8px;    
  118.     colorblack;    
  119.     border-bottomsolid black 1px;    
  120.     margin-bottom8px;    
  121. }    
  122.     
  123. .dialog_button_section {    
  124.     margin-top16px;    
  125.     border-topsolid #CCC 2px;    
  126.     padding-top8px;    
  127.     text-alignright;    
  128. }    
  129.     
  130. .ms-dlgContent {    
  131.     padding-bottom2px;    
  132. }    
  133.     
  134.     
  135. .ms-dlgFrameContainer {    
  136.     padding-top4px;    
  137.     padding-left8px;    
  138.     padding-right8px;    
  139.     padding-bottom0px;    
  140. }   

Good URL:

1-http://www.dotnetcurry.com/sharepoint/1041/rest-apis-sharepoint-crud-database

2-http://ukreddysharepoint2010.blogspot.in/2015/01/how-to-crud-operation-in-sharepoint.html
3-http://blog.ch.atosconsulting.com/performing-rest-operations-on-host-webs-from-sharepoint-hosted-apps/