Search This Blog

Saturday, July 18, 2015

SharePoint 2013: How to create a custom Page Layout

With the new Designer Manager in SharePoint 2013 it is now much easier to create a custom Page Layout. In this blog article I ‘m providing a step by step pictorial guidance on how to create a simple custom Page Layout.
My prerequisites: I have created a site collection based on the template ‘Publishing Portal’ and installed SharePoint Designer 2013.
image
What I need is a simple Page Layout with two columns with different widths. These columns should be created as Web Part Zones to enable editors to place Web Parts on the page.
First I open the site settings and start the new Design Manager:
image
Because I want to create a custom Page Layout I click on ‘Edit Page Layouts’ …
image
… and create a new Page Layout (based on a predefined master page and the ‘Article Page’ content type):
image
It should take just a few seconds until SharePoint has created the new Page Layout.
image
OK - now let’s switch over to SharePoint Designer 2013. To find the newly created Page Layout I click on ‘All Files’ in the left navigation. Now I open the folder _catalogs and click on master page. I have marked the files of the newly created Page Layout with a red rectangle.
image
The newly created Page Layout consists of two files. Don’t touch the aspx-file! To create a custom Page Layout you only need to edit the html-file. SharePoint will create and update the aspx-file based on the changes in the associated html-file.
Let’s open the html-file to see what SharePoint has created. I check out the html-file and open it in Advanced Mode:
Now this is what you should see:
image
For this demo I have chosen the Article Page as the template for my new Page Layout - but I don’t want to keep most of the controls. So I scroll down to the area of the html-file where the page controls are defined.
image
The page controls are surrounded by <div> tags - so they should be pretty easy to find. Now I locate this line of code:
<!--MS:<asp:ContentPlaceHolder ID="PlaceHolderMain" runat="server">-->
and delete everything beginning from (but excluding) the line above until (excluding) this line:
<!--ME:</asp:ContentPlaceHolder>-->
In other words: I delete every line of code between these two (ContentPlaceHolder) lines (but I keep these lines).
With this deletion I have removed almost every page control and the newly created custom Page Layout file should look like this (I marked the deleted area with an empty red box):
image
Let’s see how this empty Page Layout looks like in SharePoint 2013. I save and check-in the html-file in SharePoint Designer 2013 and switch back to SharePoint 2013. Have look on the fifth screenshot again - here I click on the name of my newly created Page Layout and SharePoint 2013 opens this page:
image
Looks like a pretty empty page! To better check the changes in my custom Page Layout I create another page that uses my newly created custom Page Layout.
This is what the newly created page based on my custom Page Layout now looks like:
image
This page is empty in edit mode too, because I just removed all page controls. Now it’s time to add two Web Part zones..
I switch back to SharePoint Designer 2013 and open the html-file in Advanced Mode again. In the gap where I deleted the page controls before I now add a simple html table like this:
image
Just a simple table with one row and two columns (in other words: two parallel table cells). The first column should have a width of 80% and the second one should have a width of 20%. Both columns should be top-aligned.
The next step is: I need to add two Web Part Zones: one in each table’s column. I save the changes in SharePoint Designer 2013 and switch back to SharePoint’s Design Manager.
I open this page …
image
… and click on Snippets:
Now the Snippets Designer is shown and I click on Web Part Zone:
image
The Snippets Designer creates the HTML code for a new Web Part Zone and I can copy the HTML code snippet to the clipboard. You can customize some of the parameters of the Web Part Zone (or any other snippet) before copying the snippet to the clipboard. To edit parameters click on the greyed parameter names on the right.
image
Now I jump back to SharePoint Designer, open the html-file again and paste the snippet to the first table column. After that I switch back to the Snippets Designer and create another (a new - that’s important) Web Part Zone snippet with a new ID (!) and copy the snippet’s code to the second table column.
My html-file looks like this now:
image
Did you notice the doubled Page Title in the 10th screenshot? Doesn’t look very nice - that’s why  I remove the placeholder with the ID PlaceHolderPageTitleInTitleArea. I don’t want the page title here - for my demo the name of the aspx-file is sufficient. I save the changes in SharePoint Designer 2013 and check-in the html-file again.
Let’s see how the newly created Page Layout looks like now. I switch back to SharePoint 2013 and open the site with the newly created Demo Page … and hit F5 to refresh the page:
image
There are now two Web Part Zones with a different width and both are top-aligned! Just to prove that this Page Layout is working as expected I add some Web Parts to the two zones and publish the page:
image
That’s how I wanted the custom Page Layout to look like. If you want to create a more detailed Page Layout just have a look at the snippets. There are several useful snippets you can use in your own custom Page Layout by simply getting the HTML code of the snippet and pasting it to the custom Page Layout.
image
Compared to former version of SharePoint creating custom Page Layouts has been simplified very much. The new Design Manager in SharePoint 2013  (together with the Snippets) makes it easier to create custom Page Layouts. Use this blog article as a short introduction and feel free to experiment with Page Content Types, snippets and custom Page Layouts on your own.

Channels in SharePoint 2013


Channels are simple and cool. Channels are used to display website in different ways on different devices, phones, PCs, tablets...

SharePoint has one default channel and one master page to start with. If you, for example, add a new mobile channel, you can assign new mobile master page with different navigation and content to that channel. When the site is opened on a mobile phone, it will be displayed with mobile master page. This is a huge difference compared to SharePoint 2010 and altering browser definition file compat.browser in IIS to control mobile view of the site.


Top 5 things to know about Channels
1. Channels control which master page is used to show your site on for example iPhone or iPad. Channels are bound to master pages, and channels are bound to user agent string of device in use (phone, tablet or PC).
2. You can use Image Renditions with Channels  
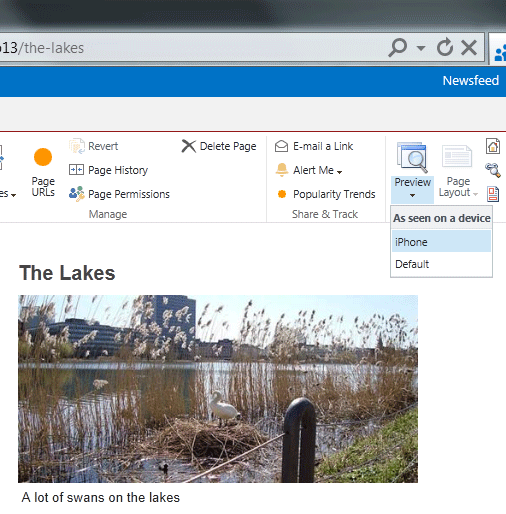
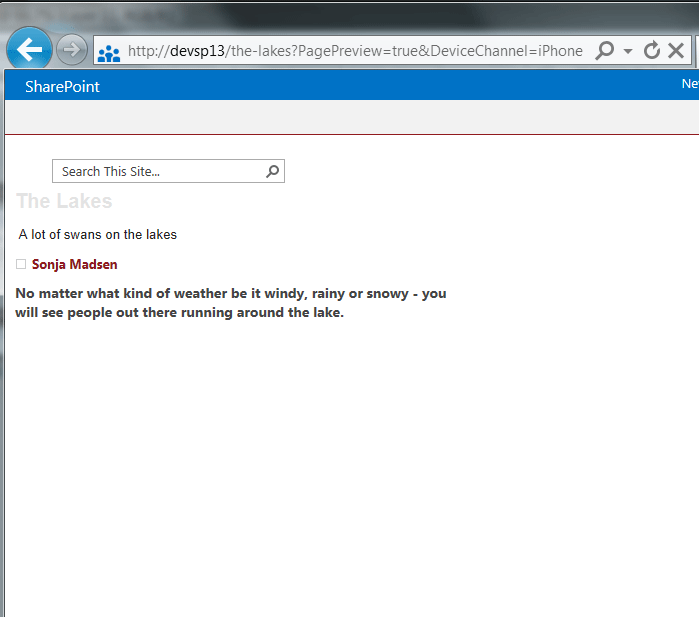
3. There is a Preview button in the Ribbon that you can use to preview the page in different channels. You  can also add “?PagePreview=true&DeviceChannel=<channel alias>” in URL to preview the page
4. Channels make use of user agent string to detect a device
5. You can use channel’s Alias value in JavaScript code

How it works
I configured my Internet Explorer to show how the page looks like on an iPhone device.
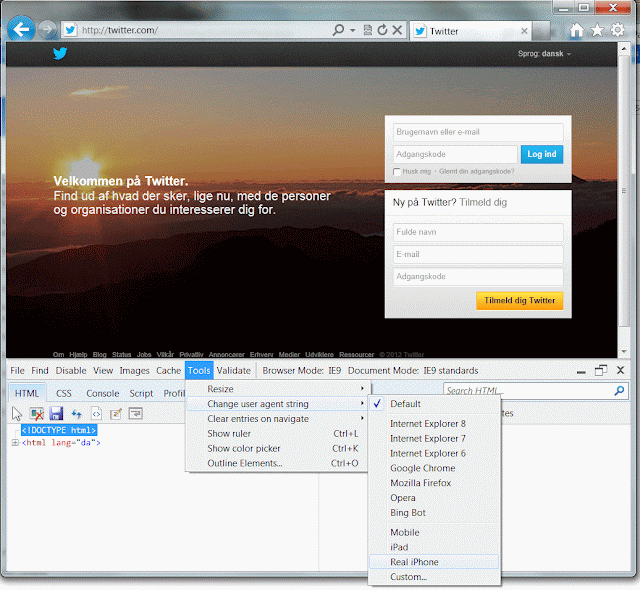
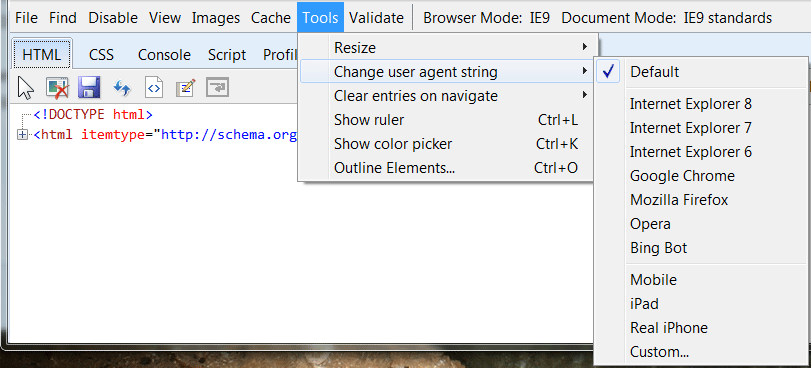
I opened my IE browser and pressed F12. I clicked on Tools, Change user agent string, and chose Custom...:
SharePoint 2013 Channels


I wrote the following:
Friendly name: Real iPhone
User Agent String: iPhone OS

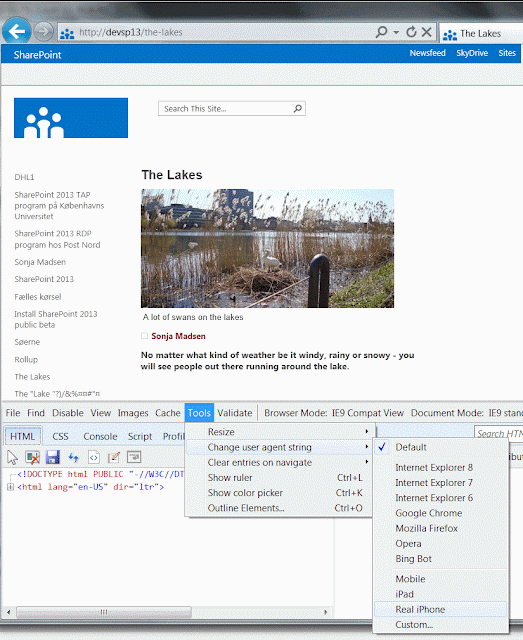
I opened Twitter and chose "Real iPhone" in Tools:
SharePoint 2013 Channels

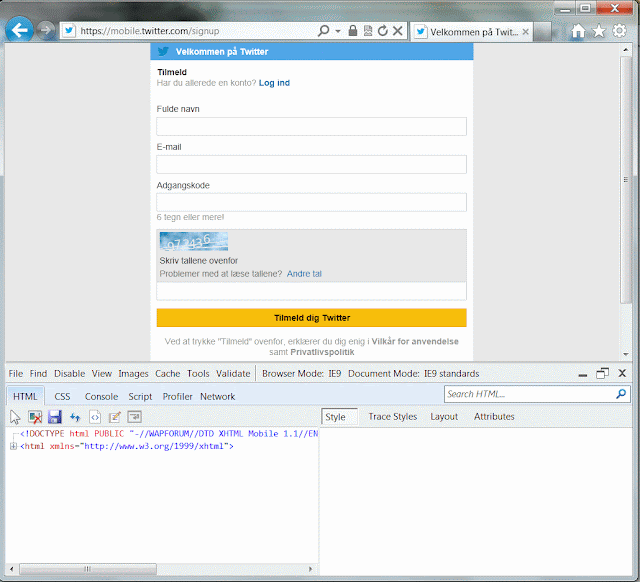
I also refreshed the browser, and I got this mobile edition of Twitter on my screen:
SharePoint 2013 Channels

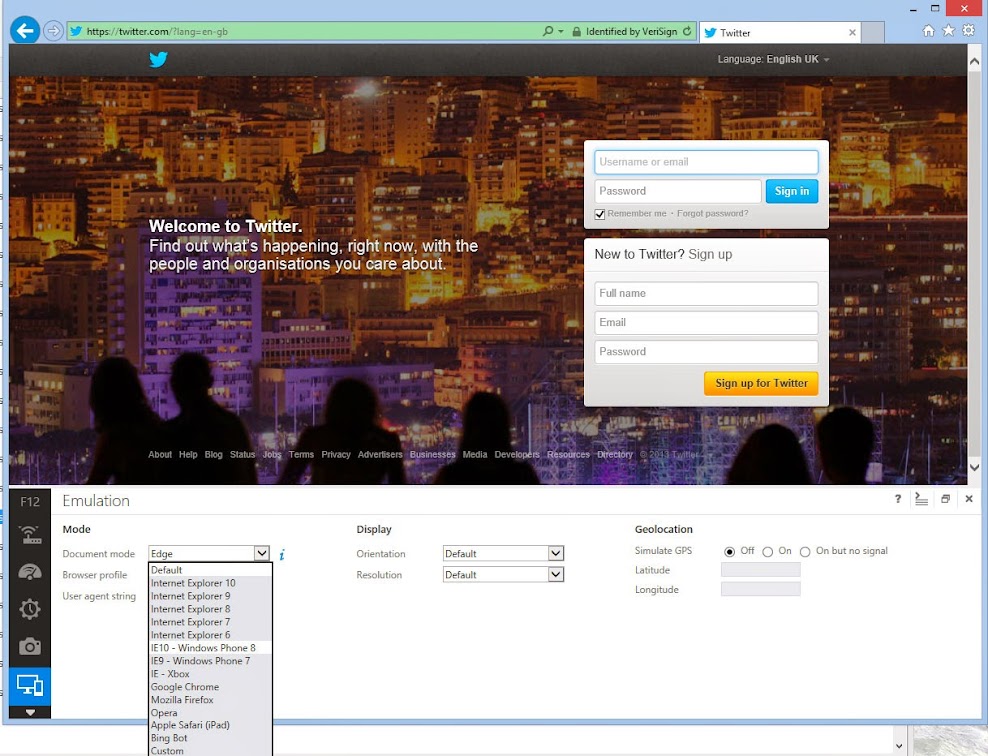
If you have IE11, press F12 and select Emulation:
SharePoint Channels

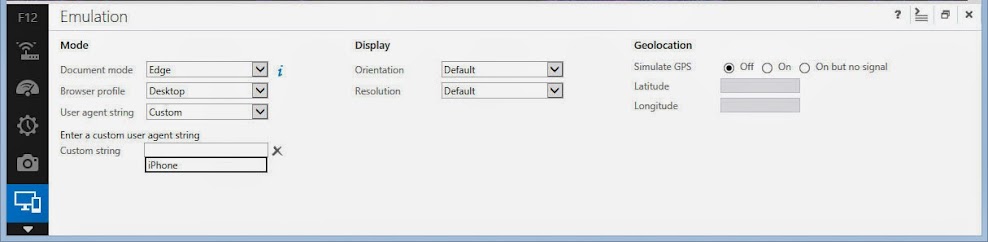
There is iPad, but no iPhone :-) I have to write a custom string here:
SharePoint Channels


In SharePoint 2013, I can do the same. I opened a page and chose "Real iPhone":
SharePoint 2013 Channels

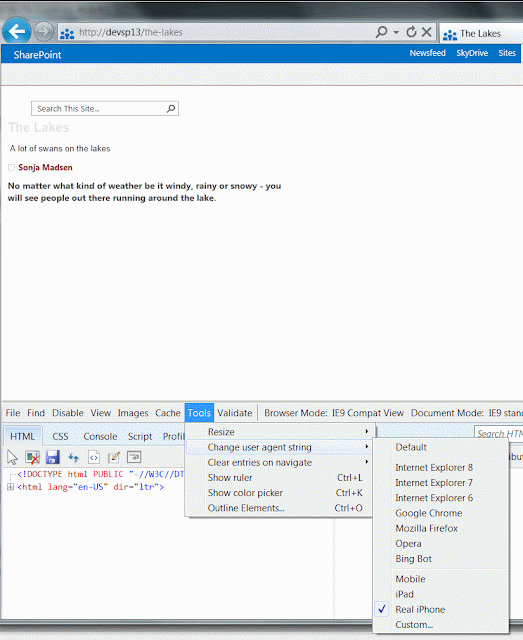
I refreshed the browser and got this page:

SharePoint 2013 Channels

It is not magic. It is out-of-box SharePoint 2013 Channels functionality.


I simply defined "iPhone" channel on my SharePoint 2013 site.
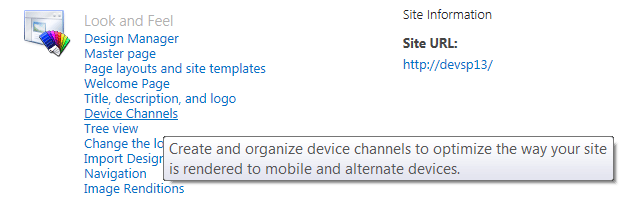
There is a link "Device Channels" in Site Settings, right under Look and Feel:
SharePoint 2013 Channels


Device Channels page is a list that allows you to add and manage channels:


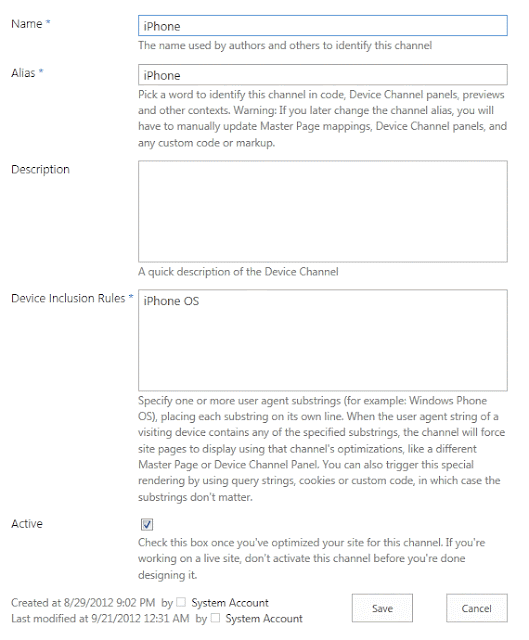
The Default channel is already there when you create a site. I defined the name, alias and Device Inclusion rules for iPhone channel:
SharePoint 2013 Channels
The text defined in Device Inclusion Rules is the same text that is defined as User Agent String in my IE browser. 

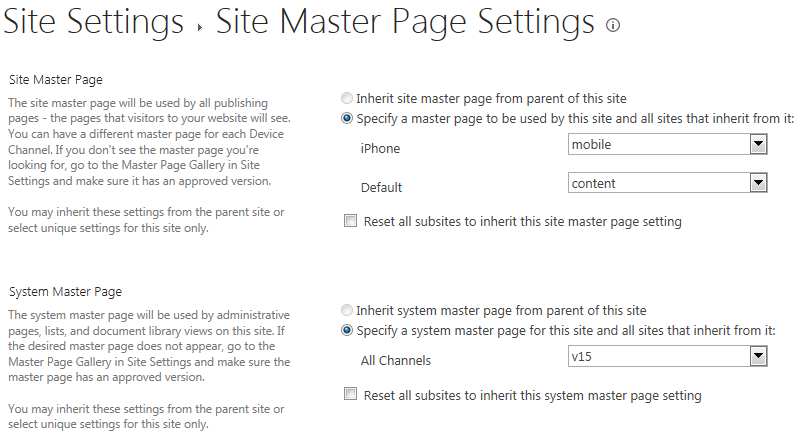
Next step is to assign a master page to iPhone channel.

I made new master page and called it mobile.master. I clicked on Master page link in Site Settings and set my iPhone channel to use mobile master page:
SharePoint 2013 Channels


I described how I made mobile master page in my post about SharePoint 2013 Mobile.

The IE browser thing with user agent string that I just did is not the only way to view how your page will be displayed on mobile devices. There is a "Preview" button in the Ribbon with drop-down list of channels:
SharePoint 2013 Channels 

You can also add "?PagePreview=true&DeviceChannel=iPhone" to URL address and get the same result:

SharePoint 2013 Channels
It means that you don’t have to target a different device with a channel. You can create a channel and assign a master page that contains different content than the content, displayed to all users. You can control when this content will be displayed by adding a parameter "?PagePreview=true&DeviceChannel=Special" in browser URL.

Target all mobile devices with a Device Channel
Create new Device Channel and write $FallbackMobileUserAgents;  in Device Inclusion Rules field.

SharePoint Device Channels are great, and I warmly recommend using them to, for example, define another top menu or another left menu in the master page for mobile channel. Here is an example of a SharePoint site that has responsive page layouts and no channels. It is video of ResponsivePages app that is available at Office Store:


SharePoint 2013- Simple App vs Classic Solution

In SharePoint 2013, developers have a choice to either develop apps for SharePoint or write SharePoint Solutions. To make an objective assessment we will see the differences in the key parameters that will help developers to make the right choice.
ParametersSharePoint AppClassic SharePoint Solution
Type of Application
Custom server-side code is not allowed in an app for SharePoint. A Solution requiring calling APIs of the SharePoint Object Model that requires access to the SharePoint Server cannot be built in the app model.
Apps for SharePoint use one of the SharePoint client object models, OData or REST endpoints to access SharePoint content and components.
 
Custom server-side code is allowed in this type of solution.
Some parts of the SharePoint object model, mainly connected with customizing SharePoint administration, management, configuration and security, are not accessible from clients. Only custom code running on the SharePoint server can access them. For extensions of Central Administration, custom Windows PowerShell commands, timer jobs, custom backups.
 
Application ScopeWeb Scope.Could be any of the scopes Farm, Web Application, Site-Collection or Web.
Run Time ScopeCode runs when a user is viewing a SharePoint page in the browser.Code can be scheduled to run.
External Data Access
You can create apps that access external data from SAP, Netflix, proprietary and other types of data without involving the administrator.
App-scoped external content types provide access to external data within an app.
 
To install and use external content types at the farm level an administrator has to be involved because of the access rights that are needed to install at the farm level.
Device on which code runsServer in the cloud, Client Computer, Mobile device.Server in the SharePoint Farm.
Interfaces AvailableSharePoint Client OM, JavaScript OM, REST/OData endpoints.SharePoint Server OM, JavaScript OM, REST/OData endpoints.
Size of applicationSmall and easy to use solutions for end users; since apps are restricted architecturally because of limited scope and APIs.Big; because of flexible architecture, scope and APIs are allowed.
LicensingThe licensing framework for apps for Office and SharePoint provide a way to include code in your apps to verify and enforce their legal use.These solutions are distributed as features or reusable solutions. There is no framework to enforce valid licenses.
Marketing and SalesDevelopers / Enterprises can now easily market their apps through the Microsoft App Store.A lot of money and time was spent in marketing and sales.
Development Language FamiliarityJavaScript is highly used in apps. An expert level of comfort is required with this language.If the development team is unfamiliar with JavaScript or prefer strongly-typing then they would go for development in a SharePoint Server OM.

Workflow Changes in SharePoint 2013


SharePoint 2013

SharePoint 2010
.Net Version
Version 4.0

Version 3.5

Hosting Engine
Workflows are hosted outside of SharePoint.  Windows Azure Workflow (WAW) is an installable product and can be hosted on an on-premise SharePoint farm. Workflow is now run as a separate service. Communication of workflows with SharePoint will happen via REST / CSOM or OAuth. Workflow architecture is shown in Figure 1 below.


SharePoint 2010 hosted the workflow runtime.

  SharePoint 2013 workflow architecture.png

Figure 
1: Workflow Architecture in SharePoint 2013

Workflow Data Storage
Workflow definitions reside within SharePoint and the actual workflow is stored on Windows Azure.

Workflow Data is stored in Content database.

Execution Context
Workflows run in the context of Azure workflow.

Workflows executed in the context of super user.

Deployment
Can be deployed On-Premise or in a hosted environment. You can have a dedicated workflow farm for large deployments.

On-Premise deployment. To deploy in a sandbox environment we need to write a full trust proxy.

Analytics
Analysis is very much improved for information related to workflows.

Analysis on the number of instances of workflows running, last run by and last run date are hard to acquire.
Performance
Since workflows are decoupled from SharePoint runtime it provides better stability, scalability and transparency.


Issues with scale and large deployments
Types of Workflows
Two types of workflows, SharePoint 2010 (Workflows hosted by SharePoint)and SharePoint 2013 (Workflows hosted by Windows Azure) as shown in Figure 2 below. New 15 workflow actions with Windows Azure Workflow . 

Workflow Foundation 3.5 hosted by SharePoint 2010


Workflow Options in SharePoint 2013.png
                   Figure 2: Workflow Platform Types

Changes for developers
Workflow Manager Client 1.0 is a redesigned workflow infrastructure that is built on Windows Workflow Foundation 4 and brings new power and flexibility to workflow authoring in SharePoint 2013. Developers can perform declaratively all of the actions as mentioned in the right hand for SharePoint 2010 by using services. SharePoint designer is significantly improved and many features that makes a developer's life easier like copy paste, undo, redo.
A new data type called DynamicValue is being introduced to capture run time dynamic values.

Write code for:
  • Calling SharePoint API
  • Connect and Query Database
  • Consume ATOM/REST Feeds
  • Call Web Services/REST Services

Visio Designer
Visio Designer is integrated into SharePoint designer,


Create in Visio and Export to SharePoint Designer.
General Improvements
  • Introduction of "Stages":
    • Mitigates SharePoint Designer's lack of loop support
    • Provides functionality of "state machine" workflows in WF 3.5
  • Declarative workflows have loops:
    •  Loop # times / with condition / with expression
  • Declarative workflows can call REST/SOAP services 


Workflows for SharePoint Apps
Visual Studio can be used to build workflows for SharePoint Apps whereas SharePoint Designer workflows cannot be used to build Apps. 
Since workflows execute in the cloud and not in SharePoint it provides enormous flexibility in designing workflow-based apps for SharePoint.

 Workflows execute in SharePoint hence it is difficult to protect the intellectual rights that goes into building apps.
Packaging
*.wsp or *.app

*.wsp


How to Configure Search Centre in SharePoint 2013

In this article we learn how to configure People search in SharePoint 2013. The Enterprise Search Center in SharePoint 2013 searches nearly everything SharePoint crawls. That is the reason why its search results are labeled "Everything". But for specialized data or scenarios, we often want a specialized search experience to match. For example, "People" takes you to People Search, that returns only People results, displays them differently, and responds intelligently to certain people-related queries such as searches for a phone number. The FAST search technology, acquired by Microsoft in 2008, is at the heart of SharePoint 2013 Technologies and ideas from Bing and elsewhere have been added to the mix to provide a comprehensive set of enterprise search capabilities, with plenty of room for customization. It includes a rules-based query parsing framework. Pricing has not yet been formally announced, but it is generally assumed that this search functionality will be a standard part of SharePoint 2013.

SharePoint Search Center site
  1. Verify that the user account that is performing this procedure is a member of the Farm Administrators group.
  2. On the home page of the Central Administration website, in the Application Management section, click Create site collections.
  3. On the Create Site Collection page, do the following:
    • In the Web Application section, select a web application to contain the new site collection. To use a web application other than the one that is displayed, click the web application that is displayed, and then click Change Web Application.
    • In the Title and Description section, in the Title box, type the name for the new Search Center site. Optionally, type a description in the Description box.
    • In the Web Site Address section, for the part of the URL immediately after the web application address, select /sites/, or select a managed path that was previously defined, and then type the final part of the URL.

      SharePoint-Search-Center-site.jpg


    • In the Template Selection section, do the following:
      • In the Select the experience version drop-down list, select 2013 to create a Search Center site that provides the SharePoint Server 2013 user experience, or select 2010 to create a Search Center site that provides the SharePoint 2010 Products user experience.
      • In the Select a template subsection, click the Enterprise tab, and then do one of the following:
      • If you are using SharePoint Foundation 2013, select the Basic Search Center template.
      • Otherwise, if you are using SharePoint Server 2013, select the Enterprise Search Center template.
     
  4. In the Primary Site Collection Administrator section, in the User name box, type the user name of the primary site collection administrator for this site collection in the form domain\user name.
  5. In the Secondary Site Collection Administrator section, type the user name of a secondary site collection administrator in the form domain\user name.
  6. In the Quota Template section, select No Quota.
  7. A Search Center site is not intended to be a data repository. Therefore, you do not have to select a quota template.
  8. Click OK.
  9. On the Top-Level Site Successfully Created page, click the link to the Search Center site that you created.

    Created-Search-Center-site.jpg
     
  10. After you create the Search Center site, you must grant site access to users so that they can perform search queries and view search results. Use the following procedure to grant site access to users.
To grant access to the SharePoint Search Center
Use the following to grant access to the SharePoint Search Center:
    In a web browser, go to the Search Center site.

    grant-access-to-the-SharePoint-Search-Center.jpg
     
  1. Verify that the user account that is performing this procedure is a member of the Owners group on the Search Center site.
  2. Open the Site menu by clicking the gear icon in the upper-right portion of the page, and then click Site Permissions.

    Sharepoint-Site-Permissions.jpg
     
  3. In the Shared with dialog box, click Invite people.

    Shared-with-dialog-box.jpg
     
  4. In the Share <SearchCenterName> dialog box, in the Enter users separated with semicolons text box, type the names of the Windows user groups and Windows users to whom you want to grant permissions for submitting queries and viewing search results in the Search Center.

    Share-SearchCenterName.jpg
     
  5. For example, to grant access to the Search Center to all Windows users, type NT Authority\authenticated users.
  6. Click Show options.
  7. Clear the Send an email invitation check box.
  8. In the Select a group or permission level drop-down list, select <SearchCenterName> Visitors [Read].
  9. Click Share.