Search This Blog

Sunday, January 15, 2023

DYNAMICS 365 HOW TO SHOW HIDE FORM HEADER AND FOOTER

Some of you know that it is possible to show/hide the header and footer of the form using Client API.


Sometimes, you need to have more space to show additional data on the form or the client simply request to hide some parts of the header. Here comes the utility of hiding the header or footer elements of the form.

The header is divided into three parts : Command barBody, and Tab navigator as per the following.

Form header/footer

In order to dynamically control the visibility of each part, you can call the following functions:
  1. Header command bar visibility
    • Hide : formContext.ui.headerSection.setCommandBarVisible(false);
    • Show : formContext.ui.headerSection.setCommandBarVisible(true);
    Header command bar visibility

  2. Header body visibility
    • Hide : formContext.ui.headerSection.setBodyVisible(false);
    • Show : formContext.ui.headerSection.setBodyVisible(true);
    Header body visibility

  3. Header tab navigator visibility
    • Hide : formContext.ui.headerSection.setTabNavigatorVisible(false);
    • Show : formContext.ui.headerSection.setTabNavigatorVisible(true);
    Header tab navigator visibility

As for the footer, it is composed of one element and its visibility can be managed by calling the following functions:
  • Footer visibility
    • Hide : formContext.ui.footerSection.setVisible(false);
    • Show : formContext.ui.footerSection.setVisible(true);
    Footer visibility

Bonus Tip:
You can return the visibility of each element by calling the functions getCommandBarVisible()getBodyVisible(), and getTabNavigatorVisible() for the header parts, and getVisible() for the footer.


For more user experience and enhancements ideas, you can check this link for some custom controls that can be used like:

DYNAMICS 365 HOW TO SHOW GLOBAL NOTIFICATION FROM ENTITY VIEW


I will show you how to display a notification from any entity view instead of the form level.

For example, if you want to show the number of pending tasks to the user or the number of opened opportunities that should be closed and maybe allow the user to click the action button and be redirected to the appropriate screen.

Let's see how!
  1. First, create a new solution and add the Application ribbon component in it
  2. From the Ribbon Workbench, open the solution
  3. Scroll to the right, and add a new button under the Home menu in Mscrm.HomepageGrid.{!EntityLogicalName}.MainTab section
    Show global notification

  4. Create the command for the button as per the below image Show global notification 2

  5. Add an Enable rule with a Custom rule for the command as per the below image Show global notification 3

  6. Once done, publish your changes and open the model-driven app. The button will be added to all the entity views but it will not appear. However, the function you called in the custom JavaScript rule will be executed and will display the global notification
  7. Finally, I will put the sample code of the previous post to show a global notification message, where you can change it in order to do display the message and do the proper action based on your needs

    function showGlobalNotif(context) {
    var formContext = context.getFormContext();
    // define action properties
    var objAction =
    {
    actionLabel: "Click to do something",
    eventHandler: function () {
    Xrm.Navigation.openUrl("https://docs.microsoft.com/en-us/");
    // perform other operations as required on clicking
    }
    };

    // define notification properties
    var objNotification =
    {
    type: 2,
    level: 4, // 1: Success, 2: Error, 3: Warning, 4: Information
    message: "This is an Information global notification text.",
    showCloseButton : true,
    action: objAction
    };

    Xrm.App.addGlobalNotification(objNotification).then(
    function success(result) {
    // add code on notification display
    },
    function (error) {
    // add code to handle error
    }
    );
    }

DYNAMICS 365 HOW TO SHOW GLOBAL NOTIFICATION IN MODEL DRIVEN APP


The function setFormNotification() is used to display a notification message as information, warning or error message on the form and it lives within the form itself. Once you navigate outside the form, the notification will be gone.

In other post, I described how to show a global notification from an entity view.

However, in this post, I will show you how to display a global notification that will be displayed across the Model driven App and not limited to the form.

To do this, you can use the function Xrm.App.addGlobalNotification(objNotification).then(success,error) that will display a warning, error, informational, or success message. In addition, it will give the user the possibility to close the notification and perform a specific action that will be executed based on the notification.

To implement this, you can call the function that displays the global notification from a form event or from a ribbon button
  1. Open the form properties and go to Events
  2. Add the JavaScript library that contains the function you want to call
  3. Add the event handler against the onLoad, onSave, or onChange field event on which the global notification will be shown
  4. In the event, specify the function that will be triggered and based on your code, it will display the global notification
  5. The below code will display a global notification with its different options that you can set
    function showGlobalNotification(context) {
    var formContext = context.getFormContext();
    // define action properties
    var objAction =
    {
    actionLabel: "Click to do something",
    eventHandler: function () {
    Xrm.Navigation.openUrl("https://docs.microsoft.com/en-us/");
    // perform other operations as required on clicking
    }
    };

    // define notification properties
    var objNotification =
    {
    type: 2,
    level: 4, // 1: Success, 2: Error, 3: Warning, 4: Information
    message: "This is an Information global notification text.",
    showCloseButton : true,
    action: objAction
    };

    Xrm.App.addGlobalNotification(objNotification).then(
    function success(result) {
    // add code on notification display
    },
    function (error) {
    // add code to handle error
    }
    );
    }

The result will be as follows based on the notification level
Global notification with information message
global notification information

Global notification with success message
global notification success

Global notification with error message
global notification error

Global notification with warning message
global notification warning

Below is a summary of the notification properties:
  1. type: currently only the 2 is supported that will display a notification on the top of the app
  2. level: number that will define the notification level
    • Success
    • Error
    • Warning
    • Information
  3. message: the text message that will be displayed in the notification
  4. showCloseButton: true/false. That will define if the user can close the notification or not
  5. action: will contain 2 properties actionLabel and eventHandler. When defined, a button inside the notification bar will be displayed and once clicked, the code written in the evenHandler property will be executed
You can check this docs link for more details about the global notification.

Bonus Tips:
  • The globalnotification will remain displayed until the user closes it manually or the function Xrm.App.clearGlobalNotification(objNotification).then(success,error) is called
  • Pay attention if on click of the button, you want to accomplish something on the form like setting a field, and since the notification will persist in other areas as well, the form context won't be available in this case, and you have to do additional checking to avoid any error
  • If the action property is set to null, no button will be displayed
  • The showCloseButton property is by default set to false

DYNAMICS 365 Confirmation/Alert/Error/FORM NOTIFICATION AND FIELD NOTIFICATION Dialog in JAVASCRIPT


ERROR DIALOG IN DYNAMICS 365 JAVASCRIPT

we will see how to display an Error Dialog in Dynamics 365 using JavaScript and what are the different properties that can be set.

The error dialog will be used to display an error message on the form

  1. errorOptions
    Contains the different dialog display properties:
    • details
      Contains details about the error. If specified, the user will be able to click the button Download Log File to download a text file that contains the message specified in this option
    • errorCode
      If you want to show specific error, you can put the code of the error that will be displayed in the error dialog. A default message will be displayed if the code is not valid
    • message
      Contains the value of the message that will be displayed in the error dialog
  2. successCallback
    This function will be called when the alert dialog is closed
  3. errorCallback
    This function will be called if the operation fails

The below code is a sample on how to use and display an Error Dialog

function displayErrorDialog(context) {
var errorOptions = {
errorCode: 1234,
details: "The details that will be in the content of the downloaded log file",
message: "This is the error dialog message!"
};
Xrm.Navigation.openErrorDialog(errorOptions).then(
function (success) {
// Do something here
},
function (error) {
// Do something here
}
);
}

ALERT DIALOG IN DYNAMICS 365 JAVASCRIPT

we will see how to display an Alert Dialog in Dynamics 365 using JavaScript and what are the different properties that can be set.

The alert dialog will be used to display an alert dialog containing a message and a button

  1. alertStrings
    Contains the different dialog display properties:
    • confirmButtonLabel
      Contains the value that will be displayed for the alert button in the alert dialog. By default it is set to Ok.
    • title
      Contains the value of the Title that will be displayed in the alert dialog
    • text
      Contains the value of the message that will be displayed in the alert dialog
  2. alertOptions
    Contains the pixels values for the width and height options of the alert dialog
  3. successCallback
    This function will be called when the alert dialog is closed
  4. errorCallback
    This function will be called if the operation fails

The below code is a sample on how to use and display an Alert Dialog

function displayAlertDialog(context) {
var alertStrings = {
confirmButtonLabel: "Confirm button label",
title: "This is an alert dialog title",
text: "This is an alert dialog message!"
};
var alertOptions = { height: 120, width: 260 };
Xrm.Navigation.openAlertDialog(alertStrings, alertOptions).then(
function (success) {
// Do something here
},
function (error) {
console.log(error.message);
}
);
}

CONFIRM DIALOG IN DYNAMICS 365 JAVASCRIPT

we will see how to display a Confirm Dialog in Dynamics 365 using JavaScript and what are the different properties that can be set.

The confirm dialog will be used to display a confirmation dialog containing a message and two button. This dialog will have the below different options

  1. confirmStrings
    Contains the different dialog display properties:
    • confirmButtonLabel
      Contains the value that will be displayed for the confirm button in the confirmation dialog. By default it is set to Ok.
    • cancelButtonLabel
      Contains the value that will be displayed for the cancel button. By default it is set to Cancel.
    • title
      Contains the value of the Title that will be displayed in the confirmation dialog
    • subtitle
      Contains the value of the Subtitle that will be displayed in the confirmation dialog
    • text
      Contains the value of the message that will be displayed in the confirmation dialog
  2. confirmOptions
    Contains the pixels values for the width and height options of the confirmation dialog
  3. successCallback
    This function will be called when the confirm button, cancel button, or X button of the dialog is clicked. An attribute named confirmed (Boolean) is passed that indicates whether the confirm button was clicked or not.
  4. errorCallback
    This function will be called if the operation fails

The below code is a sample on how to use the function openConfirmDialog and display a Confirm Dialog

function displayConfirmDialog(context) {
var formContext = context.getFormContext();
var dialogText = {
confirmButtonLabel: "Confirm button label",
cancelButtonLabel: "Cancel button Label",
title: "This is a Confirm dialog title",
subtitle: "This is a dialog subtitle",
text: "This is a Confirm dialog text message!"
};
var dialogOptions = { height: 200, width: 450 };
Xrm.Navigation.openConfirmDialog(dialogText, dialogOptions).then(
function (success) {
if (success.confirmed)
// Do something here
else
// Do something else here
},
function (error) {
console.log(error.message);
});
}


DYNAMICS 365 FORM NOTIFICATION AND FIELD NOTIFICATION

In Dynamics 365 form, you can display two types of notifications: Form Notifications and Field Notifications.

In this article, we will see how to display Form Notifications and Field Notifications within an entity form using JavaScript.

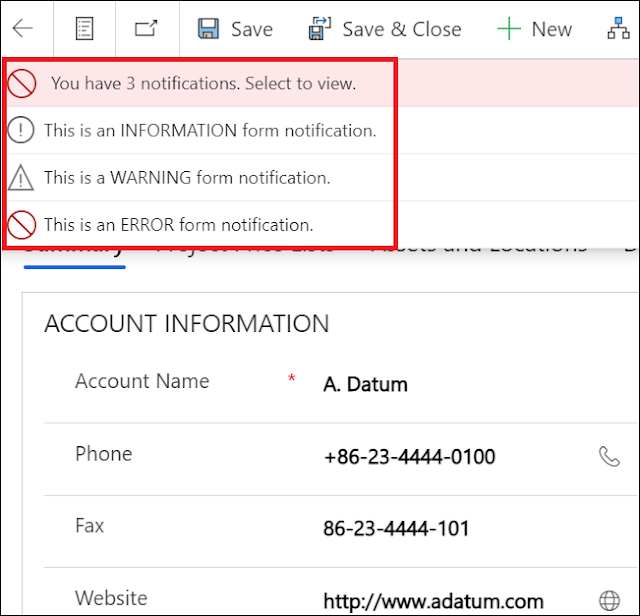
  1. The form notification will be displayed on top of the form and the setFormNotification function is used to display form level notifications

    function displayFormNotification(context) {
    var formContext = context.getFormContext();
    formContext.ui.setFormNotification("This is an INFORMATION form notification.", "INFO", "InformationNotificationId");
    formContext.ui.setFormNotification("This is a WARNING form notification.", "WARNING", "WarningNotificationId");
    formContext.ui.setFormNotification("This is an ERROR form notification.", "ERROR", "ErrorNotificationId");
    }


    We have three level of form notification:
    • INFO: It displays information notification message to the user with system info icon
    • WARNING: It displays warning notification message to the user with system warning icon
    • ERROR: It displays error notification message to the user with system warning icon

    Form notification

  2. The field notification will be displayed on the field and the setNotification function is used to display field level notifications

    function displayFieldNotification(context) {
    var formContext = context.getFormContext();
    formContext.getControl("name").setNotification("This is a field message notification.", "FieldNotificationId");
    }

    Field notification

Bonus Tips:
  • To remove form notification, you have to use the function clearFormNotification function formContext.ui.clearFormNotification("uniqueId"); with the Notification Id you want to remove
  • To remove field notification, you have to use the function clearNotification function formContext.getControl("fieldLogicalName").clearNotification("uniqueId"); with the Notification Id you want to remove

GET THE WEB API URL FOR A DYNAMICS 365 ORGANIZATION

 we will see how to get the Web API URL for the Dynamics 365 organization.

  1. Go to Settings > Customizations > Developer Resources
  2. In the Service Root URL, you will find the API URL


  3. You can copy this URL and paste it into a browser to get its result
    Web API URL 2

  4. Based on your needs, you can get and use the WebAPI URL in JavaScript using the following line of code formContext.context.getClientUrl() + "/api/data/v9.2/

GET THE SIZE OF TABLES IN DYNAMICS 365 / DATAVERSE ENVIRONMENT

Data size is continuously growing over the time. Thus, data storage and usage with the increasing complexity and new supported data types, is becoming an essential tool for the organizations to be able to expand their business.


Therefore, knowing the data volume becomes very critical and in Dataverse, you are able to check the space reserved by each table.

In this post, we will see how to get the size of Dynamics 365 / Dataverse tables for an environment.

Using the Capacity page in the Power Platform Admin Center, you can get the size of each table (in MB).
  1. Login to Power Platform admin Center
  2. Under the Resources menu, click the Capacity option
    Tables size 1

  3. Select the Dataverse tab, or click on the Trial tab to check the environments
    Tables size 2

  4. Click the Details (graph) button for the specific environment to open a detailed report of Usages for Database Usage, File Usage, and Log Usage
    Tables size 6

  5. To check the size of each table, from the Top database capacity use, by table section, click the burger menu > Download all tables option
    Tables size 3

  6. A CSV file will be downloaded where you can check the size for each table sorted by the highest space usage in MB
    Tables size 7

  7. This report can give you some insights in case you are facing some performance issues in your environment where it might be related to the tables size

DYNAMICS 365 HOW TO REFRESH SUBGRID IN JAVASCRIPT

 we will see how to refresh a subgrid in JavaScript in order to show the latest records related to a parent record upon an action on the form or clicking a ribbon button.


For the sake of this post, I will take the example of the cases subgrid related to an account record.

Refresh subgrid in JavaScript

Let's take the scenario, where an action is done on the client side that adds a case related to the account record. Therefore, the sub-grid should be automatically refreshed to reflect the updated list of cases.

In order to do this, a JavaScript function should call the refresh() in order to refresh the subgrid and display the expected result.

function refreshSubGrid(context) {
var formContext = context.getFormContext();
var subgrid = formContext.ui.controls.get("cases"); //Put the appropriate sub-grid name
subgrid.refresh();
}


Refresh subgrid in JavaScript 2

In case you are opening a web resource where you need to refresh the sub-grid, you can use the parent.Xrm.Page.ui.controls.get("cases").refresh(); or the form context as detailed in this post.

References:


CONVERT QUERYEXPRESSION TO FETCHXML AND VICE-VERSA IN DYNAMICS 365

we will see how to convert Query Expression to FetchXML and how to convert FetchXML to Query Expression in Dynamics 365.

  1. QUERY EXPRESSION TO FECTH XML
    The below function can be used to convert a Query Expression into Fetch Xml query

    public void ConvertQueryExpressionToFetchXml()
    {
    List<Account> lstAccounts = new List<Account>();
    QueryExpression qeQuery = new QueryExpression(Account.EntityLogicalName)
    {
    ColumnSet = new ColumnSet(Account.Fields.Id),
    Criteria = new FilterExpression()
    {
    FilterOperator = LogicalOperator.And,
    Conditions =
    {
    new ConditionExpression(Account.Fields.StateCode, ConditionOperator.Equal, (int)AccountState.Active),
    }
    },
    };
    var qeToFetchXmlRequest = new QueryExpressionToFetchXmlRequest
    {
    Query = qeQuery
    };
    var qeToFetchXmlResponse = (QueryExpressionToFetchXmlResponse)AdminService.Execute(qeToFetchXmlRequest);
    var fetchXml = qeToFetchXmlResponse.FetchXml;
    }

    Query expression to fetch xml

  2. FETCH XML TO QUERY EXPRESSION
    The below function can be used to convert a Fetch Xml query into a Query Expression

    public void ConvertFetchXmlToQueryExpression()
    {
    List<Account> lstAccounts = new List<Account>();
    FetchExpression feQuery = new FetchExpression();
    feQuery.Query = @"<fetch version='1.0' output-format='xml-platform' mapping='logical' distinct='false'>
    <entity name='account'>
    <attribute name='name' />
    <attribute name='primarycontactid' />
    <attribute name='telephone1' />
    <attribute name='accountid' />
    <order attribute='name' descending='false' />
    <filter type='and'>
    <condition attribute='statecode' operator='eq' value='0' />
    </filter>
    </entity>
    </fetch>";
    var feToQueryExpressionRequest = new FetchXmlToQueryExpressionRequest
    {
    FetchXml = feQuery.Query
    };
    var feToQueryExpressionResponse = (FetchXmlToQueryExpressionResponse)AdminService.Execute(feToQueryExpressionRequest);
    var queryExpression = feToQueryExpressionResponse.Query;
    }

    Fetch xml to Query expression

SELECT ALL OPTIONS OF MULTISELECT OPTION SET (CHOICES) FIELD IN DYNAMICS 365


Multiselect or Choices field type has some limitations when working with them. One of these limitations is to select all the options by default.

Since the multiselect fields cannot be used in business rules, therefore, you have to go with JavaScript to achieve this need.

For this post, we will see how to select all options of a Multiselect / Choices field in Dynamics 365.

  1. The below code snippet will get all the available options in the multiselect field and will select them all
    // Select all the options in the multiselection field on create form
    function setMultiselectDefaultValues(context) {
    var formContext = context.getFormContext();
    if (formContext.ui.getFormType() === 1) {
    var options = formContext.getAttribute("cak_multiselectoptionfieldcode").getOptions(); // Get all the available options
    var selectOptions = [];
    for (var i = 0; i < options.length; i++) {
    selectOptions.push(options[i].value); // Add the options into an array
    }
    formContext.getAttribute("cak_multiselectoptionfieldcode").setValue(selectOptions);
    }
    }


    Multiselect options
  2. Create your JavaScript web resource and add it to the needed solution
  3. From the form onLoad event, call the specific function

DISABLE SECURITY DEFAULTS FOR DYNAMICS 365 ENVIRONMENT


When creating a Dynamics 365 Trial environment, each time you want to login, you will be promted by a security message.
disable security 1

Security Defaults are a series of settings enabled by default on your Microsoft Office 365 account, to provide better security where every user is required to log in using Multi-Factor Authentication (MFA).

To know more information about the Security Defaults, check Microsoft's documentation.

In this post, we will see how to disable Security Defaults message when logging in.

You can change the security defaults from Office 365 Admin center or from the Azure Portal
  1. Log into your Office 365 management area > Admin > Azure Active Directory or from the Azure portal > Azure Active Directory
  2. Under Azure Active Directory, click Properties and then Manage Security Defaults
    disable security 2

  3. In the right pane, select No for Enable security defaults, and click Save
    disable security 3

  4. A Success message will appear indicating that Security Defaults changes have been saved
    disable security 4

  5. Click Save again to publish the changes on the tenant
    disable security 5

  6. Once done, you will no longer be prompted to set up Security Defaults when logging in

CHANGE USER BUSINESS UNIT WITHOUT REMOVING SECURITY ROLES IN DYNAMICS 365


Since the first versions of the Dynamics 365 product, the business units, users, and security roles are directly linked together and form the base of the security model in the system, where every user must belong to one business unit and must have one or more security roles assigned to him.

As you know, security roles are specific to each business unit, where a version of the security role of the root business unit will be replicated and inherited for every business unit in the hierarchy.

In addition, changing a user business unit will remove all the security roles assigned to the user from the previous business unit, and you need to reassign them manually for the new business unit.
Change business unit 1

Change business unit 2

Starting 2021 Release Wave 2 Updates, this behavior can be overridden and we can change the user business unit without removing the assigned security roles.

In this post, we will see how to change user business unit without manually re-assigning the security roles in Dynamics 365.

In order to keep the security roles of the user when changing his business unit, a new setting has been added that give you the ability to enable it and to keep the security roles after the change of business unit
  1. Import the solution Organization Settings Editor after installing it
  2. After the solution is successfully imported, open its configuration page
  3. Scroll down to the option DoNotRemoveRolesOnChangeBusinessUnit
    Change business unit 3

  4. Click Add to enable it in the system
  5. The default value is set to false
    Change business unit 4

  6. Click Edit to change the value to true
    Change business unit 5

    Change business unit 6

  7. Now in the user page, change the business unit and check the security roles
  8. As expected after updating the setting to true, the same security roles are still assigned but are the ones under the new business unit
    Change business unit 7

    Change business unit 8
  9. The setting DoNotRemoveRolesOnChangeBusinessUnit is still not available for the Dynamics 365 on-premises (checked on version 9.1.2.2)

Saturday, January 14, 2023

DYNAMICS 365 CALL CUSTOM ACTION FROM JAVASCRIPT AND C#

I will show you how to call a Custom Action from JavaScript and C#.

For the sake of the post, I created a simple custom action against the Account entity with two input parameters and one output parameter. This action will create a task record and set the Subject field to
  • Task created by custom Action from JavaScript after calling the action from JavaScript
  • Task created by custom Action from C# after calling the action from C#
Call Custom Action

Below is the end result after calling the action from JavaScript
Call Custom Action in JavaScript

Below is the end result after calling the action from C#
Call Custom Action in C#

The below function calls the Custom Action in JavaScript and read its OutputParam

function callCustomAction(context) {
var formContext = context.getFormContext();
var accountId = formContext.data.entity.getId().replace('{', '').replace('}', '');
var parameters = {};
var entity = {};
entity.id = accountId;
entity.entityType = "account";
parameters.entity = entity;
var inputparam1 = {};
inputparam1.accountid = accountId;
inputparam1["@odata.type"] = "Microsoft.Dynamics.CRM.account";
parameters.inputParam1 = inputparam1;
parameters.inputParam2 = 0;

var cak_CustomActionTestRequest = {
entity: parameters.entity,
inputParam1: parameters.inputParam1,
inputParam2: parameters.inputParam2,

getMetadata: function () {
return {
boundParameter: "entity",
parameterTypes: {
"entity": {
"typeName": "mscrm.account",
"structuralProperty": 5
},
"inputParam1": {
"typeName": "mscrm.account",
"structuralProperty": 5
},
"inputParam2": {
"typeName": "Edm.Int32",
"structuralProperty": 1
}
},
operationType: 0,
operationName: "cak_CustomActionTest"
};
}
};
Xrm.WebApi.online.execute(cak_CustomActionTestRequest).then(
function success(result) {
if (result.ok) {
var results = JSON.parse(result.responseText);
var outputParam = results.outputParam;
}
},
function (error) {
Xrm.Utility.alertDialog(error.message);
}
);
}

The below function calls the Custom Action in C# and read its OutputParam

public void ExecuteCustomAction(string actionName, Account targetEntity, Entity inputParam1Value, int inputParam2Value)
{
try
{
var testCustomAction = new OrganizationRequest()
{
RequestName = actionName,
Parameters = new ParameterCollection() {
new KeyValuePair<string, object>("inputParam1", inputParam1Value),
new KeyValuePair<string, object>("inputParam2", inputParam2Value)
}
};
testCustomAction["Target"] = new EntityReference(Account.EntityLogicalName, targetEntity.Id);
OrganizationResponse resp = AdminService.Execute(testCustomAction);
var outputParam = resp["outputParam"];
}
catch (InvalidPluginExecutionException ex)
{
throw new InvalidPluginExecutionException(ex.Message);
}
}


Bonus Tip:
  • You can easily generate the code for calling your custom action in JavaScript by importing the CRMRESTBuilder solution and generate the request upon your need
References :

DYNAMICS 365 CALL WORKFLOW FROM JAVASCRIPT AND C#

 I will show you how to call workflows from JavaScript or C# and to accomplish this, you need two parameters:

  • The Workflow Id that you want to call AND
  • The Record Id that the workflow will be executed against
For the sake of the demo, I created a workflow that will set the Account Name field to:
  • WF Called and Updated From JavaScript after calling the workflow from JavaScript
  • WF Called and Updated From C# after calling the workflow from C#
Below is the end result after calling the workflow in JavaScript
Call workflow in JavaScript

Below is the end result after calling the workflow in C#
Call workflow in C#

The below function can be used to call the workflow in JavaScript

function executeWorkflow(context, workflowId, recordId) {
var formContext = context.getFormContext();
var data = {
"EntityId": recordId
};
var WorkflowId = workflowId;
var req = new XMLHttpRequest();
req.open("POST", formContext.context.getClientUrl() + "/api/data/v9.1/workflows(" + WorkflowId + ")/Microsoft.Dynamics.CRM.ExecuteWorkflow", true);
req.setRequestHeader("OData-MaxVersion", "4.0");
req.setRequestHeader("OData-Version", "4.0");
req.setRequestHeader("Accept", "application/json");
req.setRequestHeader("Content-Type", "application/json; charset=utf-8");
req.onreadystatechange = function () {
if (this.readyState === 4) {
req.onreadystatechange = null;
if (this.status === 200 || this.status === 204) { // Asynchronous || Synchronous
Xrm.Utility.alertDialog("Success");
}
else {
Xrm.Utility.alertDialog(this.statusText);
}
}
};
req.send(JSON.stringify(data));
}

The below function can be used to call the workflow in C#

public void ExecuteWorkflow(Guid workflowGuid, Guid recordGuid)
{
try
{
var executeWorkflowRequest = new ExecuteWorkflowRequest()
{
WorkflowId = workflowGuid, // Guid of workflow
EntityId = recordGuid // Guid of record
};
var executeWorkflowResponse = (ExecuteWorkflowResponse)AdminService.Execute(executeWorkflowRequest);
}
catch (InvalidPluginExecutionException ex)
{
throw new InvalidPluginExecutionException(ex.Message);
}
}

Bonus Tips:
  • The workflow must be saved to run on-demand
  • The workflow can be saved to run as Synchronous or Asynchronous

New Features In Dynamics 365

 Dynamics 365 and industry clouds’ second release wave in 2022 introduce brand-new technologies that provide you with important tools to improve your business. Dynamics 365 applications, including Marketing, Sales, Customer Service, Field Service, Finance, Supply Chain Management, Retail, etc., are included in the release, which includes hundreds of new features. Here’s a synopsis.


Marketing

New updates to Dynamics 365 for marketing will bring real-time customer journey orchestration to enable businesses to optimise their marketing with hyper-personalized experiences, intuitive lead capture forms, hands-off automation, lead nurturing, and a new analytics dashboard. to reach new levels of marketing maturity.

Sales

Dynamics 365 for Sales will continue to get new features to optimise their selling experiences using modern data and AI productivity tools. including D365 sales premium features to be available to customers with a sales enterprise licence.

Service

Dynamics 365 Service has also introduced additional tools to allow businesses to effectively plan service operations for employees. In order to continue empowering frontline workers, we are providing optimization improvements for limitations and offering a variety of user experience improvements to the mobile app.

Finance and operations

The new update has made vendor invoice OCR generally available, automating the reading and recognition of vendor invoices. with speculation of integrating the tax calculation service with Dynamics 365 Project Operations (preview) and extending electronic invoice support.

Though it is regularly updated with new features and functionality to improve the user experience and extend the capabilities of the platform, some of the new features that have been introduced in Dynamics 365 over the past few years include:

  • Artificial intelligence (AI) and machine learning (ML) capabilities
  • Dynamics 365 includes various AI and ML capabilities, such as predictive analytics, customer segmentation, and chatbots, to help businesses automate and optimise their operations.

  • Enhanced financial management:
  • Dynamics 365 has improved its financial management capabilities with features such as cash flow forecasting, budgeting, and expense management.

  • Improved sales and marketing capabilities :
  • Dynamics 365 has enhanced its sales and marketing capabilities with features such as lead and opportunity management, email marketing, and social media integration. Enhanced financial management: Dynamcs 365 has improved its financial management capabilities with features such as cash flow forecasting, budgeting, and expense management.

  • Improved customer service :
  • Dynamics 365 has added features to improve customer service, such as case management, knowledge management, and customer self-service portals.

  • Advanced project management:
  • Dynamics 365 has introduced advanced project management capabilities, including project planning, resource management, and project tracking.

  • Improved supply chain management:
  • Dynamics 365 has added features to improve supply chain management, including inventory management, purchasing, and vendor collaboration.

  • Enhanced analytics and reporting:
  • Dynamics 365 has improved its analytics and reporting capabilities with features such as data visualisation, dashboards, and custom report creation.

    In addition to these major updates, there are many other minor but helpful enhancements in 365, such as improved reporting options and integration with Office 365 for a unified user experience. In this blog post, we’ll take a look at some of the new CRM features that have been included in the latest version of Dynamics 365. We’ll cover all you need to know about the new features in Dynamics 365.

    Get ready to take your CRM system to the next level with the latest version of Dynamics 365.

  • Automated task flows
  • One of the most important updates in D365 is the addition of automated task flows. to easily create processes and workflows that automate your workflows and help to improve team collaboration. With AI and automation capabilities, you can use AI to automatically generate reports on customer activity or trends. This can save you time and effort, and it can also help to increase your productivity and better understand customer needs and preferences.

  • Updated Dashboard
  • With the updated dashboard, you have increased flexibility and control over your data and operations. In the new version of Dynamics CRM, you get a new and updated dashboard, accessible from mobile, tablet, and desktop devices, which makes it more convenient for you to stay up to date on your business. Additionally, the integrated support for third-party analytics and BI tools allows you to gain deeper insights into your organisation’s performance.

  • Advanced Find 
  • Advanced find is the next powerful and rebranded edition of the previous edition of “classic find” in Dynamics 365 CRM. To make advanced searches and query finding faster and simpler. If you’ve used Dynamics 365 before, you’ll likely be excited by this one, which was rolled out in 2022. If you’ve used Dynamics 365 before, you’ll probably be excited about this one, which was released in April 2022.

    For users who have never used this feature, clicking the new button will open a blank form for the entity for which the Advanced Find is being run. This will allow you to create a new record directly from Advanced Find. This feature will allow you to edit, delete, merge, share, assign, or export one or more records (bulk records) to Excel.

  • Improved UI for desktop and mobile
  • The new version of Dynamics 365 will give the platform a much-needed facelift. The new Unified Client Interface will make the platform look more like the rest of the Microsoft 365 suite. Other than improving the look of Dynamics 365, this will radically improve the experience on the device.

  • Enhanced mobile experience
  • While Dynamics is currently accessible via mobile and tablet, the latest update is set to bring the experience more in line with the desktop experience. This will make Dynamics 365 a much more portable tool. Businesses will be able to access valuable intel on sales or company performance wherever staff might be, making key updates to Dynamics 365 on the go rather than waiting to get back to a desktop computer.

  • Customer Service Hub
  • For some time, Dynamics 365 has been developing into a customer service tool. The launch of the Customer Service Hub will cement this by bringing key features together. This includes the ability to log and track cases, tag key customer communications (emails, recorded calls, etc.) against case records, and manage customers based on predefined service level agreements. The addition of the timeline feature, which presents a linear view of interactions and allows users to get up to speed quickly with accounts, will also benefit users of the platform.

    It may sound simple, but it’s a big improvement for the platform. And if that’s not enough, you will also be able to customise widgets and views to get a more personalised view of your data with the new update.


    Call Flow from Webhooks in Dynamics 365 CRM | Power Automate


    Pre-Requisites

    Given that you already have Admin Access to create Flows with HTTP Request Triggers, you’ll need to have Plugin Registration Tool in case you are not familiar – Download Plugin Registration Tool for Dynamics 365 CRM using PowerShell

    Initiate a Flow

    Here’s how you start building your Flow –

    1. You must select the HTTP Trigger when you start a new flow. This will be your Flow trigger.

    2. Now, in order to be able to get the URL of the HTTP Trigger which you’ll need, you’ll need to save the Flow first.
      And for that, Flow needs to have more than 1 step. So just go ahead and add a variable, maybe. ðŸ˜Š

    3. Once you save the Flow, the URL will be generated which you can copy

    4. Copy this URL and paste it in the Notepad. We’ll come to it later.
      It should look like this –

      So we’ll come to this later. Let’s keep this handy in clipboard since you’ve copied it anyway and let’s move towards registering the Webhook itself.

    Register Webhook in Dynamics 365 CRM

    Given that you have Plugin Registration Tool and you are logged in, you can proceed with registering a Webhook in the environment –

    1. In the menu, select Register a Webhook option.

    2. Now, you can start by giving it a name.
      Then, in Endpoint URL – copy only till the work invoke
      https://prod-131.westus.logic.azure.com:443/workflows/6092c774224e498ebe413f3d7c05a45e/triggers/manual/paths/invoke?api-version=2016-06-01&sp=%2Ftriggers%2Fmanual%2Frun&sv=1.0&sig=gvfm52Mpnhsz4Ew4ufRllNM_VhfC6a-GkCpM7AigPU0

      Also, select the Authentication as HttpQueryString

    3. Now, coming the next part, you can start add properties to this –
      Green are the PropertiesPink are the Values

      https://prod-131.westus.logic.azure.com:443/workflows/6092c774224e498ebe413f3d7c05a45e/triggers/manual/paths/invoke?api-version=2016-06-01&sp=%2Ftriggers%2Fmanual%2Frun&sv=1.0&sig=gvfm52Mpnhsz4Ew4ufRllNM_VhfC6a-GkCpM7AigPU0

      Also, in case you are wondering what does the %2F mean – It’s the HTML encoding for a slash symbol “/
      Ref Link: https://www.w3schools.com/tags/ref_urlencode.ASP

      And, the properties should look like below –


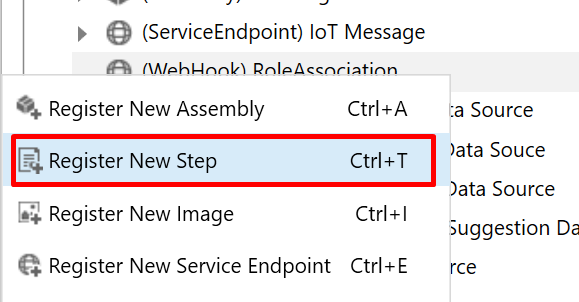
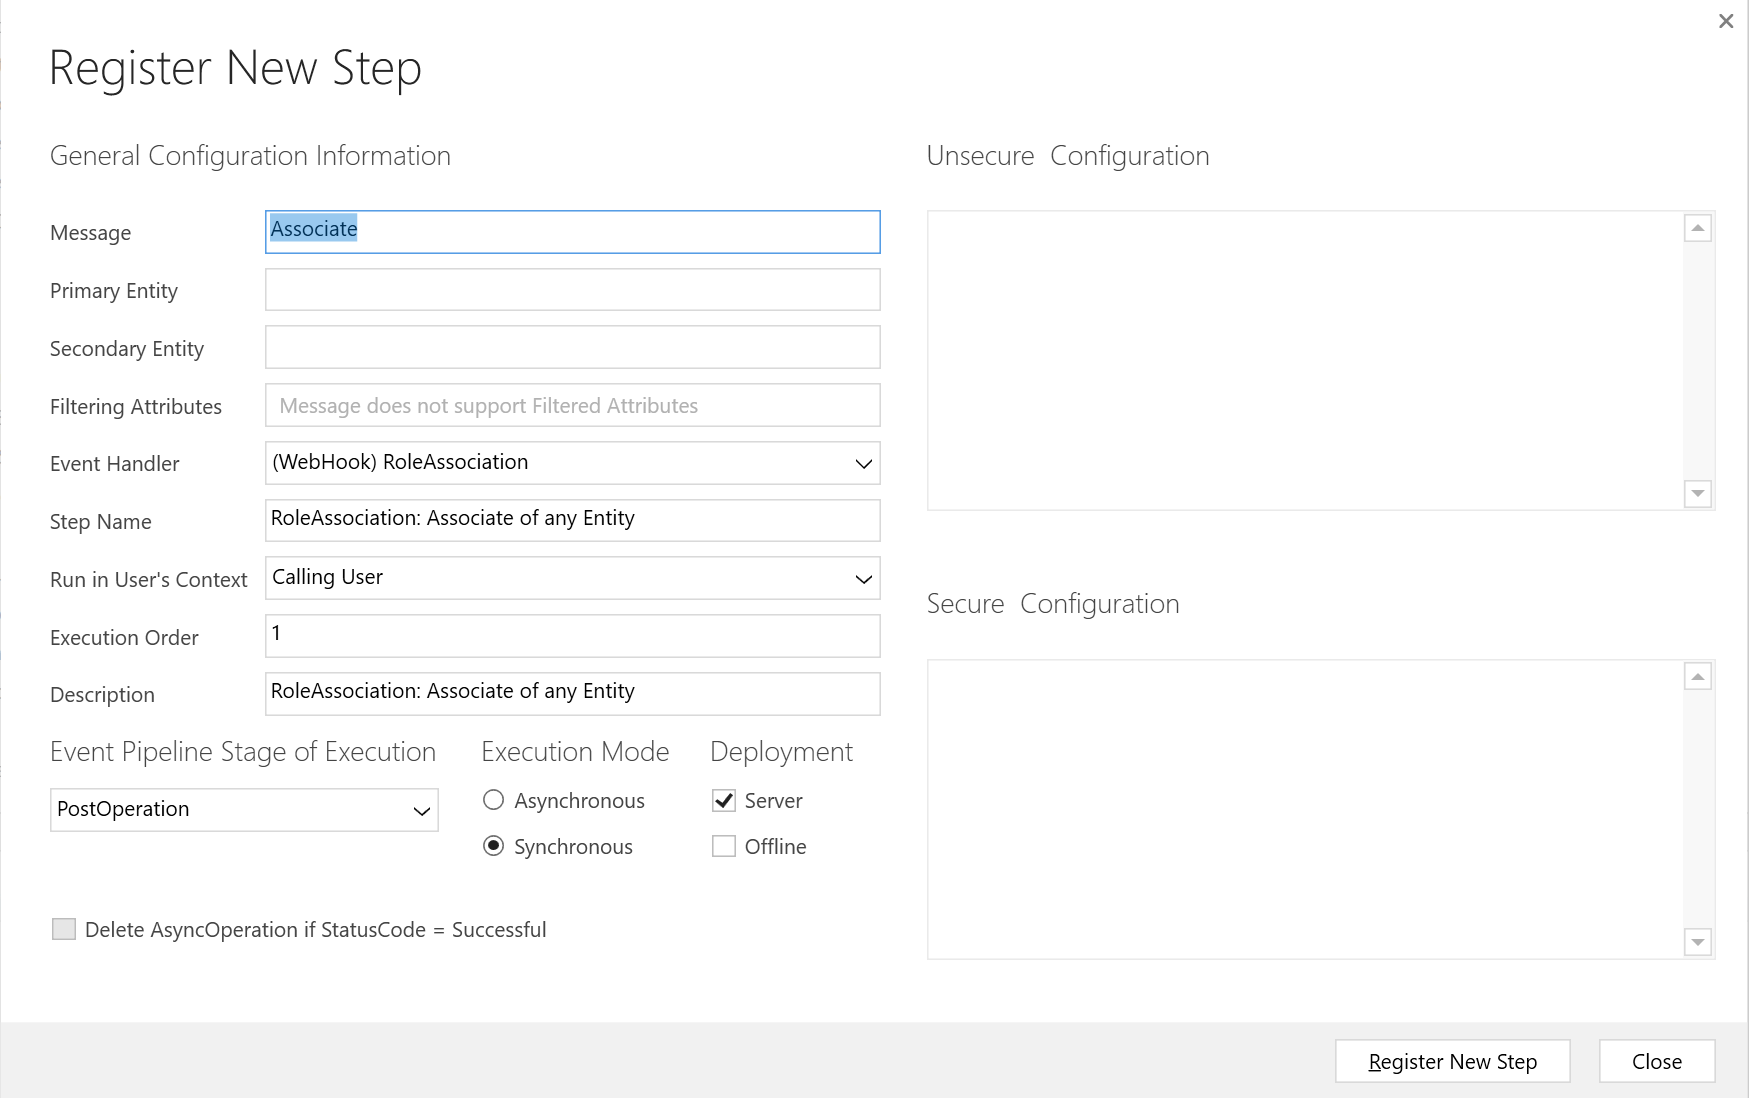
    4. Now, you can go ahead and add a Step just like you would do in a Plugin assembly


      And then, for example, register a step on Associate. It could be any message.

    5. And, when you Associate a record, example – Assigning a security role to a User –

    6. The Webhook will call the HTTP Request Flow


      And if you open the Flow, you can expand the first step and see the Detailed outputs


    7. You can copy the above Outputs and use this to generate Schema for the HTTP Trigger so that you can use it further in the Flow


      And this is how it will be generated