Search This Blog

Sunday, January 15, 2023

DYNAMICS 365 HOW TO SHOW HIDE FORM HEADER AND FOOTER

Some of you know that it is possible to show/hide the header and footer of the form using Client API.


Sometimes, you need to have more space to show additional data on the form or the client simply request to hide some parts of the header. Here comes the utility of hiding the header or footer elements of the form.

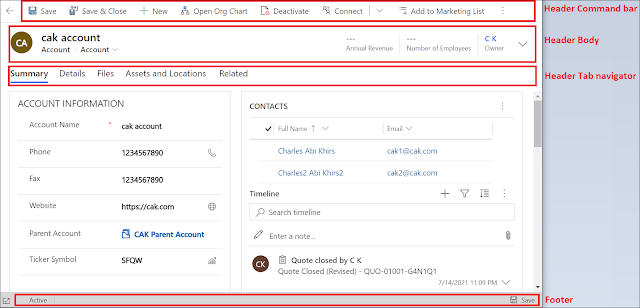
The header is divided into three parts : Command barBody, and Tab navigator as per the following.

Form header/footer

In order to dynamically control the visibility of each part, you can call the following functions:
  1. Header command bar visibility
    • Hide : formContext.ui.headerSection.setCommandBarVisible(false);
    • Show : formContext.ui.headerSection.setCommandBarVisible(true);
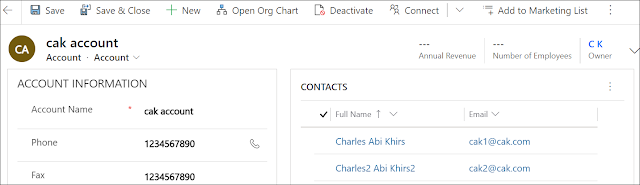
    Header command bar visibility

  2. Header body visibility
    • Hide : formContext.ui.headerSection.setBodyVisible(false);
    • Show : formContext.ui.headerSection.setBodyVisible(true);
    Header body visibility

  3. Header tab navigator visibility
    • Hide : formContext.ui.headerSection.setTabNavigatorVisible(false);
    • Show : formContext.ui.headerSection.setTabNavigatorVisible(true);
    Header tab navigator visibility

As for the footer, it is composed of one element and its visibility can be managed by calling the following functions:
  • Footer visibility
    • Hide : formContext.ui.footerSection.setVisible(false);
    • Show : formContext.ui.footerSection.setVisible(true);
    Footer visibility

Bonus Tip:
You can return the visibility of each element by calling the functions getCommandBarVisible()getBodyVisible(), and getTabNavigatorVisible() for the header parts, and getVisible() for the footer.


For more user experience and enhancements ideas, you can check this link for some custom controls that can be used like:

DYNAMICS 365 HOW TO SHOW GLOBAL NOTIFICATION FROM ENTITY VIEW


I will show you how to display a notification from any entity view instead of the form level.

For example, if you want to show the number of pending tasks to the user or the number of opened opportunities that should be closed and maybe allow the user to click the action button and be redirected to the appropriate screen.

Let's see how!
  1. First, create a new solution and add the Application ribbon component in it
  2. From the Ribbon Workbench, open the solution
  3. Scroll to the right, and add a new button under the Home menu in Mscrm.HomepageGrid.{!EntityLogicalName}.MainTab section
    Show global notification

  4. Create the command for the button as per the below image Show global notification 2

  5. Add an Enable rule with a Custom rule for the command as per the below image Show global notification 3

  6. Once done, publish your changes and open the model-driven app. The button will be added to all the entity views but it will not appear. However, the function you called in the custom JavaScript rule will be executed and will display the global notification
  7. Finally, I will put the sample code of the previous post to show a global notification message, where you can change it in order to do display the message and do the proper action based on your needs

    function showGlobalNotif(context) {
    var formContext = context.getFormContext();
    // define action properties
    var objAction =
    {
    actionLabel: "Click to do something",
    eventHandler: function () {
    Xrm.Navigation.openUrl("https://docs.microsoft.com/en-us/");
    // perform other operations as required on clicking
    }
    };

    // define notification properties
    var objNotification =
    {
    type: 2,
    level: 4, // 1: Success, 2: Error, 3: Warning, 4: Information
    message: "This is an Information global notification text.",
    showCloseButton : true,
    action: objAction
    };

    Xrm.App.addGlobalNotification(objNotification).then(
    function success(result) {
    // add code on notification display
    },
    function (error) {
    // add code to handle error
    }
    );
    }

DYNAMICS 365 HOW TO SHOW GLOBAL NOTIFICATION IN MODEL DRIVEN APP


The function setFormNotification() is used to display a notification message as information, warning or error message on the form and it lives within the form itself. Once you navigate outside the form, the notification will be gone.

In other post, I described how to show a global notification from an entity view.

However, in this post, I will show you how to display a global notification that will be displayed across the Model driven App and not limited to the form.

To do this, you can use the function Xrm.App.addGlobalNotification(objNotification).then(success,error) that will display a warning, error, informational, or success message. In addition, it will give the user the possibility to close the notification and perform a specific action that will be executed based on the notification.

To implement this, you can call the function that displays the global notification from a form event or from a ribbon button
  1. Open the form properties and go to Events
  2. Add the JavaScript library that contains the function you want to call
  3. Add the event handler against the onLoad, onSave, or onChange field event on which the global notification will be shown
  4. In the event, specify the function that will be triggered and based on your code, it will display the global notification
  5. The below code will display a global notification with its different options that you can set
    function showGlobalNotification(context) {
    var formContext = context.getFormContext();
    // define action properties
    var objAction =
    {
    actionLabel: "Click to do something",
    eventHandler: function () {
    Xrm.Navigation.openUrl("https://docs.microsoft.com/en-us/");
    // perform other operations as required on clicking
    }
    };

    // define notification properties
    var objNotification =
    {
    type: 2,
    level: 4, // 1: Success, 2: Error, 3: Warning, 4: Information
    message: "This is an Information global notification text.",
    showCloseButton : true,
    action: objAction
    };

    Xrm.App.addGlobalNotification(objNotification).then(
    function success(result) {
    // add code on notification display
    },
    function (error) {
    // add code to handle error
    }
    );
    }

The result will be as follows based on the notification level
Global notification with information message
global notification information

Global notification with success message
global notification success

Global notification with error message
global notification error

Global notification with warning message
global notification warning

Below is a summary of the notification properties:
  1. type: currently only the 2 is supported that will display a notification on the top of the app
  2. level: number that will define the notification level
    • Success
    • Error
    • Warning
    • Information
  3. message: the text message that will be displayed in the notification
  4. showCloseButton: true/false. That will define if the user can close the notification or not
  5. action: will contain 2 properties actionLabel and eventHandler. When defined, a button inside the notification bar will be displayed and once clicked, the code written in the evenHandler property will be executed
You can check this docs link for more details about the global notification.

Bonus Tips:
  • The globalnotification will remain displayed until the user closes it manually or the function Xrm.App.clearGlobalNotification(objNotification).then(success,error) is called
  • Pay attention if on click of the button, you want to accomplish something on the form like setting a field, and since the notification will persist in other areas as well, the form context won't be available in this case, and you have to do additional checking to avoid any error
  • If the action property is set to null, no button will be displayed
  • The showCloseButton property is by default set to false

DYNAMICS 365 Confirmation/Alert/Error/FORM NOTIFICATION AND FIELD NOTIFICATION Dialog in JAVASCRIPT


ERROR DIALOG IN DYNAMICS 365 JAVASCRIPT

we will see how to display an Error Dialog in Dynamics 365 using JavaScript and what are the different properties that can be set.

The error dialog will be used to display an error message on the form

  1. errorOptions
    Contains the different dialog display properties:
    • details
      Contains details about the error. If specified, the user will be able to click the button Download Log File to download a text file that contains the message specified in this option
    • errorCode
      If you want to show specific error, you can put the code of the error that will be displayed in the error dialog. A default message will be displayed if the code is not valid
    • message
      Contains the value of the message that will be displayed in the error dialog
  2. successCallback
    This function will be called when the alert dialog is closed
  3. errorCallback
    This function will be called if the operation fails

The below code is a sample on how to use and display an Error Dialog

function displayErrorDialog(context) {
var errorOptions = {
errorCode: 1234,
details: "The details that will be in the content of the downloaded log file",
message: "This is the error dialog message!"
};
Xrm.Navigation.openErrorDialog(errorOptions).then(
function (success) {
// Do something here
},
function (error) {
// Do something here
}
);
}

ALERT DIALOG IN DYNAMICS 365 JAVASCRIPT

we will see how to display an Alert Dialog in Dynamics 365 using JavaScript and what are the different properties that can be set.

The alert dialog will be used to display an alert dialog containing a message and a button

  1. alertStrings
    Contains the different dialog display properties:
    • confirmButtonLabel
      Contains the value that will be displayed for the alert button in the alert dialog. By default it is set to Ok.
    • title
      Contains the value of the Title that will be displayed in the alert dialog
    • text
      Contains the value of the message that will be displayed in the alert dialog
  2. alertOptions
    Contains the pixels values for the width and height options of the alert dialog
  3. successCallback
    This function will be called when the alert dialog is closed
  4. errorCallback
    This function will be called if the operation fails

The below code is a sample on how to use and display an Alert Dialog

function displayAlertDialog(context) {
var alertStrings = {
confirmButtonLabel: "Confirm button label",
title: "This is an alert dialog title",
text: "This is an alert dialog message!"
};
var alertOptions = { height: 120, width: 260 };
Xrm.Navigation.openAlertDialog(alertStrings, alertOptions).then(
function (success) {
// Do something here
},
function (error) {
console.log(error.message);
}
);
}

CONFIRM DIALOG IN DYNAMICS 365 JAVASCRIPT

we will see how to display a Confirm Dialog in Dynamics 365 using JavaScript and what are the different properties that can be set.

The confirm dialog will be used to display a confirmation dialog containing a message and two button. This dialog will have the below different options

  1. confirmStrings
    Contains the different dialog display properties:
    • confirmButtonLabel
      Contains the value that will be displayed for the confirm button in the confirmation dialog. By default it is set to Ok.
    • cancelButtonLabel
      Contains the value that will be displayed for the cancel button. By default it is set to Cancel.
    • title
      Contains the value of the Title that will be displayed in the confirmation dialog
    • subtitle
      Contains the value of the Subtitle that will be displayed in the confirmation dialog
    • text
      Contains the value of the message that will be displayed in the confirmation dialog
  2. confirmOptions
    Contains the pixels values for the width and height options of the confirmation dialog
  3. successCallback
    This function will be called when the confirm button, cancel button, or X button of the dialog is clicked. An attribute named confirmed (Boolean) is passed that indicates whether the confirm button was clicked or not.
  4. errorCallback
    This function will be called if the operation fails

The below code is a sample on how to use the function openConfirmDialog and display a Confirm Dialog

function displayConfirmDialog(context) {
var formContext = context.getFormContext();
var dialogText = {
confirmButtonLabel: "Confirm button label",
cancelButtonLabel: "Cancel button Label",
title: "This is a Confirm dialog title",
subtitle: "This is a dialog subtitle",
text: "This is a Confirm dialog text message!"
};
var dialogOptions = { height: 200, width: 450 };
Xrm.Navigation.openConfirmDialog(dialogText, dialogOptions).then(
function (success) {
if (success.confirmed)
// Do something here
else
// Do something else here
},
function (error) {
console.log(error.message);
});
}


DYNAMICS 365 FORM NOTIFICATION AND FIELD NOTIFICATION

In Dynamics 365 form, you can display two types of notifications: Form Notifications and Field Notifications.

In this article, we will see how to display Form Notifications and Field Notifications within an entity form using JavaScript.

  1. The form notification will be displayed on top of the form and the setFormNotification function is used to display form level notifications

    function displayFormNotification(context) {
    var formContext = context.getFormContext();
    formContext.ui.setFormNotification("This is an INFORMATION form notification.", "INFO", "InformationNotificationId");
    formContext.ui.setFormNotification("This is a WARNING form notification.", "WARNING", "WarningNotificationId");
    formContext.ui.setFormNotification("This is an ERROR form notification.", "ERROR", "ErrorNotificationId");
    }


    We have three level of form notification:
    • INFO: It displays information notification message to the user with system info icon
    • WARNING: It displays warning notification message to the user with system warning icon
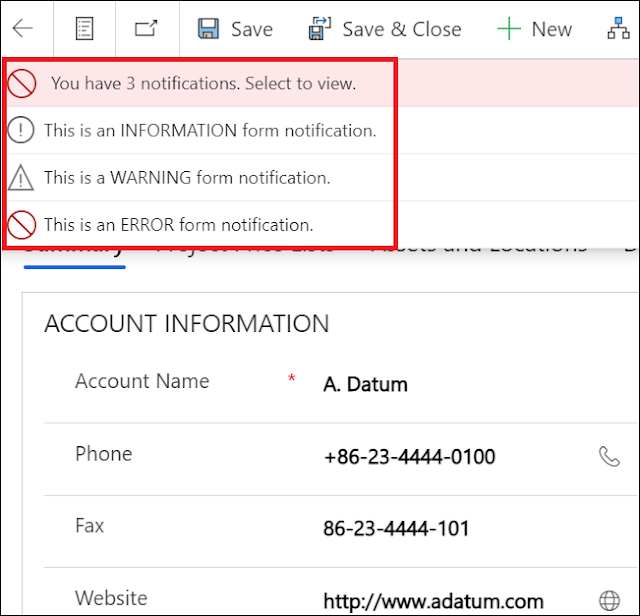
    • ERROR: It displays error notification message to the user with system warning icon

    Form notification

  2. The field notification will be displayed on the field and the setNotification function is used to display field level notifications

    function displayFieldNotification(context) {
    var formContext = context.getFormContext();
    formContext.getControl("name").setNotification("This is a field message notification.", "FieldNotificationId");
    }

    Field notification

Bonus Tips:
  • To remove form notification, you have to use the function clearFormNotification function formContext.ui.clearFormNotification("uniqueId"); with the Notification Id you want to remove
  • To remove field notification, you have to use the function clearNotification function formContext.getControl("fieldLogicalName").clearNotification("uniqueId"); with the Notification Id you want to remove

GET THE WEB API URL FOR A DYNAMICS 365 ORGANIZATION

 we will see how to get the Web API URL for the Dynamics 365 organization.

  1. Go to Settings > Customizations > Developer Resources
  2. In the Service Root URL, you will find the API URL


  3. You can copy this URL and paste it into a browser to get its result
    Web API URL 2

  4. Based on your needs, you can get and use the WebAPI URL in JavaScript using the following line of code formContext.context.getClientUrl() + "/api/data/v9.2/

GET THE SIZE OF TABLES IN DYNAMICS 365 / DATAVERSE ENVIRONMENT

Data size is continuously growing over the time. Thus, data storage and usage with the increasing complexity and new supported data types, is becoming an essential tool for the organizations to be able to expand their business.


Therefore, knowing the data volume becomes very critical and in Dataverse, you are able to check the space reserved by each table.

In this post, we will see how to get the size of Dynamics 365 / Dataverse tables for an environment.

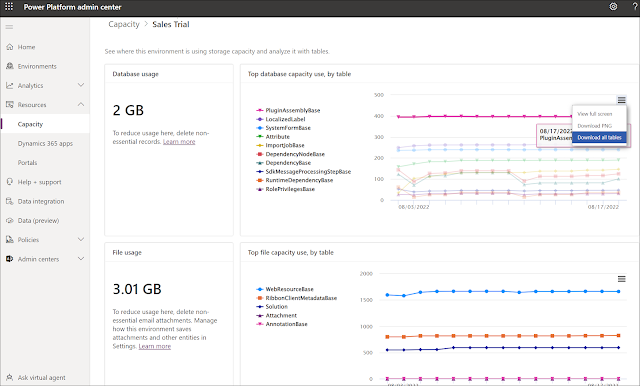
Using the Capacity page in the Power Platform Admin Center, you can get the size of each table (in MB).
  1. Login to Power Platform admin Center
  2. Under the Resources menu, click the Capacity option
    Tables size 1

  3. Select the Dataverse tab, or click on the Trial tab to check the environments
    Tables size 2

  4. Click the Details (graph) button for the specific environment to open a detailed report of Usages for Database Usage, File Usage, and Log Usage
    Tables size 6

  5. To check the size of each table, from the Top database capacity use, by table section, click the burger menu > Download all tables option
    Tables size 3

  6. A CSV file will be downloaded where you can check the size for each table sorted by the highest space usage in MB
    Tables size 7

  7. This report can give you some insights in case you are facing some performance issues in your environment where it might be related to the tables size

DYNAMICS 365 HOW TO REFRESH SUBGRID IN JAVASCRIPT

 we will see how to refresh a subgrid in JavaScript in order to show the latest records related to a parent record upon an action on the form or clicking a ribbon button.


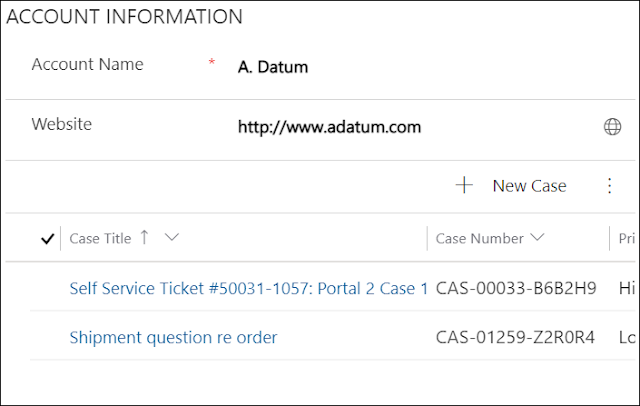
For the sake of this post, I will take the example of the cases subgrid related to an account record.

Refresh subgrid in JavaScript

Let's take the scenario, where an action is done on the client side that adds a case related to the account record. Therefore, the sub-grid should be automatically refreshed to reflect the updated list of cases.

In order to do this, a JavaScript function should call the refresh() in order to refresh the subgrid and display the expected result.

function refreshSubGrid(context) {
var formContext = context.getFormContext();
var subgrid = formContext.ui.controls.get("cases"); //Put the appropriate sub-grid name
subgrid.refresh();
}


Refresh subgrid in JavaScript 2

In case you are opening a web resource where you need to refresh the sub-grid, you can use the parent.Xrm.Page.ui.controls.get("cases").refresh(); or the form context as detailed in this post.

References: