Search This Blog

Friday, July 16, 2021

A Beginner’s Guide to Microsoft PowerApps

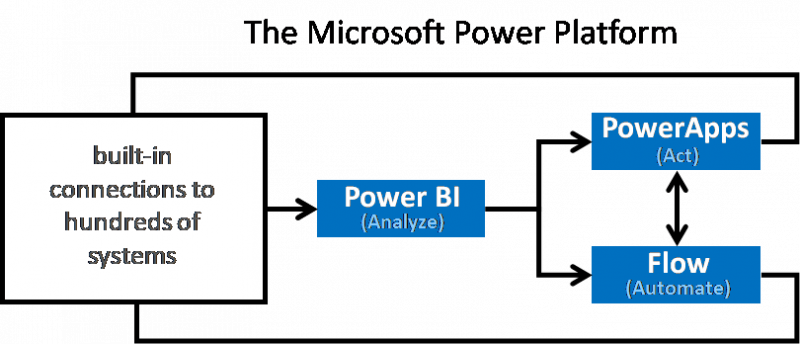
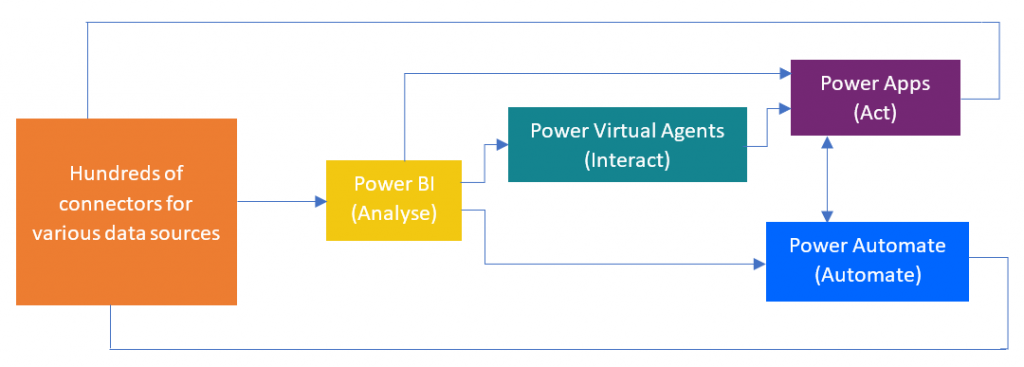
The Power Platform is comprised of the Power BI, PowerApps, and Flow. Microsoft has been increasingly promoting this as a whole. These three services provide tools to manage our digital world where data is king and the basis of any enterprise process. Their applications are as follows:

  1. You can display and analyze data with Power BI.
  2. You can act and modify data with PowerApps.
  3. You can automate data with Flow.

For more details on Power Platform positioning, you can refer to this official blog post.

How to Build an App with Microsoft PowerApps

The simplest way to build a PowerApps app is to start from the data source. This is part one in a three-part process:

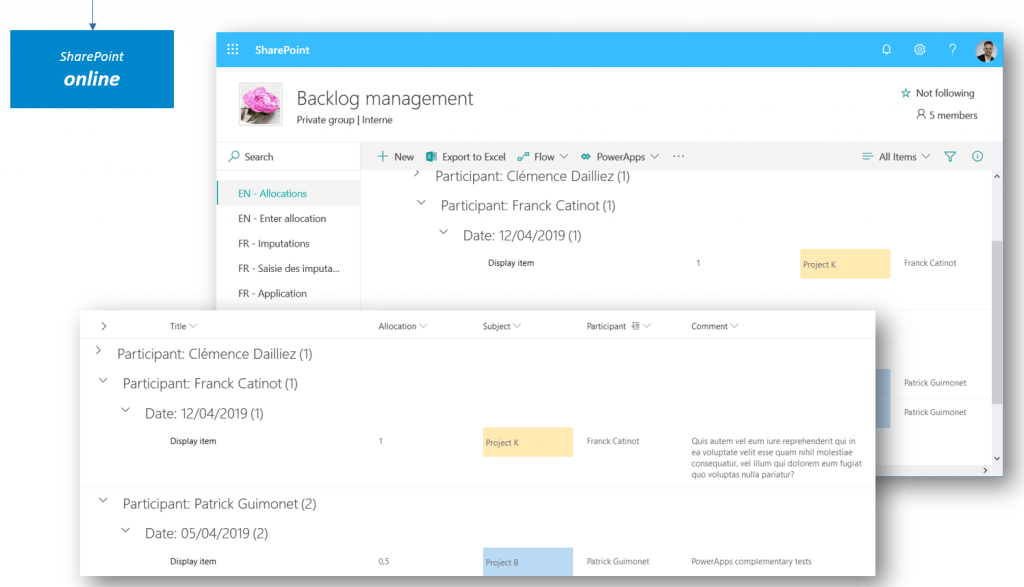
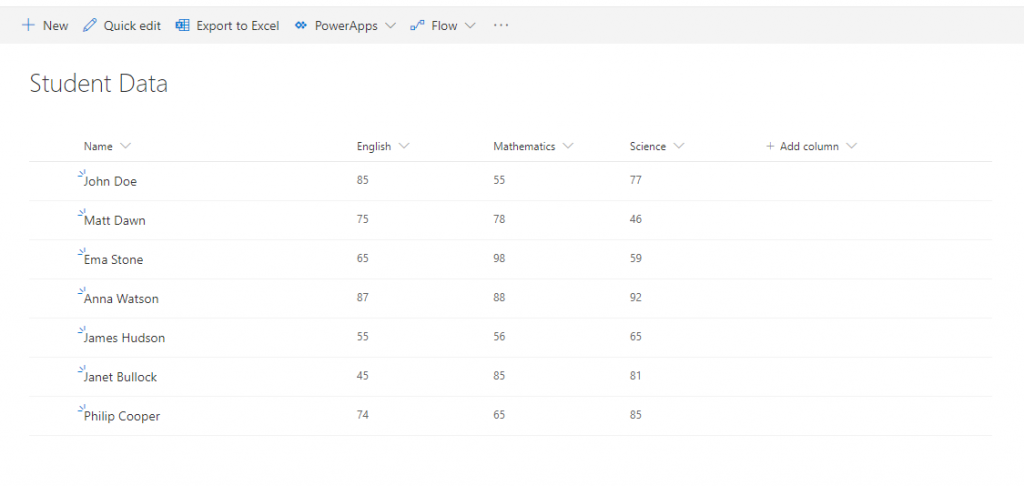
1. For this example, we’ll start from a SharePoint list that stores consulting interventions:

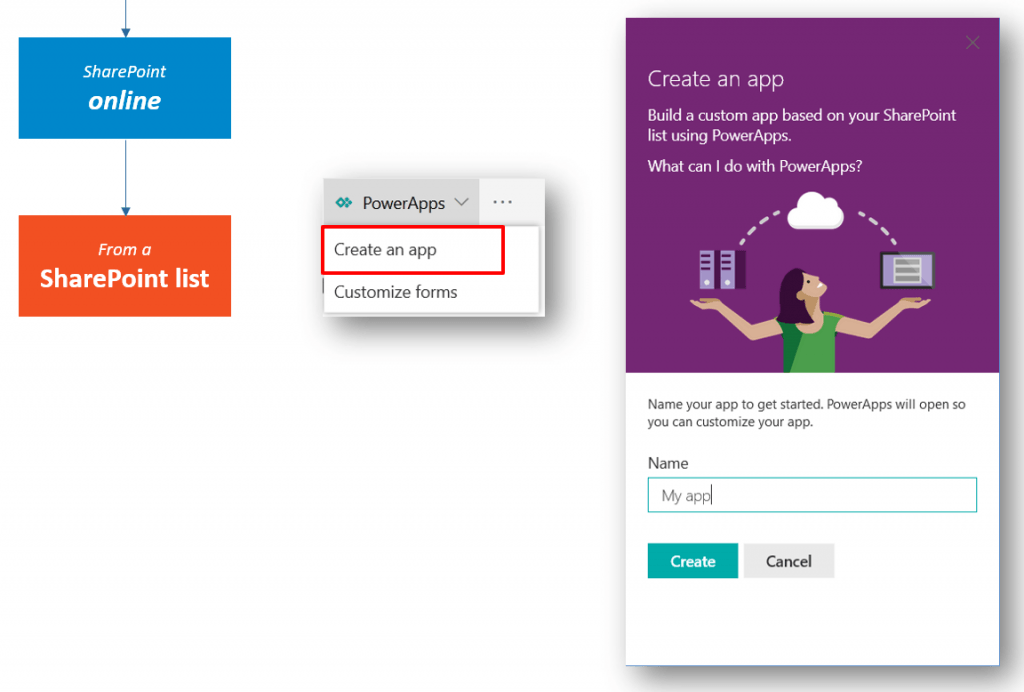
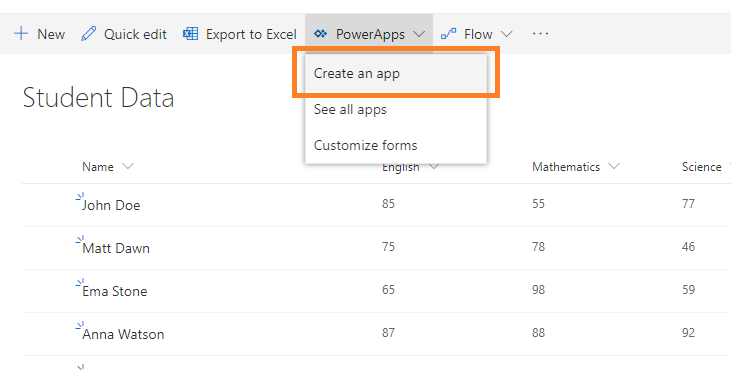
2. Next, we’ll select the “Create an app” option in the PowerApps menu:

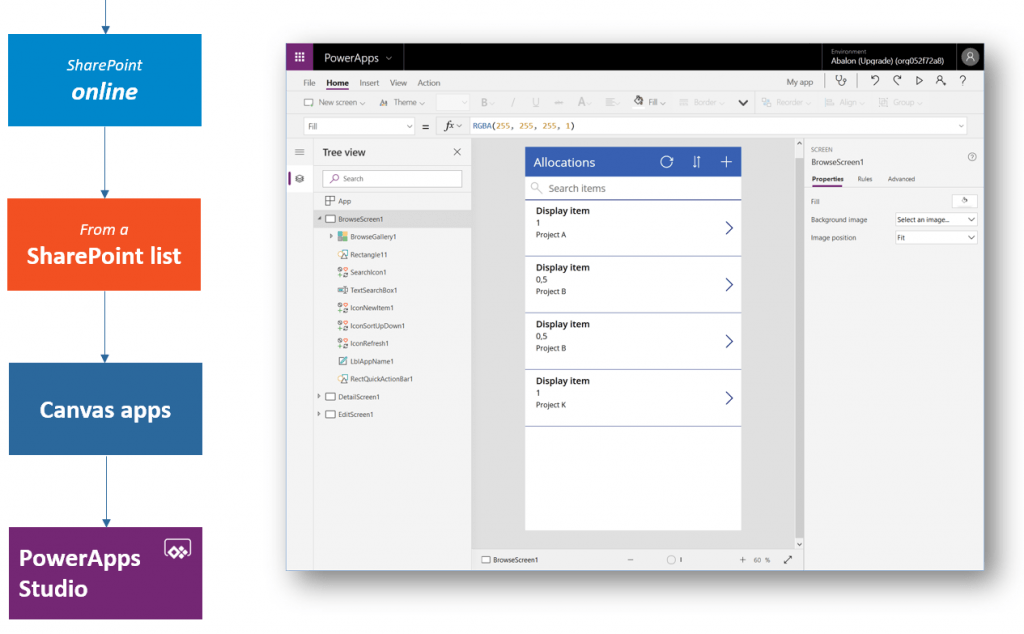
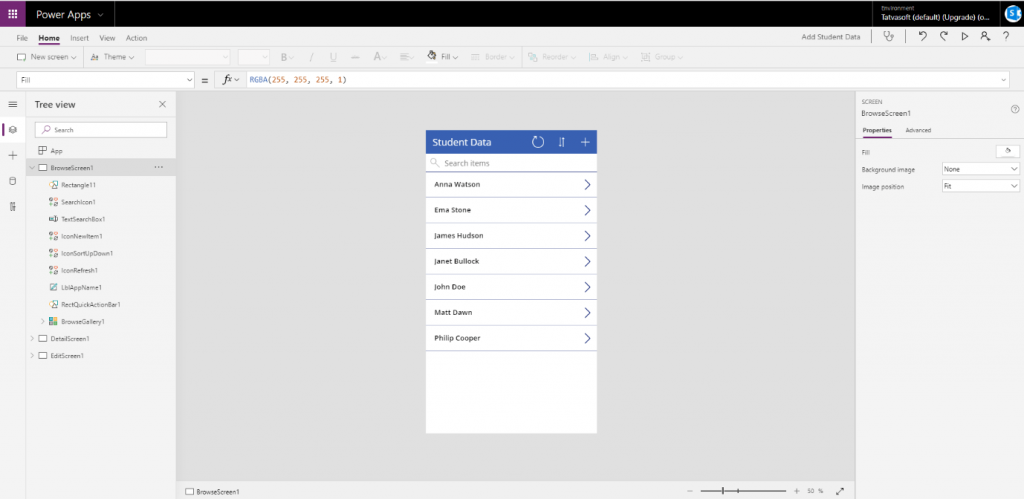
3. This takes us to the PowerApps Studio where we’ll find a fully functional canvas app generated by the system:

Keep in mind that these are just the default choices. They hide a much wider set of available options, configurations, and architectural choices that PowerApps provides. Without further ado, let’s take a more in-depth look!

Step 1: Select Your PowerApps Environment

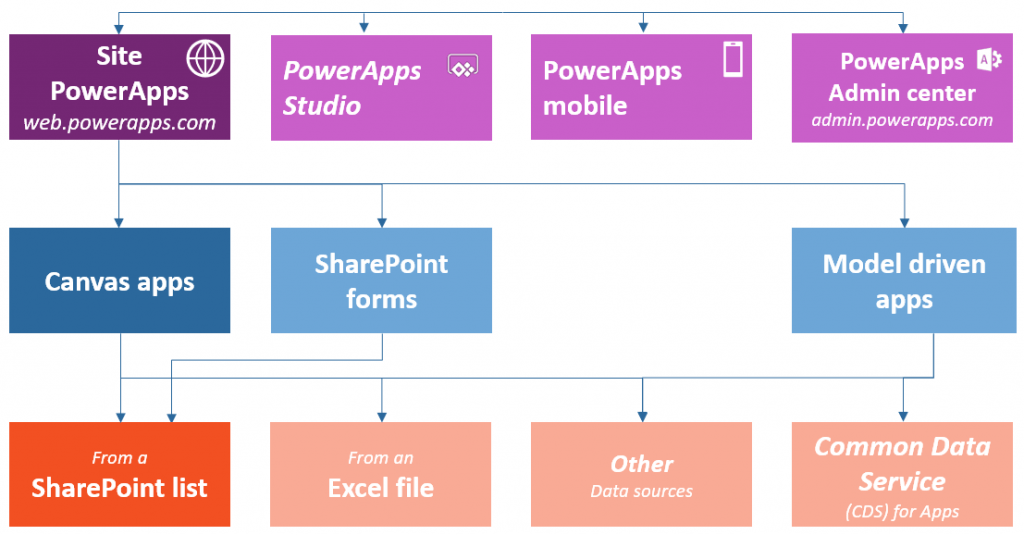
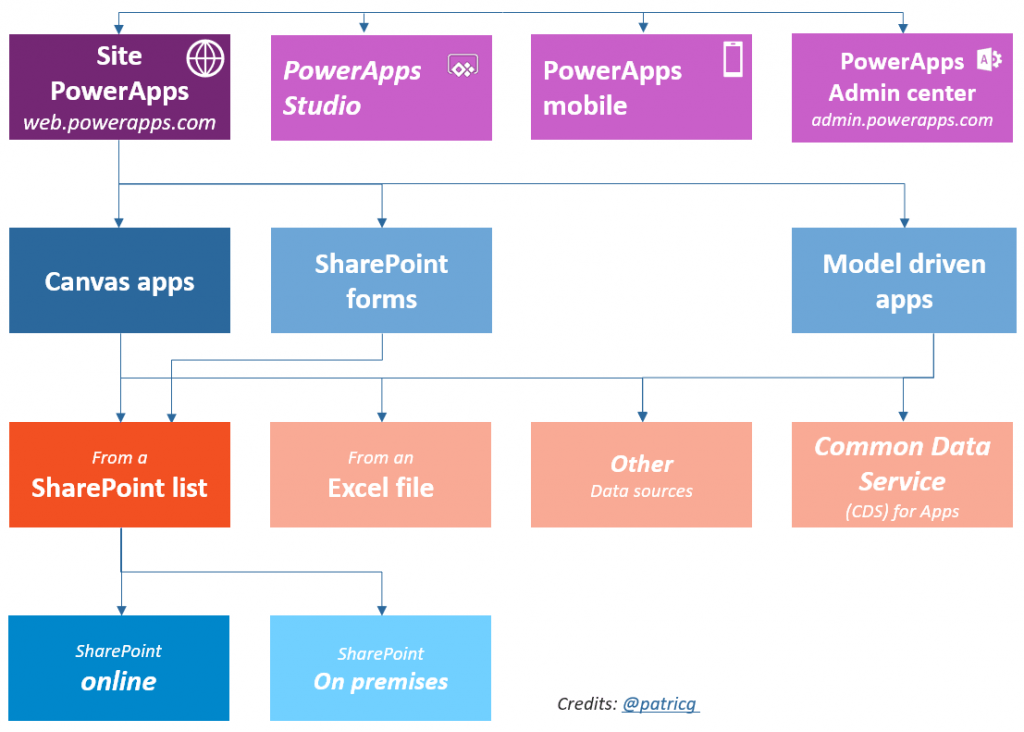
There are four tools or environments that you can work within PowerApps, and they each have their own capabilities and roles.

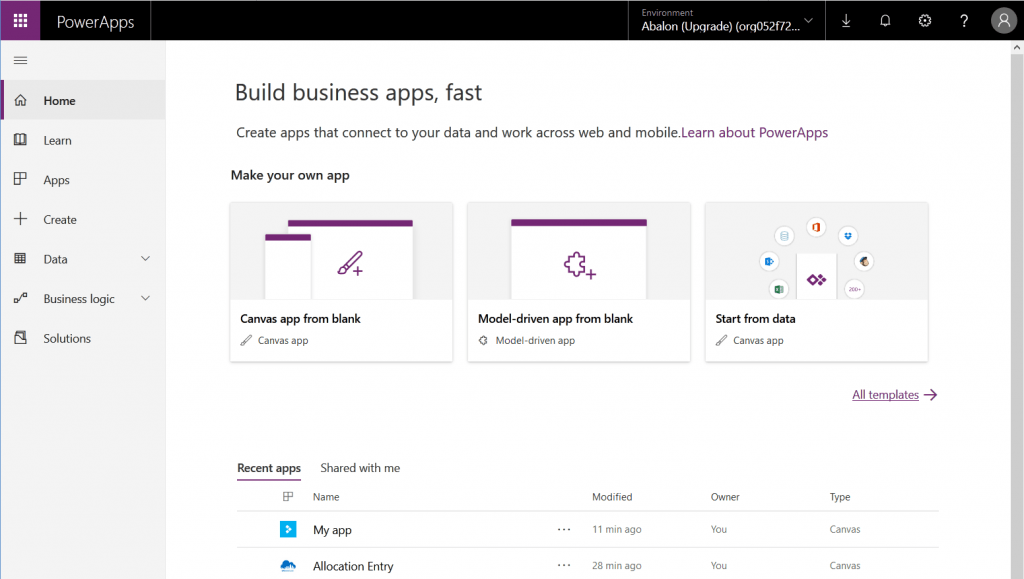
PowerApps Website

The website is where you’ll begin your PowerApps service journey. This is where you will be able to create a new app and to manage existing ones.

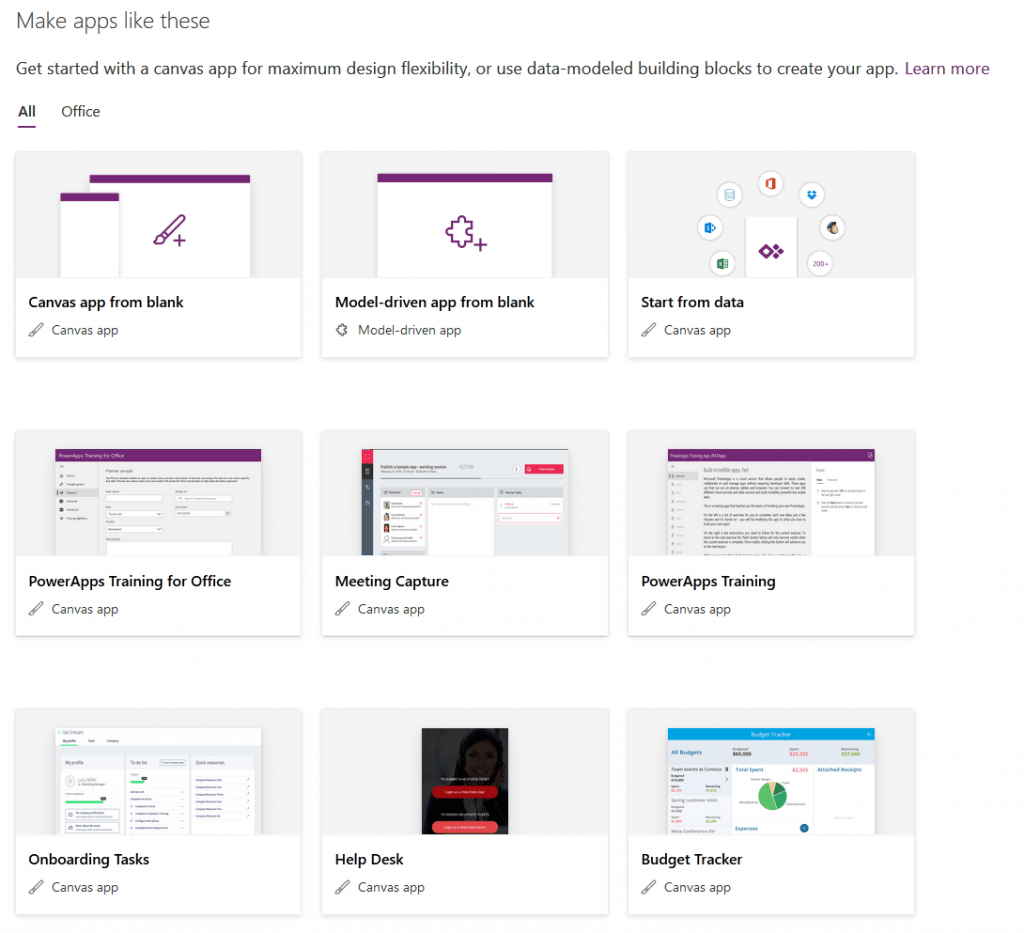
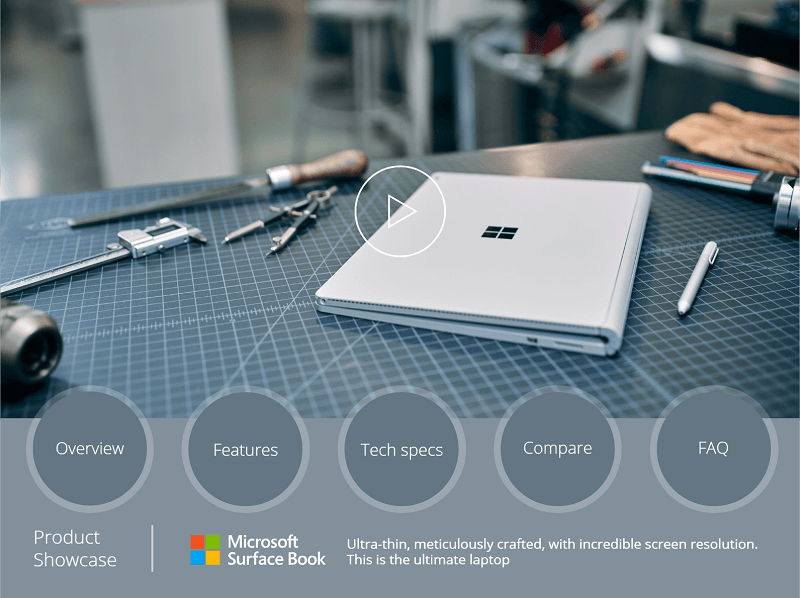
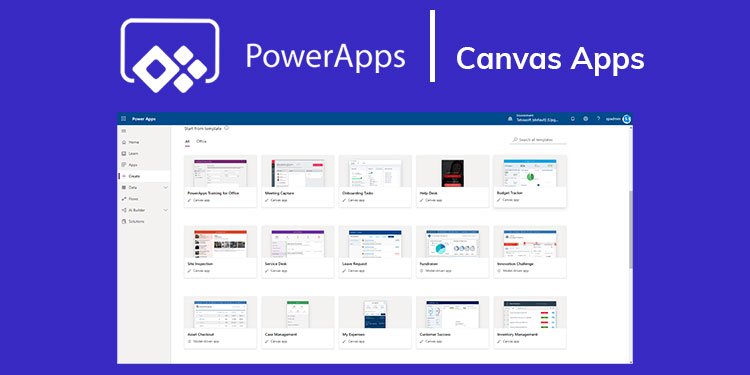
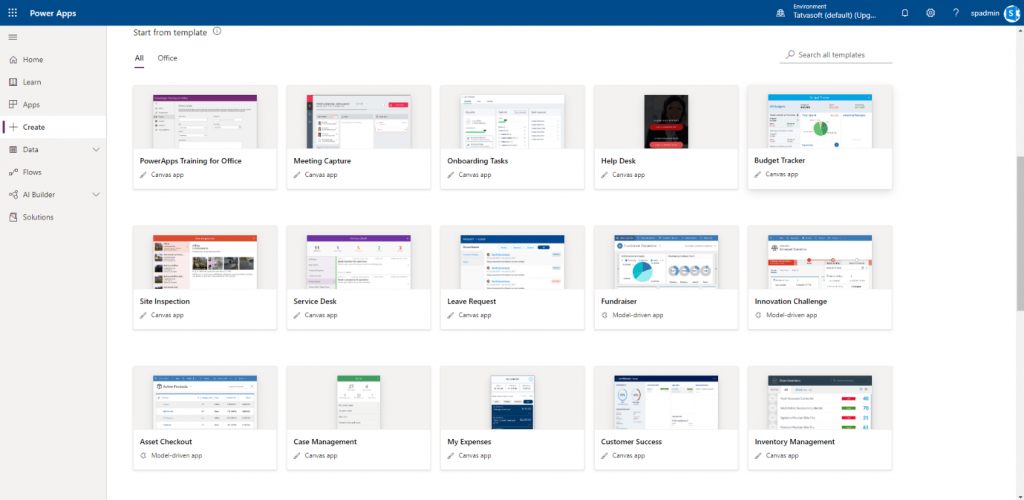
Here’s a small snapshot of some of the templates that might give you some usage ideas for the app:

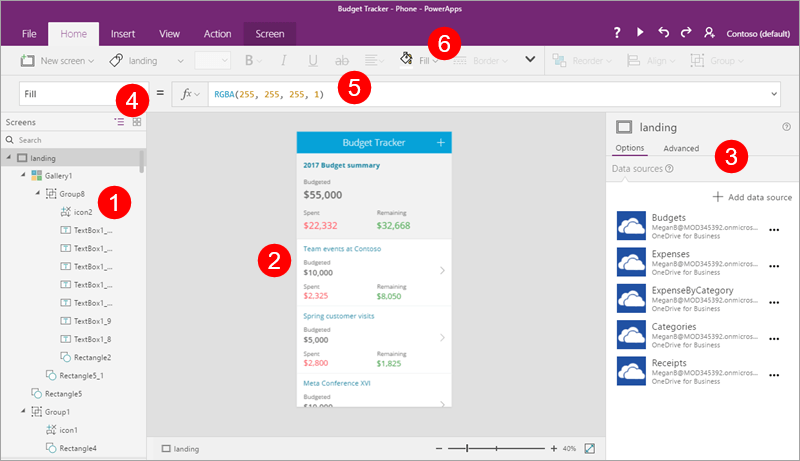
PowerApps Studio

Here you’ll be able to design and adapt apps that you create to your specific business needs!

PowerApps Studio contains three panes and a ribbon that help make app creation feel similar to creating a slide deck in PowerPoint. Source: Quick review of PowerApps Studio

PowerApps Mobile App

This handy mobile app is available on both phones (iOSAndroid) and tablets (Windows 10). No matter the platform, the app provides a runtime environment where you’ll be able to execute all of your PowerApps apps. This includes the ones that were shared with you as well as the ones you designed and coded yourself.

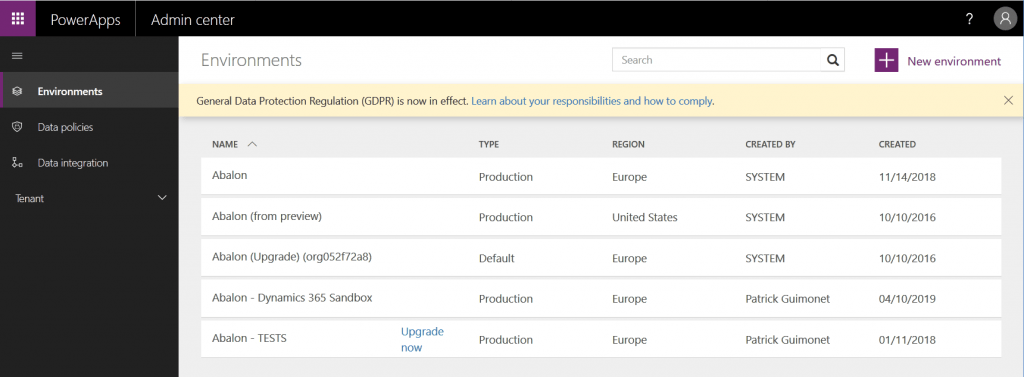
PowerApps Admin Center

Admin.powerapps.com gives you the power to create and manage environments, DLP (Data Loss Prevention) strategies and user roles. You can get a list of user licenses in the tenant.

Step 2: Select Your PowerApps Application Type

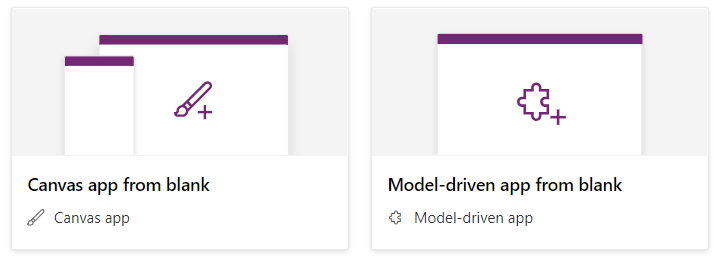
There are two main types of apps you can create with PowerApps:

  • Canvas apps
  • Model-driven apps

Canvas apps enable you to organize freely and easily interface by positioning controls and fields in a “pixel-perfect” user experience. The main focus here is bringing your business knowledge and creativity to the app’s design. Canvas apps target lightweight apps or even disposable apps that can be designed and used in minutes.

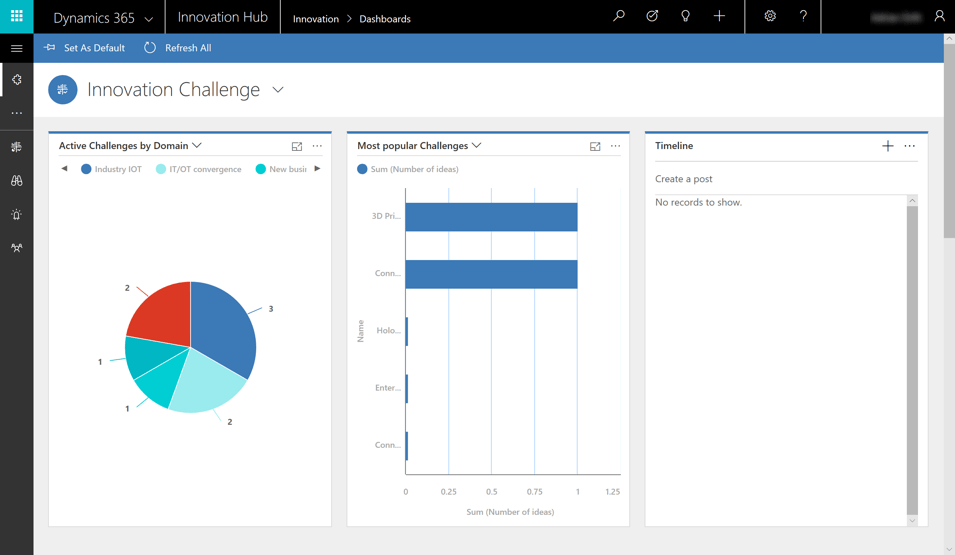
Model-driven apps are built on top of the Common Data Services used to help rapidly build forms, processes, and business rules. They focus on targeting heavier apps that are intended to be used intensively (multiple hours at a time).

powerapps

When working with model-driven apps, a good amount of the layout is determined for you and mostly designated by the components you add to the app. By contrast, the designer has complete control over the app layout in canvas app development.

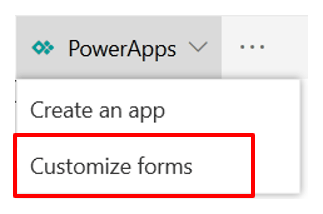
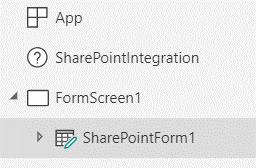
There’s also technically a “third” type of app that’s a specific version of Canvas: SharePoint list customized forms. From a SharePoint list, you can leverage PowerApps to customize the standard SharePoint form. After pulling up the “customize forms” menu, you would then get access to one specific component in your PowerApps called “SharePointIntegration.”

Need a quick primer on PowerApps? This post is pretty thorough:CLICK TO TWEET

This control is responsible for communicating user actions between PowerApps and SharePoint. It adds several properties like “OnNew,” “OnSave,” and “OnEdit” which provide ways for the app to respond when a user clicks or taps the “New” button, taps an item, or taps the “Edit All” button.

Step 3: Select Your Storage Type

Power Platform and specifically PowerApps target a world where data is king and the foundation of any business process. Thus, choosing the correct data sources is very impactful when it comes to designing an app.

Data are stored in a data source and you import them in your app by creating a connection.

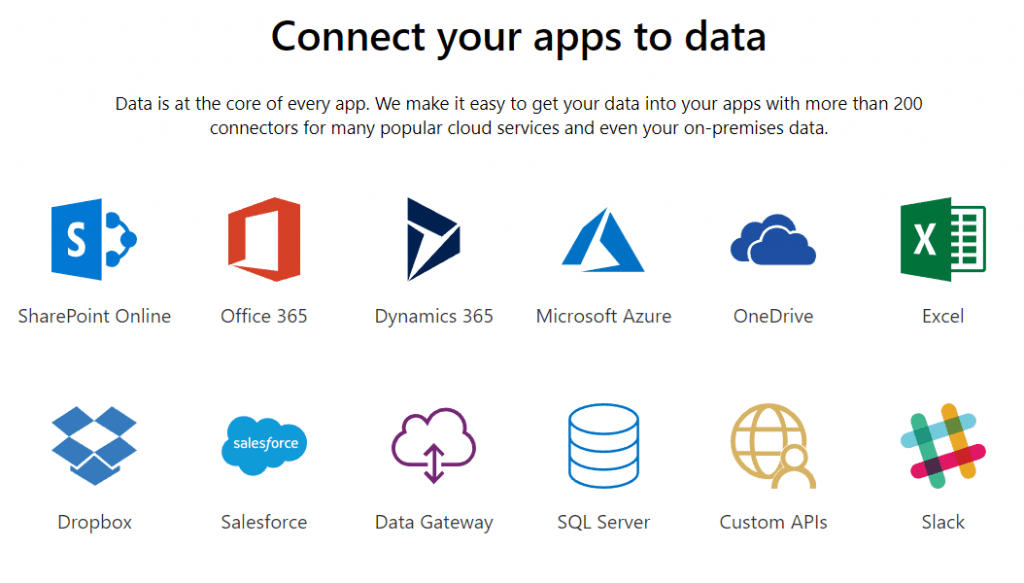
SharePoint lists and Excel spreadsheets are typically some of the most usual data sources, but there are also more than 200 data connectors available. PowerApps share connectors with Flow and Logic apps (the Azure service on top of which Flow is built). One of the great strengths of the platform is to provide connectors towards Microsoft worldOffice 365, SQL Server, Azure, etc., as well as towards external data sources like Salesforce, Dropbox, and Google Drive.

In PowerApps, a connector can provide data tables, actions, or both. Here’s for example of how a data source to a “Lessons” table can be used in PowerApps:

An action will have to be manually connected to a control to be executed:

For more, here’s an Overview of canvas-app connectors for PowerApps.

Be aware that the choice of data sources will have an impact on licenses needed to create and execute your app. If you choose or need a Premium source (like Salesforce or Common Data Service) you’ll need a PowerApps P1 or P2 license.

Step 4: Connect Your App to an Online or On-Premises Data Source
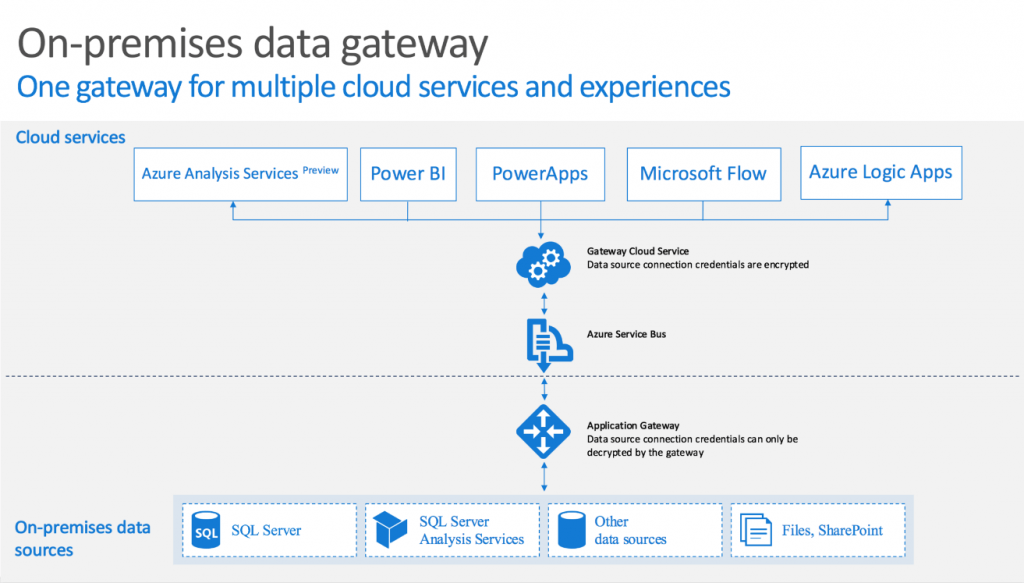
PowerApps is born in the cloud and can natively connect to cloud data sources. That said, it can connect to on-premises data sources as well. For that to happen you should configure an on-premises data gateway. This gateway is shared between several cloud apps like all the Power Platform (Power BI, Flow, PowerApps), Azure Analysis Services, and Azure Logic Apps.

powerapps

At the time of writing, supported data sources by the gateway are:

  • SharePoint
  • Oracle
  • SQL Server
  • Filesystem
  • DB2
  • Informix

Detailed instructions on how to configure and manage the gateway are available here.

Be aware that using on-premises data sources will have an impact on licenses needed to create and execute your app. If you choose or need a local data source, you will need PowerApps P1 or P2 license.

For all licensing information, you should have a look at:


Tuesday, July 6, 2021

Top 5 reasons to choose PowerApps

 With so many other mobile development tools on the market, why choose PowerApps? Here are 5 compelling features.

  1. PowerApps requires no programming experience. It provides a graphical designer that we can use to visually build our apps. PowerApps is based on Excel and the designer includes a formula bar, just like Excel. The language that PowerApps uses shares many of the same function names with Excel. Therefore if you know how to use Excel, you'll feel familiar with PowerApps.
  2. We can easily access company data sources from within PowerApps. Businesses frequently store data in SharePoint or SQL servers inside internal company networks. We can access this data by installing a gateway program on a computer inside the internal network. This provides a simple, non-programmatic way to make internal company data accessible from the mobile apps that we create.
  3. Simple deployment. We can make our apps available to end users through the sharing and publishing features in PowerApps. Compared to other methods of mobile development, there's no need to register for iOS developer accounts, obtain security certificates, or work out how to deploy Android APKs to devices.
  4. PowerApps provides access to hardware features on mobile devices, such as location services and cameras. We can retrieve the GPS location of a device, as well as compass and acceleration values. PowerApps also provides a pen control to capture signatures, and also provides barcode recognition capabilities.
  5. Finally, PowerApps provides lots of rich features, such as the ability to display charts, maps, and videos. We can also access a wide range of cloud services which includes services from Google, Adobe, Salesforce, and many other third party companies.

Excel vs SharePoint vs SQL Server vs CDS

 What data source should you use for your app? Here's a summary of the pros and cons of Excel, SharePoint, SQL Server, and the CDS.

Excel Spreadsheet

The key feature of Excel is that it's very simple to use. Users with very basic IT skills can cope with Excel. Other features include:

  • We can easily work with the data outside of PowerApps.
  • It's simple to backup data by copying the spreadsheet.
A severe limitation of Excel is that we can only access the first 2000 rows of a spreadsheet (more details here). Therefore, it is suitable only for simple apps where we don't need to store very much data.

SharePoint 365

SharePoint is a better data source, compared to Excel. For Office365 users, it works very well because a typical subscription includes access to SharePoint and PowerApps. Therefore, there's no need to pay extra for data storage. Features of SharePoint include:

  • It's simple to set up data lists in SharePoint. If you inlcude lookup or choice columns in a list, the form designer can generate combolist/dropdown controls for data entry.
  • SharePoint can validate the data that a user enters.
A limitation of SharePoint is that filtering and searching data can be difficult or impossible due to limited support for delegated queries (more details here). For example, a 'contains' search isn't delegable with SharePoint which means that SharePoint can only carry out a contains search on the first 2000 rows of a list. Backing up SharePoint data, and moving lists between Office365 tennents is also difficult.

SQL Server

In my opinion, SQL Server is the best data source. Its features include:

  • Rich database engine features - such as data validation, relationships, auto-incrementing fields
  • The best delegation support - we can query and return more accurate results, compared to SharePoint
  • We can use the built in/industry standard tools for backing up and restoring data.
  • We can bulk import data with tools like SSIS, import key values with 'identity insert', and more easily import sets of related data.
  • We can optimise data retrieval and join tables with SQL views. We can use view to return aggregate calucations (sums, counts, averages) for statistical reporting.
  • For more complex tasks, we can call stored procedures with Flow.

Using SQL Server doesn't need to be expensive. There is no license needed for an on-premise installation of SQL Server Express. The most basic setup of SQL Azure can start at around $5 month. Despite all the benefits, there are numerous issues to be aware of - not supporting tables with triggers is one of them. The best reference for SQL Server problems is Meneghino's blog.

CDS (Common Data Service)

The CDS is simple to use (compared to SQL Server) and provides great delegation support. The key features include:
  • The ability to design tables via a web based designer - no need to install/learn SQL Management Studio
  • Management of permissions through a web interface
  • Access to pre-built data structures/entities for common tasks like sales, invoicing, and helpdesk.
  • The ability to access data through an Excel add-in
  • The simplicity of having a database that's attached to an environment - no need to configure Azure firewall, or to understand 'database connection strings'
Access to pre-built entities can be a great benefit for non-developers. On the forums, non-developers often report problems  that arise from using non-normalised data sources. This can help these users avoid these types of problems. However, using the CDS can be expensive. It requires users to have a 'Plan 1' license which costs $7/month. For applications with 100's of users, the cost of using the CDS can be prohibitaive.   

Conclusion

For PowerApps, SQL Server is the data source that I recommend . It offers the most features, provides great support for delegation, and performs very quickly.

References:

http://powerappsguide.com/blog/post/excel-vs-sharepoint-vs-sql-server-vs-cds


Friday, July 2, 2021

Dataflow Vs. Dataset: What are the Differences of these two Power BI Components

 What is Dataflow?

Power BI Dataflow is the data transformation component in Power BI. It is a Power Query process that runs in the cloud, independent from Power BI report and dataset, and store the data into CDM: Common Data Model inside Azure Data Lake storage.

What is Dataset?

Power BI Dataset is the object that contains the connection to the data source, data tables, the data itself, the relationship between tables, and DAX calculations. Usually, Power BI dataset is hidden from the Power BI Desktop view, but easily can be seen in the Power BI service.


Thursday, July 1, 2021

POWER APPS – CANVAS APPS (PART 1)

 Power Apps Canvas Apps

After a bunch of wonderful announcements in recent Ignite 2019, Microsoft provides rigorous innovations and update releases in their products and solutions. Organizations have huge amounts of data lying in different database servers, stored in drives as documents and as hard-core paper documents in their file closets. Often manual processes increase the pile of paper documents and thus lead to slower business processes in huge organizations or the organizations which are geographically distributed. Microsoft has provided a platform – Power Platform to help SharePoint developers and end-users easily manipulate, surface, automate, and analyze data lying under different data sources.

Here, in this blog, we will learn about Power Platform and details of applications that can be created using this Microsoft platform.

What is the Power Platform?

In this digital age, the world is extremely reliant on data – companies are creating data and are increasing continually, but without the insight on data, it will be useless for them. They need a tool to analyze or process such data to gain insight into data. From the past, you can see that these data analysis, app development, and set up automation processes are handled by Software development teams. This would require additional people who first analyze your current situation, understand your needs to see as an end-user and outline a requirement for development teams. This custom apps development is costly, time-consuming, and would cause internal delays.

The Power Platform is very exciting as it is an association of the four Microsoft products: Power BI, Power Automate, Power Apps, and Power Virtual Agents. The Power Platform aims to provide you with the power to build custom apps as per your business needs. Secure and cloud-based storage is provided by the most underlying data source – Common Data Service for your data. You can build your custom applications to connect with your data stored in Common Data Service or any Online/On-premise data sources. SharePoint developers can use data from Office 365, Dynamics 365, as well as any third-party apps and other Microsoft SharePoint development services.

Power Platform provides you the ability to develop your apps without writing any code and saves your time and money being spent on custom application development. The Power Platform is new, and Microsoft will provide regular updates to make them mature. Microsoft will bring their services closer together, and Power Platform will be a key player to connect all services like Dynamic 365, Azure, and Microsoft 365.

Power Platform contains the following applications –

  • Power BI – to show and analyze your data.
  • Power Virtual Agents – smartly interact with data.
  • Power Apps – act and modify data.
  • Power Automate – automate data.

Power Platform

Let’s explore the Power Apps in more detail with the series of this blog.

Power Apps

Power Apps is defined as a suite of apps, services, connectors, and data platforms. It provides an extensive application development environment to build apps as per your business needs. Various Online and on-premises data sources are provided to connect with your business data to create your custom business apps.

Apps built using Power Apps have a responsive design and, therefore, seamlessly run on the browser as well as in mobile – tablet devices. Your manual business processes are transformed into automated processes through these apps.

Power Apps targets both business and SharePoint developers. It provides a platform where non-techie can create apps without writing any code, and SharePoint developers can write code to interact with data and metadata programmatically, to build complex business logic, and to create custom connectors.

Building apps using Power Apps helps from SharePoint developers to business analysts to develop apps with more intuitive tools that don’t need code and work faster with a data platform that connects various data sources. You can build highly tailored and sophisticated applications without using any conventional app development approaches that give more flexibility and freedom.

Apps can be developed using the PowerApps Studio client application or directly from the browser. However, the browser version is highly popular and faster to use in the development of apps. There are several templates already available to start building apps.

Power App Templates

There are two types of apps: Canvas apps and Model-driven apps.

Canvas apps

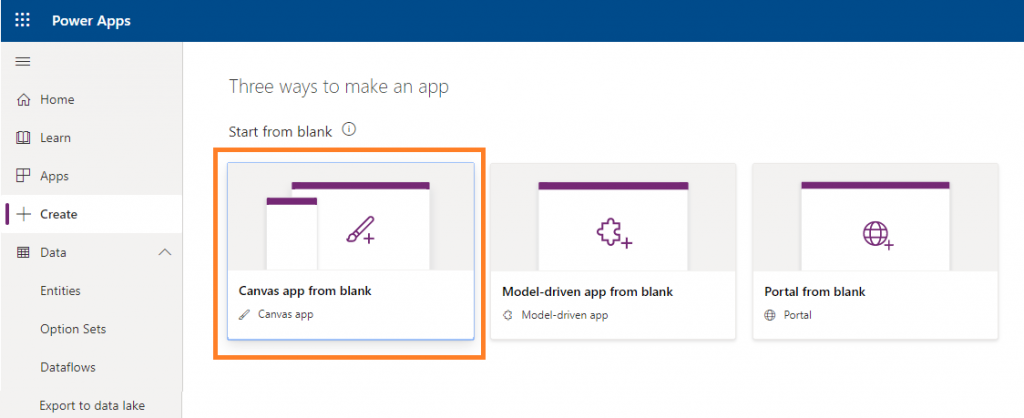
To fabricate the user interface and experience in your desired way, the Canvas app entertains that liberty to you. You can set the look and feel of apps the way you want it. You can link over 200 connectors and 100 templates in your app. Canvas apps can be created for the web, mobile, and tablet applications.

You can drag and drop elements that you require to create your canvas app. You can pull data from multiple data sources and combine it into one app.

You can start to build your app in one of the following ways:

  • From a SharePoint listSharePoint list
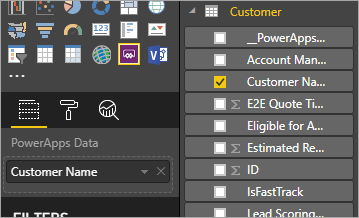
  • From a Power BI dashboardPower BI dashboard

Model-driven apps

Model-driven apps are relatively new to Power Apps. You can create an app without code and with simple or complex business logic. Model-driven apps run either as a standalone app or as a back-end app for canvas apps. In this app, you can create your data model as per your requirement and with a unified client interface to look similar on mobile, tablet, and web. If you are familiar with Dynamics 365, then you already have used a model-driven app without knowing it. Dynamics 365 is designed to store data in CDS. You can create entities for your app in CDS while developing it.

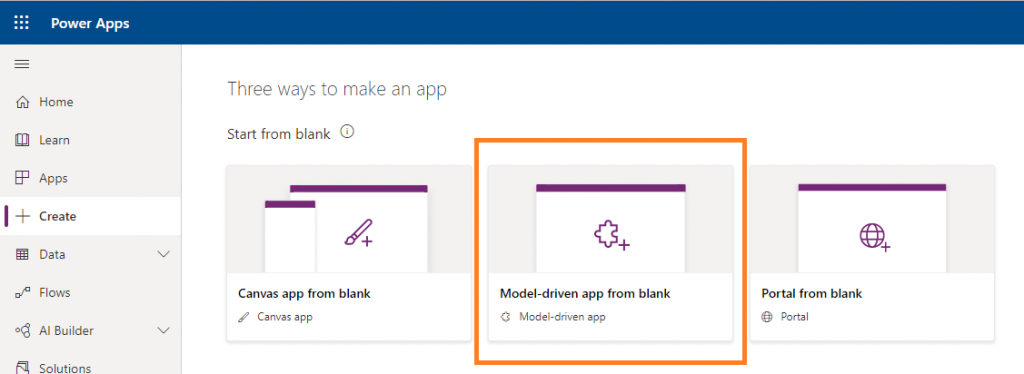
You can start to create your app from Power Apps Studio:

Model-driven apps

Canvas app vs. Model-driven app

Upon reading about both apps, you find both apps quite similar, but that’s not the whole truth. Though both have the same components to their design, the main difference is over user control. You have full privileges on every single aspect of your app while creating it.

In a Model-driven app, your entered data will control your app. The output of the app will be decided by the input you add. The layout and overall design will be more affected than the Canvas app. If you need flexibility, choose the Canvas app, or you are more concerned about structure, choose the Model-driven app.

Canvas Apps

Let’s see a small demo with Power Apps, Power BI, and Power Automate. SharePoint developers have prepared a Canvas app to collect Student Data from users and store it in the SharePoint list. There is an automated approval process that sends details to the administrator once the user submits the information. After the approval of the administrator, details will be stored in a SharePoint list. One Power BI report is prepared where all the details will be reflected to analyze the data.

Create a Canvas app

  • Login to the SharePoint site and create one SharePoint list as below:Create one SharePoint list
  • There is a “PowerApps” option in the command bar. Select the “Create an app” option.Create an app
  • The left pane will be opened to ask for the name of the app. Pass the name and click on the “Create” button to create a new app in Power Apps. The app will be opened in App Studio.Create new app in Power Apps
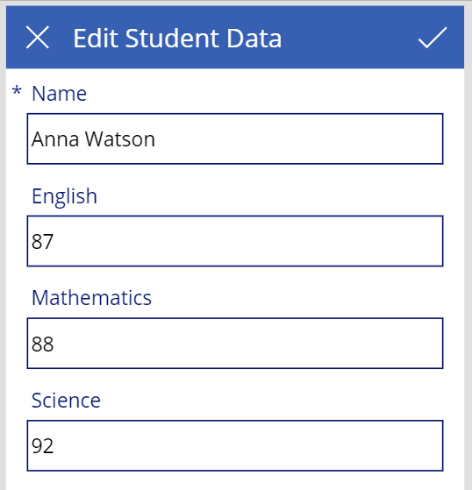
  • The app will have several screens already created, based on the list like Browse Screen, Details screen, and Edit Screen. Add/Edit form will have validations on fields that are supported by SharePoint OOTB validations on columns.
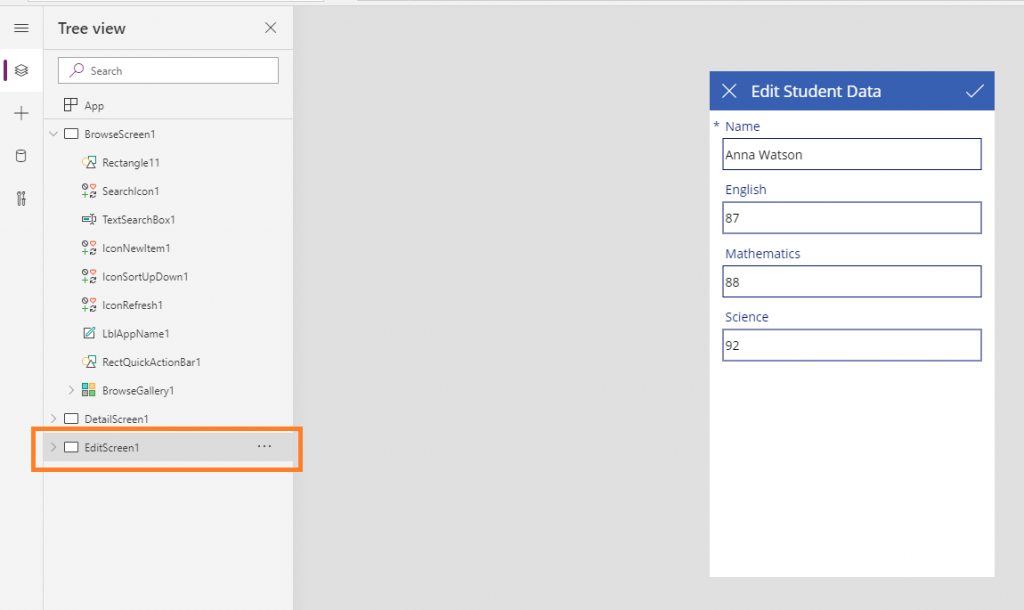
  • Click on “EditScreen1” from the tree view to open a form in the editor. You can find fields for all columns from the SharePoint list.EditScreen1
  • Click on the triangle icon from the top bar on the far most right to preview the app.Preview the app
  • You will find below screens and functionality already created by Studio in the app:
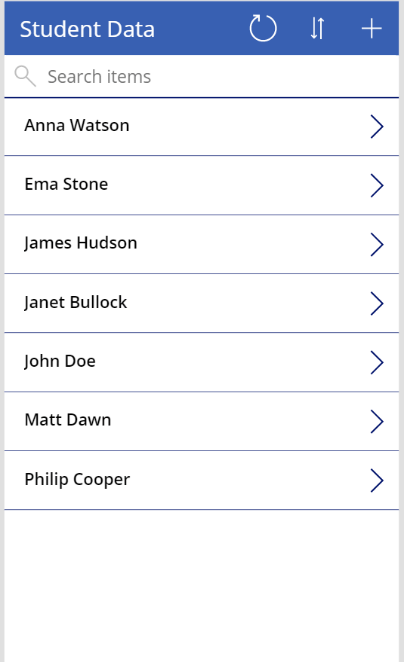
    • Show all items from the list on the browse screen.
    • Search items based on the “Title” column from the SharePoint list.Search items Based on Title
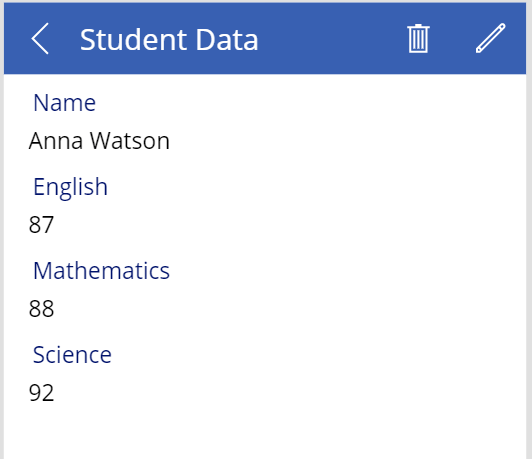
  • Show Item detail screen.Show Item detail screen
  • Add/Edit form on the screen.Edit form in screen

Create a flow in Power Automate

Now let’s create a flow for the approval process and attach it with the app.

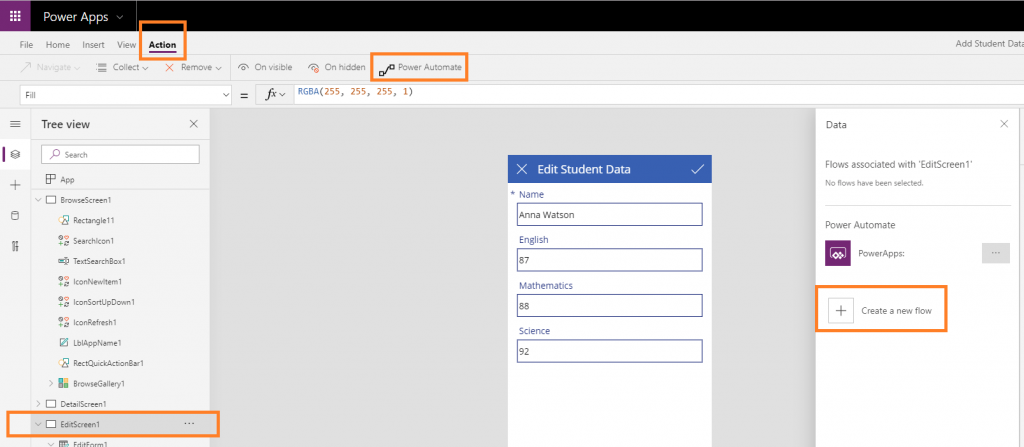
  • Go to “EditScreen1” and click on “Action” → click on “Power Automate,” → click on “Create a new flow.”Create a new flow
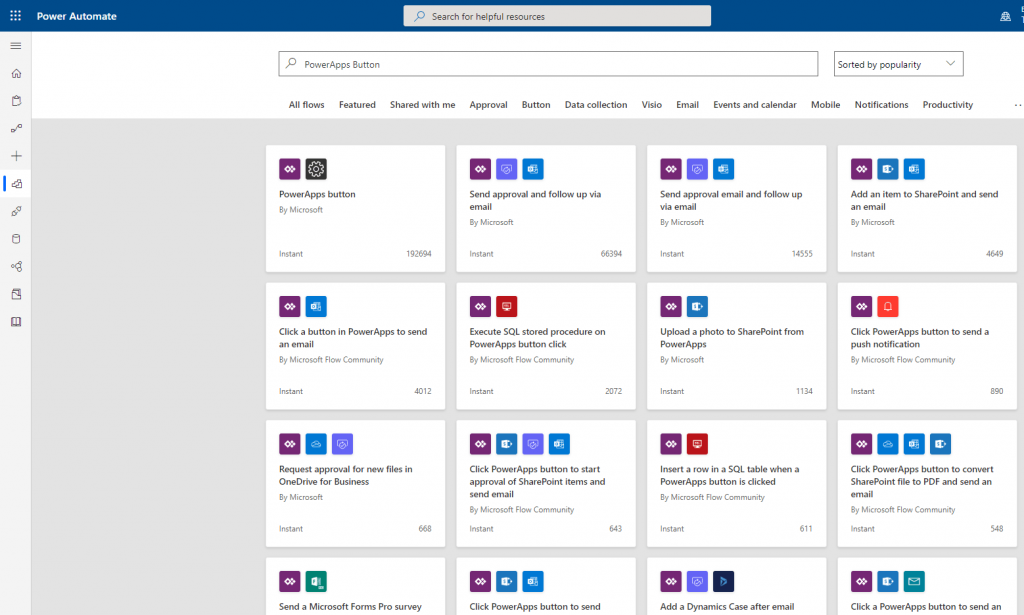
  • The Power Automate screen will be open in the new tab where there are many templates provided by Microsoft available, or you can create your custom flow as per your requirement.Power Automate screen
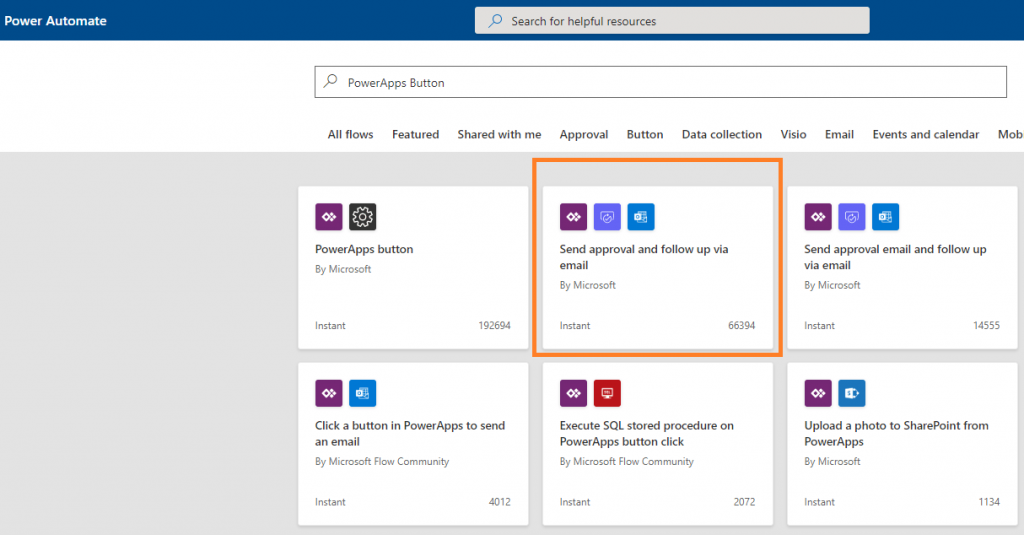
  • Choose the “Send Approval and follow up via email” template and create a flow.Send Approval and follow up via email
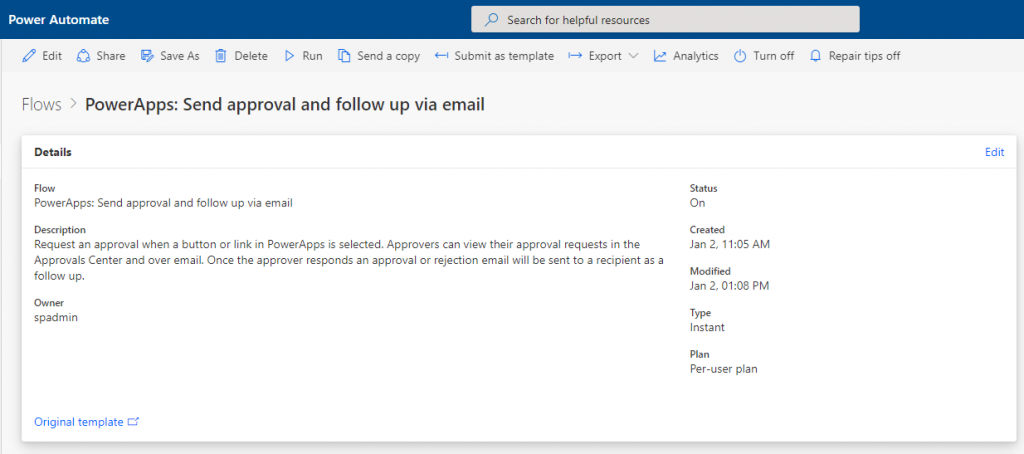
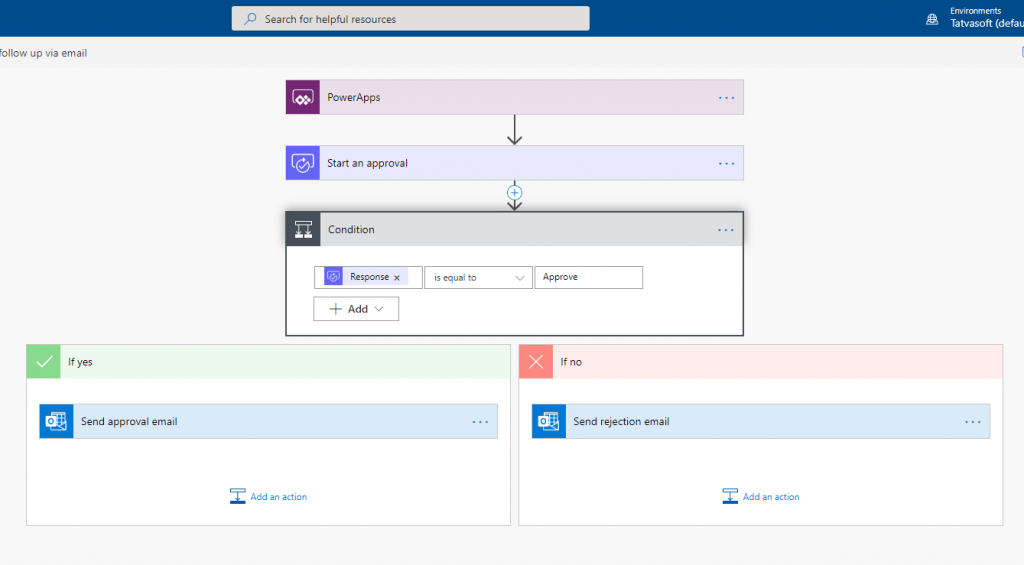
  • A flow will look like as below:A flow details
  • Click on “Edit” to open a flow in edit mode. You can see a flow with a default approval process is already created, where it will send an email to the approver. Once the approver approves/rejects your request, it will acknowledge it to the requestor. Default flow

This is the default flow created from the template. Let’s make a few changes to it.

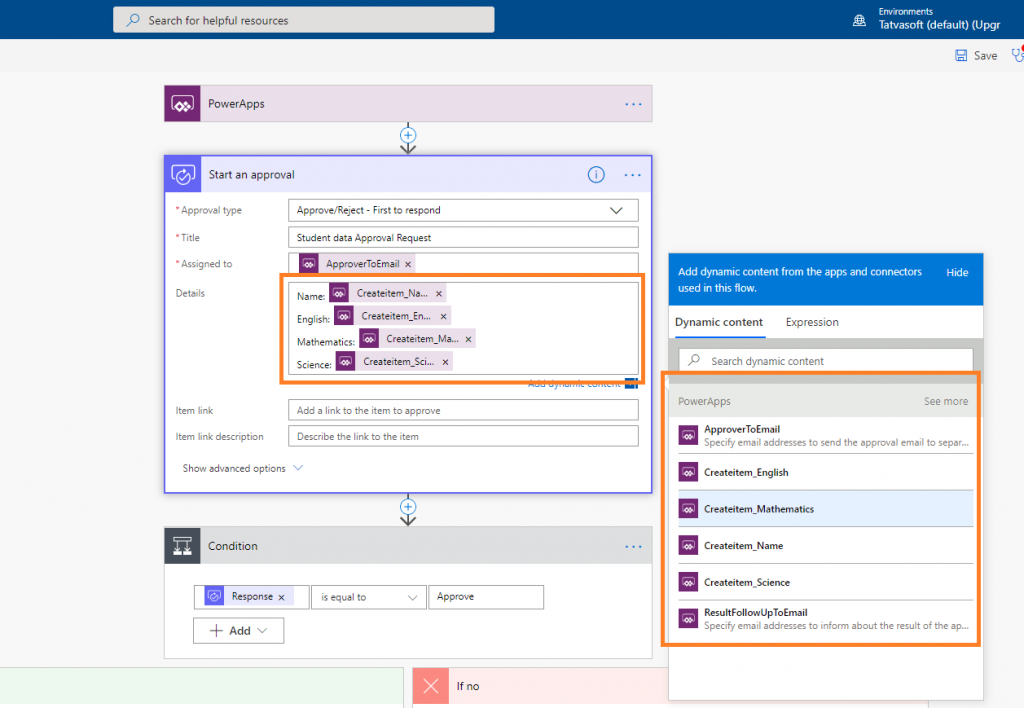
  • Click on “Start an approval” to expand that action. Add Name, English, Mathematics, and Science details by selecting from Dynamic Content pane as shown in the below image:Start an approval
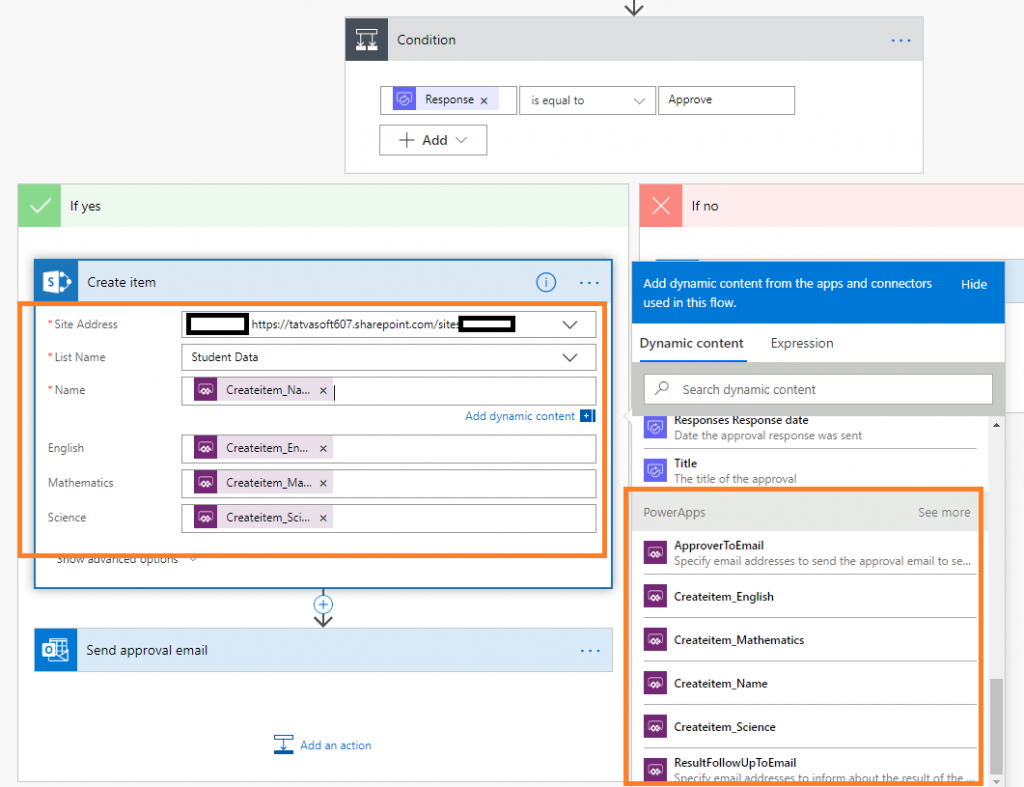
  • In the “Condition” action’s “Yes” part, add the “Create item” action to create a new item in the “Student Data” SharePoint list. Pass appropriate site name, list name, and student details, as shown in the below image:Condition Action
  • Save the changes inflow.

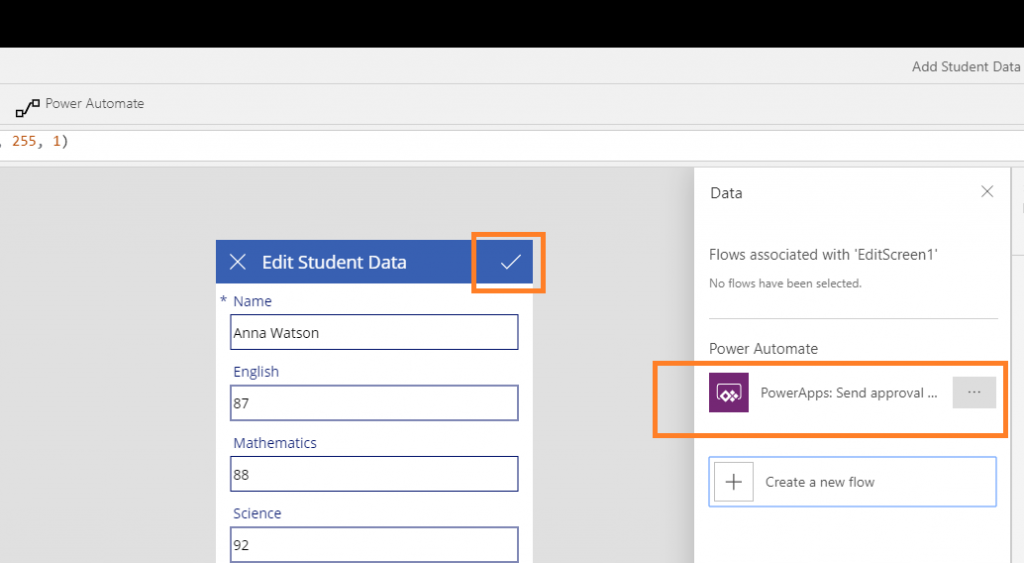
Let’s connect this flow to Power Apps, i.e., when the user submits the form in-app, details will be sent to the approver for the approval process, and once it’s approved by the approver, it will be stored in the SharePoint list.

  • Open the app in Power Apps studio → open Power Automate, and you will see the flow created earlier.Flow created earlier
  • Click on the “Submit” button and add a formula to connect flow with the submit button event.
    There are few parameters: email address of approver, email address of the user (who filled the form), fields: name; English; Mathematics; Science required to pass these values inflow.
  • Write the below formula on the “Submit” button event:
    If(EditForm1.Mode=FormMode.Edit,
     
    SubmitForm(EditForm1)
    +
    Navigate(BrowseScreen1,ScreenTransition.Fade),
    'PowerApps:Sendapprovalandfollowupviaemail'.Run("<approver user email id>", User().Email,DataCardValue5.Text,DataCardValue6.Text,DataCardValue7.Text,DataCardValue8.Text)
    +
    Navigate(BrowseScreen1,ScreenTransition.Fade))

Note: This formula will check if the form is in edit mode, it will save changes in the list, and for new items, it will send it for the approval process and then will save it in the list after the approval process.

Formula

  • SharePoint developers can test their app by running in preview mode.
  • Save the app and publish it.
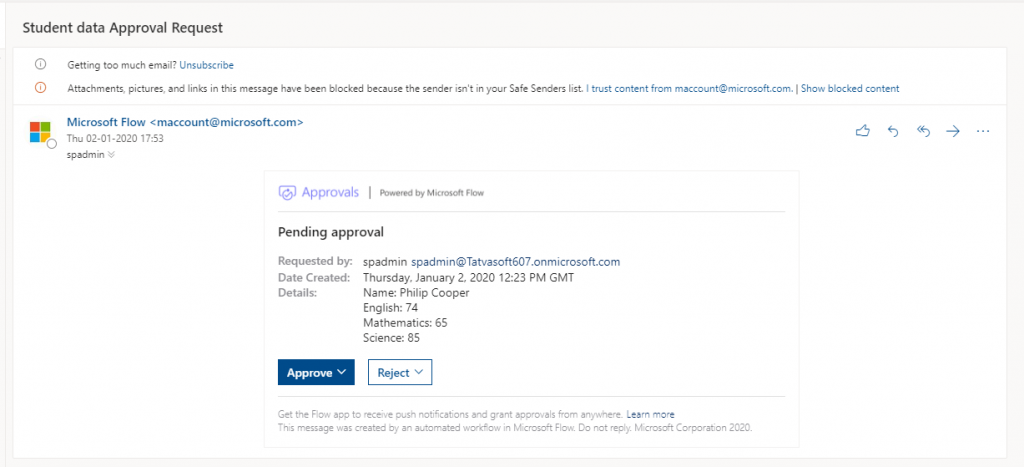
  • Approver users will get below mail during the approval process. Student details will be saved once the user approves the request, and the requestor will acknowledge the email.Approval process

Without coding and in very few steps, you can create a Power App and approval system connected with it. Formulas used in Power Apps are very similar to excel and Power BI report formulas that are quite easy to use.
Note: Please follow the best practices in naming conventions for the elements used in Power Apps. To show you the default functionalities – capabilities of Power Apps and Power Platform, we haven’t followed that in our demo.

Create a Power BI report

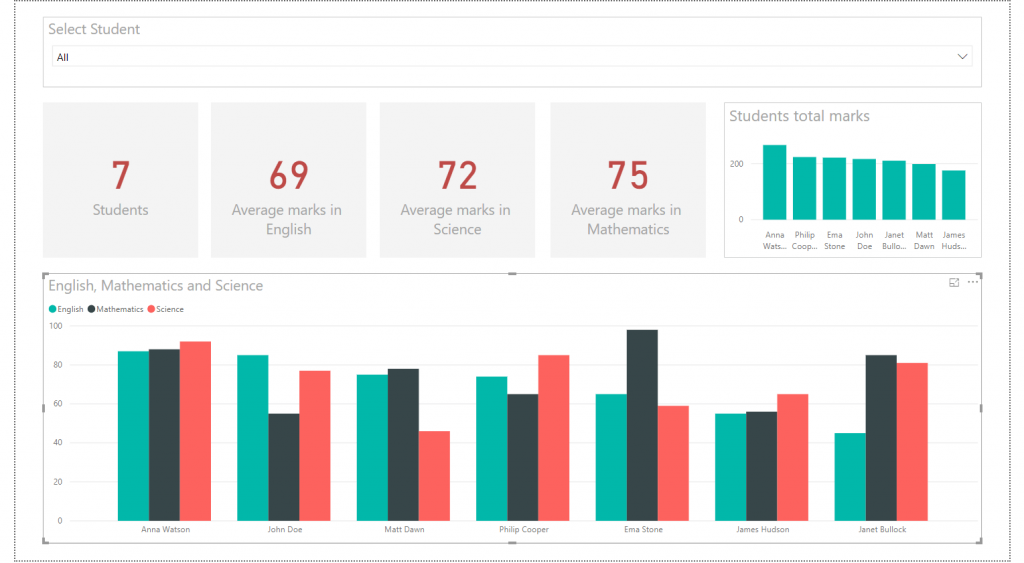
Our expert SharePoint developers have also prepared a Power BI report connected with a SharePoint list to generate various charts. It’s very easy to analyze data where you can access real-time data in a Power BI report.

Power BI report

Go through this blog to generate a Power BI report using a SharePoint list and integrating the Power BI report in your SharePoint Online.

Conclusion

Via this blog, one is aware of the power of this MS product. Based on end-users requirements, one can opt for the Power Apps type. If there is a requirement for some good GUI experience for an app, to carry out some automated processes, and to summarize the captured data which is available through many of the outs of the box connectors, a Canvas app is an excellent choice to go. Also, one can achieve this requirement by following this blog.