While there are tons of great articles and videos on PCF are already available, I decided to provide comprehensive PCF beginner guide along with steps to reuse the pre-built controls.
Topics to be covered in this article:
- What is PCF?
- How we survived Pre-PCF era?
- Pre-requisites
- Understand the file structure of PCF control
- Get familiar with commands
- Build a simple PCF control.
- Run and Debug in Browser
- Packaging PCF control to a Solution
- How to download and use the sample pcf controls
- Add components to Model Driven App
Lets get started and dive in to the details.
What is PCF?
- With PCF we can provide enhanced user experience for the users to work with data on forms, views, and dashboards.
- For example, a basic ‘Whole Number’ field can be turned in to a Slider control where user can slide to set the value rather than typing.
- Couple of important points consider
- PCF works only on Unified Interface and not on the web client.
- PCF doesn’t work for on-premises instances.
How we survived Pre-PCF era?
- As mentioned in previous section, with PCF we can achieve the enhanced user experience.
- Before PCF, with the help of HTML web resource we could enhance the user experience. As an example, we can build a ‘Slider’ control in HTML page with .css and add as Web Resources to the form.
- How PCF different from web resources?
- Unlike HTML web resources, PCF code components are rendered as a part of the same context, load at the same time as any other components, providing a seamless experience for the users.
Pre-requisites:
Now lets see the pre-requisites to build our first PCF control.
- Microsoft Power Apps CLI
- Power Apps CLI enables developers to create code components quickly.
- Download form here

- Get TypeScript
- PCF component uses TypeScript language. We need to get TypeScript before we get in to development.
- Getting TypeScript is 2 step process.
Understand the file structure of PCF control:
Before we build our first PCF control, lets understand the structure of PCF component.
- PCF components consist of three elements:
- Manifest
- Manifest is the XML metadata (i.e., Name, Properties, etc..) file that defines a PCF control.
- Component implementation
- Implementation is nothing but building your control using the TypeScript.
- Each code component must have a
index.ts file. - index.ts file contain following methods
- init (Required) – When the Dynamics form is ready, it initializes the PCF component by calling the init method.
- updateView (Required) – If the data changes, platform calls out the updateView method.
- getOutputs (Optional)
- destroy (Required)
- Resources
- If the PCF control requires styling(i.e., CSS) it has to be added as Resource.
- Resource file has to be defined in the Manifest.
Get familiar with commands:
We have to be familiar with Power Apps CLI commands before building our first control. All these commands need to be triggered from Visual Studio Command Prompt.
- Initialization
- This is the first command which creates basic folder structure of PCF control project.
- Syntax:
pac pcf init –namespace <specify your namespace here> –name <Name of the code component> –template <component type>
- –namespace: Unique namespace of your control.
- –name: Name of the control. Below is the command to create a control by name ‘HelloWorld’
- –template: Two types of components: field and dataset for model-driven apps. For canvas apps, only the field type
- Ex – pac pcf init –namespace RajeevPCF –name HelloWorld –template field
- Install Dependencies
- Once ‘init’ sets up the basic folder, as a next step install all the PCF control dependencies using ‘npm install’ command.
- Syntax:
- Note: If you are wondering what is npm, it stands for ‘Node Package Manager’. As we installed ‘Node.js’ already as part of Pre-requisites we are able to use this now.
- Build PCF Component
- Once you implement the PCF component, build the code for any syntax errors.
- Syntax:
- Solution – Init
- Once we done with PCF component code implementation, we need to package in to a Solution which can be imported to your CDS instance.
- ‘Init’ creates basic solution folder structure.
- Syntax:
pac solution init –publisher-name <enter your publisher name> –publisher-prefix <enter your publisher prefix>
- –publisher-name : Name of the solution Publisher.
- –publisher-prefix : Solution prefix name.
- Ex – pac solution init –publisher-name SamplePCF –publisher-prefix samppcf
- Solution – Add-Reference
- Solution – Init, creates a basic solution folder structure.
- To link the PCF component, to the Solution trigger ‘Add-Reference’ command.
- Syntax:
pac solution add-reference –path <path to your Power Apps component framework project>
- –path : Path of PCF component project folder.
- Ex – pac solution add-reference –path “D:\E\Practice\PCF\Controls\HelloWorld”
- Solution – Package
- This is the final solution packaging step which generates zip file.
- Syntax:
- msbuild /t:build /restore
- Run the PCF control in browser
- Use ‘npm start’ command to open the PCF control in browser.
- This helps to debug and test before we import the PCF control to CDS.
- Syntax:
Build a simple PCF control:
As we installed Pre-requisites and familiarized with commands, lets start building our first PCF control.
- Create 2 folders (i.e., Controls, Solutions) in your drive.
- Note: You can only have a single folder but 2 folders gives me flexibility to manage.
- Under ‘Controls’ folder, create a sub folder with your PCF control name.
- Open the ‘Developer Command Prompt for VS 2017/2019’ and point to the ‘Controls -> PCF Control name’ folder. In my case, my PCF control folder name is ‘HelloWorld’.


- As we know, ‘Init’ creates a basic folder structure, if you go to the folder, you would see following files.

- Now run the ‘install’ command to add all dependencies.

- If you go to the folder, you would see a new ‘node_modules’ folder.

- Now open the project folder in either Visual Studio or Visual Studio Code.
- If you are using ‘VS Code’ editor, trigger ‘code‘ command from ‘Command Prompt’ which auto opens the ‘VS Code’ editor.
- If you glance the files from explorer, you would see ‘Manifest’ file (ControlManifest.Input.xml) with metadata.

- Also ‘index.ts’ file, which contains 4 methods as described in above sections.

- ‘context’ parameter in ‘index.ts’ file
- Contains the context of the form similar to plugincontext in plug-ins.
- ‘context.parameters’ fetches the PCF control parameter defined in Manifest file. ‘sampleProperty’ is the default property name of PCF control parameter defined in Manifest.
- I’ve added the following simple logic in both ‘init’ and ‘updateView’ methods, which reads the field value from ‘context’ and display the value in HTML DIV control.

- Once complete the implementation, build the project by triggering ‘npm run build‘ command.

Run and Debug in Browser:
- If no errors during build, use ‘npm start‘ command to open the PCF control in browser.
- This is a handy option which allows to debug locally in browser before ported to CDS.

- ‘npm start’ opens the PCF control in a new browser tab as below.

- Use ‘F12’ to debug the functions (i.e., init, updateView, etc.).
Packaging PCF control to a Solution:
Now that we built and tested the PCF control, lets package it in to a solution which enables us to transport the PCF control to CDS which can be further used in Forms, Dashboards.
- In the ‘Solution’ folder which has been created in above steps, create another sub folder for the PCF control. In my case, I named the folder as ‘PCF_HelloWorld’.
- Open the ‘Developer Command Prompt for VS 2017/2019’ and point to the ‘Solutions -> PCF_HelloWorld’ folder.
- Trigger ‘solution init‘ command which creates folder structure.

- Trigger ‘solution add-reference‘ command, which links our PCF control with Solution.

- Finally, trigger ‘msbuild‘ command to zip the components.

- ‘msbuild‘ creates ‘bin/Debug’ folder along with solution zip file.

- Once we have the solution zip file, we are good to use the PCF control by importing to CDS. This is explained in coming sections.
How to download and use the sample pcf controls:
As we learnt how to build our own PCF control, lets see how to use the pre-built PCF controls. I am going to leverage increment-control to from sample components.
- Open the link and scroll to the end. Click on ‘Download sample components’ link, which prompts you to download a zip folder contain all the sample controls.

- Save the zip to drive, extract and copy to our ‘Controls’ folder which we created in previous sections. It looks something as below.

- As we are going to use ‘TS_IncrementComponent’ control, we need to run the NPM commands to build and package ‘TS_IncrementComponent’ control to solution (i.e., zip file).
- Open the ‘Developer Command Prompt for VS 2017/2019’ and point to the ‘Controls -> TS_IncrementComponent’ folder.
- Note: We don’t need to run the ‘Init’ command as the folder structure is already formed from the download.
- Run the ‘npm install‘ command to install all the required dependencies.

- Note: We don’t need to run ‘build’ command as control was already built. So we can directly start solution packaging.
- Create a new sub folder (i.e., ‘PCF_Increment’ is my folder name) under ‘Solutions’ folder and point the ”Developer Command Prompt for VS 2017/2019′ to this new folder.
- Run ‘solution init’ command to start packaging.

- Run ‘solution add-reference’ command to link PCF control to Solution.

- Finally, run ‘msbuild’ command to create solution .zip folder.
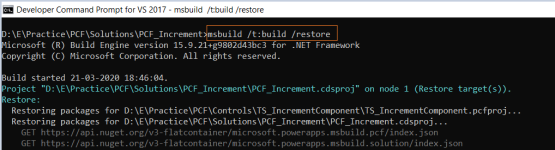
- Go to folder and you should see a new ‘bin/Debug’ folder as follow with the solution zip file.

- As we got the solution zip file, lets see how to use the PCF control in our Dynamics forms.
Add components to Model Driven App
In this section, lets see how to transport the PCF control solution zip file created in above section to CDS.

Prerequisites:
- Subscribe to Dynamics 30 days trial and get Office 365 account.
- Connect to Power Apps maker portal using Office 365 account.
Add PCF component solution to CDS:
- To import the solution to CDS, first connect to the Power Apps maker portal
- Go to ‘Solutions’ tab.
- Click on ‘Import’ and browse the solution zip file (i.e., PCF_Increment.zip) and complete the import process.

Add PCF control to Entity:
As we imported ‘TS_IncrementComponent’ control, which works with ‘Whole Number’ field, create a ‘Whole Number’ field and configure the PCF control.
- Create a new ‘Whole Number’ field in one of the entities.

- Open the ‘Main’ customization form in legacy editor.
- Note: At the time of writing this article, PCF controls can be configured only from legacy UI.
- Click on field, go to ‘Controls’ tab and click on ‘Add Control…’.
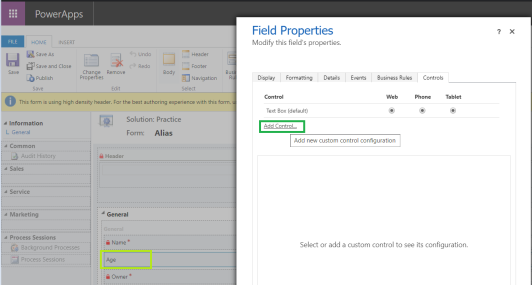
- Select the ‘IncrementControl’ from the list.

- Save and Publish the form
- Open the form in Model driven app and you should see the PCF control in the place of ‘Whole Number’ field as below.

Note:
- A solution project can contain references to multiple code components, whereas code component projects may only contain a single code component.
- Using
pac solution init and msbuild to build a cdsproj solution project that has references to one or more code components. - Each code component is added to the
cdsproj using pac solution add-reference.


