Search This Blog

Saturday, February 28, 2015

List Updating in SharePoint 2010 Programmatically Using VS 2010

Introduction

Today, in this article let's play around with one of the interesting and most useful concepts in SharePoint 2010.
 
Question: What is a list?

In simple terms "When you create a custom list, a new empty list is created with just two columns - Title and Attachments. The list contains a single default view. Once you create the list, you can add more columns, views, and so on".

I think we are now good to go and implement this wonderful concept.

Step 1: Create a custom list and modify the view.

Step 2: Open SharePoint 2010 Central Administration and navigate to specific site.

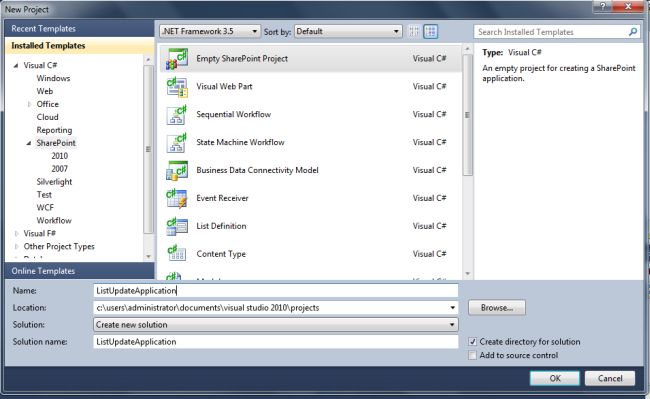
Step 3: Open Visual Studio 2010 and create an "Empty SharePoint project":

Output1.jpg
 

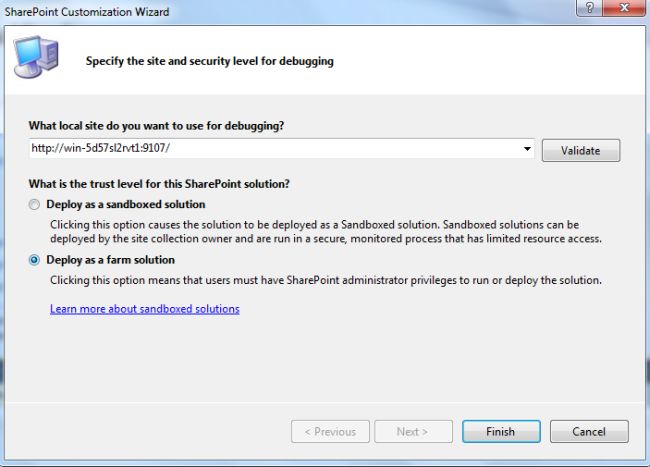
Step 4: Select "Deploy as a farm solution" and click on the "Finish" button. Now an empty project will be created:

Output2.1.jpg
 

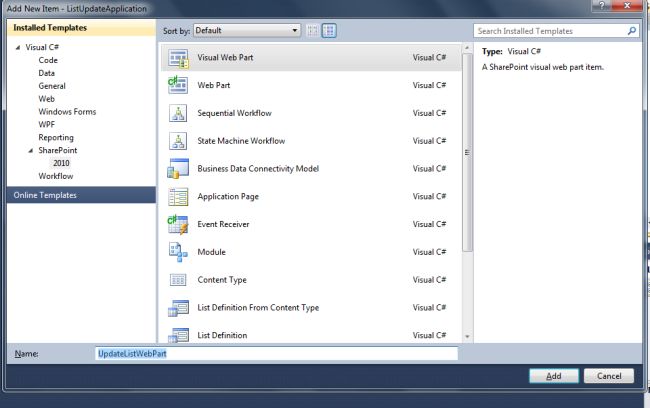
Step 5: Add a new visual webpart for that project:

Output3.jpg

Step 6: The complete code of visualwebpart1usercontrol.ascx looks like this:

<%@ Assembly Name="$SharePoint.Project.AssemblyFullName$" %>
<%@ Assembly Name="Microsoft.Web.CommandUI, Version=14.0.0.0, Culture=neutral, PublicKeyToken=71e9bce111e9429c" %>
<%@ Register TagPrefix="SharePoint" Namespace="Microsoft.SharePoint.WebControls"
    Assembly="Microsoft.SharePoint, Version=14.0.0.0, Culture=neutral, PublicKeyToken=71e9bce111e9429c" %>
<%@ Register TagPrefix="Utilities" Namespace="Microsoft.SharePoint.Utilities"Assembly="Microsoft.SharePoint, Version=14.0.0.0, Culture=neutral, PublicKeyToken=71e9bce111e9429c" %>
<%@ Register TagPrefix="asp" Namespace="System.Web.UI"Assembly="System.Web.Extensions, Version=3.5.0.0, Culture=neutral, PublicKeyToken=31bf3856ad364e35" %>
<%@ Import Namespace="Microsoft.SharePoint" %>
<%@ Register TagPrefix="WebPartPages"Namespace="Microsoft.SharePoint.WebPartPages"
    Assembly="Microsoft.SharePoint, Version=14.0.0.0, Culture=neutral, PublicKeyToken=71e9bce111e9429c" %>
<%@  Control Language="C#" AutoEventWireup="true"CodeBehind="UpdateListWebPartUserControl.ascx.cs"
    Inherits="ListUpdateApplication.UpdateListWebPart.UpdateListWebPartUserControl" %>
<div>
    <center>
        <table>
            <tr>
                <td colspan="2">
                    <asp:label id="Label1" runat="server" text="Update List Data via Object Modelling - SharePoint 2010"
                        font-bold="true" font-size="Large" font-names="Verdana" forecolor="Maroon"></asp:label>
                </td>
            </tr>
            <tr>
                <td>
                    <asp:label id="Label6" runat="server" text="Please Enter ID" font-size="Large" font-names="Verdana"
                        font-italic="true"></asp:label>
                </td>
                <td>
                    <asp:textbox id="TextBox4" runat="server"></asp:textbox>
                </td>
            </tr>
            <tr>
                <td>
                    <asp:label id="Label2" runat="server" text="Please Enter FirstName" font-size="Large"
                        font-names="Verdana" font-italic="true"></asp:label>
                </td>
                <td>
                    <asp:textbox id="TextBox1" runat="server"></asp:textbox>
                </td>
            </tr>
            <tr>
                <td>
                    <asp:label id="Label3" runat="server" text="Please Enter LastName" font-size="Large"
                        font-names="Verdana" font-italic="true"></asp:label>
                </td>
                <td>
                    <asp:textbox id="TextBox2" runat="server"></asp:textbox>
                </td>
            </tr>
            <tr>
                <td>
                    <asp:label id="Label4" runat="server" text="Please Enter Age" font-size="Large"font-names="Verdana"
                        font-italic="true"></asp:label>
                </td>
                <td>
                    <asp:textbox id="TextBox3" runat="server"></asp:textbox>
                </td>
            </tr>
            <tr>
                <td colspan="2">
                    <asp:button id="Button1" runat="server" text="Update Data" font-names="Verdana"width="166px"
                        backcolor="Orange" font-bold="True" onclick="Button1_Click" />
                </td>
            </tr>
            <tr>
                <td colspan="2">
                    <asp:label id="Label5" runat="server" font-bold="true" font-names="Verdana"forecolor="Maroon"></asp:label>
                </td>
            </tr>
        </table>
    </center>
</div>

Step 7: 
The complete code of visualwebpart1usercontrol.ascx.cs looks like this:

using System;
using System.Web.UI;
using System.Web.UI.WebControls;
using System.Web.UI.WebControls.WebParts;
using Microsoft.SharePoint;
namespace ListUpdateApplication.UpdateListWebPart
{
    public partial class UpdateListWebPartUserControl : UserControl
    {
        protected void Page_Load(object sender, EventArgs e)
        {
            TextBox4.Focus();
        }
        protected void Button1_Click(object sender, EventArgs e)
        {
            if (string.IsNullOrEmpty(TextBox4.Text))
            {
                Label5.Text = "Please Enter Some Values";
            }
            else
            {
                SPSite site = SPContext.Current.Site;
                SPWeb web = site.OpenWeb();
                web.AllowUnsafeUpdates = true;
                SPList list = web.Lists["Student"];
                SPListItem item = list.GetItemById(Convert.ToInt32(TextBox4.Text));
                item["First Name"] = TextBox1.Text;
                item["Last Name"] = TextBox2.Text;
                item["Age"] = Convert.ToInt32(TextBox3.Text); item.Update();
                Label5.Text = "Data Successfully Updated";
                TextBox1.Text = string.Empty;
                TextBox2.Text = string.Empty;
                TextBox3.Text = string.Empty;
                TextBox4.Text = string.Empty;
            }
        }
    }
}

Step 8: Deploy the solution file and add the created webpart to the SharePoint site:

Step 9: The output of the application looks like this:

Output4.png
 

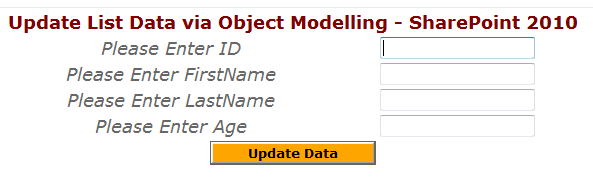
Step 10: When updating the list the output of the application looks like this:

 
Output5.png
 

Output6.jpg
 

I hope this article is useful for you.

Programmatically uploading multiple files to Custom sharepoint list in 2007

Introduction:

A custom SharePoint list can be configured to collect any type of data and SharePoint automatically generates the forms for adding new items, editing items and viewing items.

Team Web site comes with a built-in List Calendar, Task, which is listed on the Quick Launch bar. A new custom list has to be created for storing the files.

Steps creating custom list:


Custom list created


Custom Column Creation

  1. While creating custom list Named as FileList default column will create Title.
  2. Modify column name Title as Filename.
  3. Create one more column as Filedate.
  4. Create one more column as FileSize.
Implementation of Web part

The files are added to the custom GridView (list) in web part level using browse file upload button. You can add and delete multiple files in this list. Finally all the files are uploaded in custom share point list Filelist using submit button in webpart.

The steps to create a web part
  • Make sure installed VS.net 2005.
  • Make sure installed Web part Project Library in your system.
  • Start VS.Net 2005 and create a new project.
  • Select Project Type as Visual C#-->SharePoint.
  • Visual Studio Installed templates as Web Part.
  • Change Name as MultipleUploadWebpart.
  • Change Location as e:\ MultipleUploadWebpart.
  • Change Solution name as FileUploadWebPart.

Using the Render method

The Web part base class seals the Render method of System.Web.UI.Control because the Web Part infrastructure needs to control rendering the contents of a Web Part. For this reason, custom Web Parts must override the Render method of the Web part base class.

The Complete Web part Code

#region File Information
///<summary>
/// ------------------------------------------------------------------------------------------------------
/// Namespace : MultipleFileUploadWebPart
///
/// Purpose   : To Create Webpart to programmatically upload MultipleFiles to Custom SharePoint List
///        
/// Change History
/// -------------------------------------------------------------------------------------------------------
/// Date            Edit            Author            Comment             
/// -------------+--------+-------------------------------------------------------------------------------
/// 12-July-2007    [100]          Saravanan_Gajendran     Create Webpart
/// -------------+--------+-------------------------------------------------------------------------------
///</summary>
using System;
using System.Runtime.InteropServices;
using System.Web.UI;
using System.Web;
using System.Web.UI.WebControls;
using System.Web.UI.HtmlControls;
using System.Web.UI.WebControls.WebParts;
using System.Xml.Serialization;
using System.Data;
using System.IO;
using System.Text;
using System.Web.SessionState;
using Microsoft.SharePoint;
using Microsoft.SharePoint.WebControls;
using Microsoft.SharePoint.WebPartPages;

namespace MultipleUploadWebpart
{
     [Guid("2115a405-ff46-4040-8370-6e4fcb7b9194")]
     public class MultipleUploadWebpart : System.Web.UI.WebControls.WebParts.WebPart
     {
          #region Variables
          private HtmlInputFile inputFile;
          private Button btnUpload;
          private Label lblMessage;
          private GridView dgdUpload;
          private string fileName = "";
          private Button btnSubmit;
          private HyperLinkField hlnkFileName;        
          private BoundField bndFileSize;
          private BoundField bndFileKb;
          private ButtonColumn btnclmDelete;
          private CommandField cmdDelete;
          private double length;
          byte[] contents;
          DataTable dt;//datatable use for multiple file upload
          DataRow dr;//datarow use for multiple file upload
          DataColumn dc;//datacolumn use for multiple file upload
          double count = 0;//count of file size
          #endregion
          #region Create Child Control
          protected override void CreateChildControls()
          {
               #region inputfile
               this.inputFile = new HtmlInputFile();
               this.inputFile.ID = "_fileUpload";
               #endregion           
               #region message label
               this.lblMessage = new Label();
               this.lblMessage.ID = "_lblMessage";
               this.lblMessage.Text = "";
               #endregion
   
               #region
  Button
               this.btnUpload = new Button();
               this.btnUpload.ID = "_btnUploadUpload";
               this.btnUpload.Text = "Upload";
               this.btnUpload.Click += new EventHandler(btnUploadUploadClick);
               this.btnSubmit = new Button();
               this.btnSubmit.ID = "_btnSubmit";
               this.btnSubmit.Text = "Submit";
               this.btnSubmit.Click += new EventHandler(btnSubmit_Click);
               #endregion
               #region GridView
               this.dgdUpload = new GridView();
               this.hlnkFileName = new HyperLinkField();
               this.hlnkFileName.DataTextField = "FileName";
               this.hlnkFileName.DataNavigateUrlFormatString = "FilePath";
               this.hlnkFileName.HeaderText = "FileName";
               this.bndFileSize = new BoundField();
               this.bndFileSize.HeaderText = "FileSize";
               this.bndFileSize.DataField = "FileSize";
               this.bndFileKb = new BoundField();
               this.bndFileKb.HeaderText = "";
               this.bndFileKb.DataField = "KB";
               this.cmdDelete = new CommandField();
               this.cmdDelete.HeaderText = "Delete";
               this.cmdDelete.ButtonType = ButtonType.Link;
               this.cmdDelete.InsertImageUrl = "delete.gif";
               this.cmdDelete.DeleteText = "Delete";
               this.cmdDelete.ShowDeleteButton = true;
               this.dgdUpload.ID = "_dgdFileUpload";
               this.dgdUpload.Columns.Add(hlnkFileName);
               this.dgdUpload.Columns.Add(bndFileSize);
               this.dgdUpload.Columns.Add(bndFileKb);
               this.dgdUpload.Columns.Add(cmdDelete);
               this.dgdUpload.AutoGenerateColumns = false;          
               this.dgdUpload.RowDeleting += new GridViewDeleteEventHandler
               
(dgdUpload_RowDeleting);
               #endregion
               #region Add Controls
               this.Controls.Add(dgdUpload);
               this.Controls.Add(inputFile);
               this.Controls.Add(lblMessage);
               this.Controls.Add(btnUpload);
               this.Controls.Add(btnSubmit);
               base.CreateChildControls();
               #endregion
          }
          #endregion
          #region RowDeleting
          private void dgdUpload_RowDeleting(object sender, GridViewDeleteEventArgs e)
          {
               int recordToDelete= e.RowIndex;
               dt = (DataTable)Page.Session["Files"];
               int cn = dt.Rows.Count;
               dt.Rows.RemoveAt(recordToDelete);
               dt.AcceptChanges();
               Page.Session["Files"] = dt;
               this.dgdUpload.DataSource = dt
               this.dgdUpload.DataBind();
           }
           #endregion
           #region OnLoad
           protected override void OnLoad(EventArgs e)
           {
                base.OnLoad(e);
           }
           #endregion
           #region File in SharePoint List
           private void btnSubmit_Click(object sender, EventArgs e)
           {
                SPWeb site = SPContext.Current.Web;
                SPList list = site.Lists["FileList"];
                SPListItem myNewItem ;          
                dt = (DataTable)Page.Session["Files"];
                int _dtcnt = dt.Rows.Count;
                string strDate="";
                foreach (DataRow dr in dt.Rows)
            {
                 strDate = System.DateTime.Now.Date.TimeOfDay.ToString();
                 myNewItem = list.Items.Add();
                 fileName = dr["Filename"].ToString();              
                 string strFilepath= dr["FilePath"].ToString()
                 StreamReader sr = new StreamReader(strFilepath);
                 Stream fStream=sr.BaseStream ;               
                 contents = new byte[fStream.Length];
                 fStream.Read(contents, 0, (int)fStream.Length);
                 fStream.Close();
                 myNewItem["Filename"] = dr["Filename"].ToString();
                 myNewItem["FileSize"] = dr["FileSize"].ToString();
                 myNewItem["Filedate"] = strDate;
                 myNewItem.Attachments.Add(fileName, contents);
                 myNewItem.Update();
                 System.IO.File.Delete(strFilepath);
             }
             lblMessage.Text = "Sucessfully Submited";
             }
             #endregion
             #region Upload File Add in List
             protected void btnUploadUploadClick(object sender, EventArgs e)
             {
                  fileName = System.IO.Path.GetFileName(inputFile.PostedFile.FileName);
                  if (fileName != "")
             {
                  string _fileTime = DateTime.Now.ToFileTime().ToString();
                  string _fileorgPath =  System.IO.Path.GetFullPath
                  (inputFile.PostedFile.FileName);
                  string _newfilePath = _fileTime + "~" + fileName;
                  length = (inputFile.PostedFile.InputStream.Length) / 1024;
                  string tempFolder = Environment.GetEnvironmentVariable("TEMP");
                  string _filepath = tempFolder + _newfilePath;               
                  inputFile.PostedFile.SaveAs(_filepath);
                  AddRow(fileName, _filepath, length);
                  lblMessage.Text = "Successfully Added in List";
             }
             else
  
           {
                  lblMessage.Text="Select a File";
                  return;
             }
        }
        #endregion
        #region Render
        protected override void Render(HtmlTextWriter writer)
        {
             // TODO: add custom rendering code here.
             EnsureChildControls();
             this.inputFile.RenderControl(writer);
             this.btnUpload.RenderControl(writer);
             this.lblMessage.RenderControl(writer);
             this.dgdUpload.RenderControl(writer);
             this.btnSubmit.RenderControl(writer);
        }
        #endregion
        #region AddMoreRows for file upload
        private void AddMoreColumns()
        {
             dt = new DataTable("Files");
             dc = new DataColumn("FileName"Type.GetType("System.String"));
             dt.Columns.Add(dc);
             dc = new DataColumn("FilePath"Type.GetType("System.String"));
             dt.Columns.Add(dc);
             dc = new DataColumn("FileSize"Type.GetType("System.String"));
             dt.Columns.Add(dc);
             dc = new DataColumn("KB"Type.GetType("System.String"));
             dt.Columns.Add(dc);
             Page.Session["Files"] = dt;
        }
        #endregion
        #region AddRow for file upload
        private void AddRow(string file, string path, double length)
        {
             dt = (DataTable)Page.Session["Files"];
             if (dt == null)
            {
                 AddMoreColumns();
            }
            dr = dt.NewRow();
            dr["FileName"] = file;
            dr["FilePath"] = path;          
            dr["FileSize"] = Convert.ToString(length);
            dr["KB"] = "KB";         
            dt.Rows.Add(dr);
            Page.Session["Files"] = dt;
            this.dgdUpload.DataSource = dt;
            this.dgdUpload.DataBind();//bind in grid
       }
       #endregion
   }
}

Deploy File Upload Web part in the share point server
  1. Right click solution file then select properties. 
  2. Select Debug Start browser with URL selects your respective SharePoint Site.

  3. Select Signing option.

  4. Ensure the strong name key and sign the assembly check box.
  5. Right Click properties select Deploy.

  6. It is automatically deployed the web part in respective site.
  7. Deploy will take care of .Stop IIS, Buliding solution, Restarting Solution, Creating GAC, Restarting IIS like that.

  8. Multiple Upload Webpart is new one.
  9. New MultipleUploadWebpart Web Part.

Events
1. Browse Button 
It is used to browse and select the particular file.

2. Upload Button
It is used to upload file to the windows temp folder then list the files.
3. Submit Button
It is used to store all files in share point custom list.


All the files are listed
Delete
using this option you need to delete the file in this list.Whenever you give the submit only it will go to SharePoint list.


All the files are uploading in respective share point custom list.