Security Roles Overview
To be able to access a Dynamics 365 CRM, any user with a valid license must:
- Be assigned to a Business Unit
- Be assigned to at least one security role
Security Roles define the way users can access and handle data in Dynamics 365. It enables administrators to control access to data and ensure that each user has the information that they need to complete their tasks and nothing more.
With this approach, Dynamics 365 enables to:
- Protect information from being mishandled by users who lack understanding.
- Protect private knowledge from getting into the wrong hands
- Ensure that users have the power to take actions commensurate with their profile/job role.
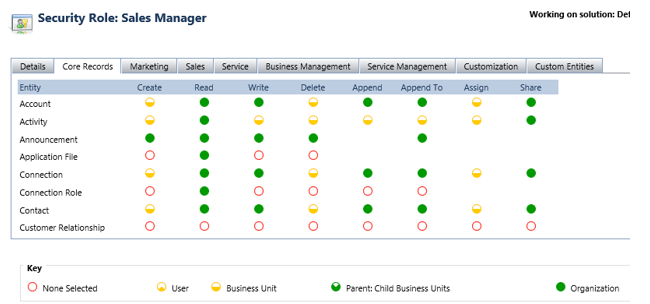
Security Roles can be seen as a matrix of privileges and access levels for all entities.
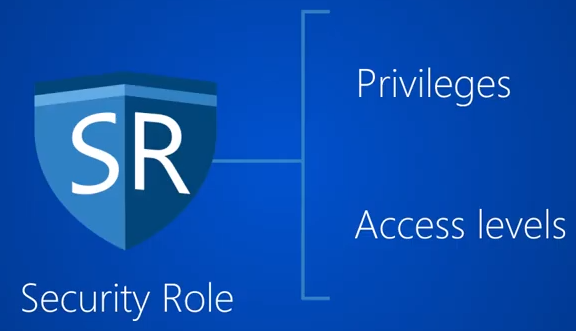
Privileges
Privileges enable users to take actions on records. They are the basic security unit that details what actions a user can perform in the CRM.
Allow users to take actions on records.
| - | Allows the user to add a new record. |
| - | Allows the user to view a record. |
| - | Allows the user to edit an existing record. |
| - | Allows the user to delete an existing record. |
| - | Allows the user to change the owner of the record, to another user or team. |
| - | Allows the user to share an existing record. When sharing a record, it’s possible to specify the permission given to the user.
 |
| - | Allows the user to attach other entities to, or associate other entities with a parent record (e.g: lookup fields). In case of many-to-many relationships, you must have Append privilege for both entities being associated or disassociated. In one line: when an entity has the lookup of another entity on its form. |
| - | Allows the user to attach other entities to, or associate other entities with the record. In one line: when an entity is available as a lookup on another entity form. |
| | e.g: A Contact has a lookup to an Account (for example: employer). The user needs to have a security role with privilege “Append” on the Contact entity and privilege “Append to” on the Account entity. |
The above height privileges are called “record-level privileges”. They defined which actions a user can do. There are also “task-based privileges”. Those miscellaneous privileges are not linked to an entity directly but operate on specific tasks, such as viewing audit history, publish e-mails, bulk edit, export data to Excel, etc…
In Dynamics 365, task-based privileges are at the bottom of the Security Role form.
Note that it’s not possible to remove access for a given record. Any change to a security role privilege applies to all records of that record type – exception made if the user has been given access to a record via the “Share” functionality.
Access Levels
Determine the scopes a user can perform a given privilege on data.
 None None
| - | No privilege was given. Set by default if nothing specified. |
 User User
| - | Privileges to the records owned by the sure or share with the users. It also includes the privileges owned by the team user belongs to. |
 Business Unit Business Unit
| - | Privileges for all records owned in the business unit to which the user belongs |
 Parent-Child Business Units Parent-Child Business Units
| - | Privileges for all records owned in the business unit to which the user belongs and to all the child business units subordinate to that business unit |
 Organization Organization
| - | Privileges for all records in Dynamics 365. |
In Dynamics 365, this is indicated by the degree of fill and color of the little circles against each entity for each privilege.

Example: For the security role below, a user assigned to it can create only its own records – but no records under other user names. But users can delete contacts owned by anyone in their business unit. They can also read and edit any contacts in the entire CRM.

Entity Ownership: When creating an entity, administrators need to specify the kind of ownership between “User or Teams” and “Organization”. By default, the value is set to “User or Teams”.
If “Organization” is chosen, it will have an impact on the Privileges and Access levels available. As the entity is owned by the organization, there is no specific owner and no notion of Business Unit ownership.
Therefore, in the Security Roles for those entities:
- Privilege: Assign and Share privileges are not available.
- Access Levels: There are only two scopes available: None and Organization.
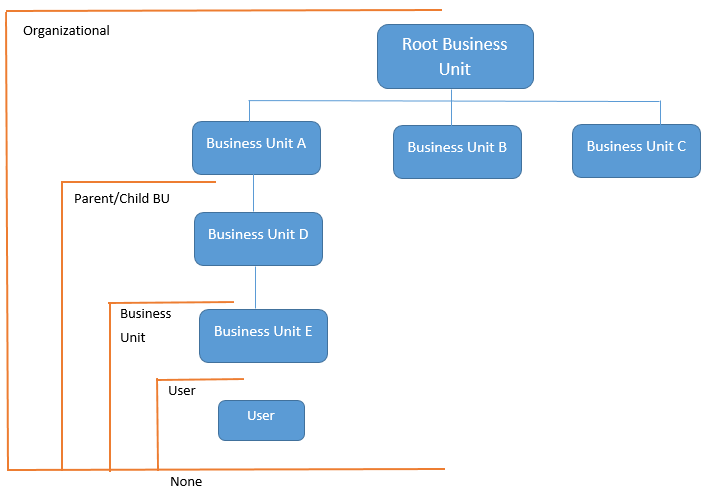
Business Unit
Dynamics 365 uses Business Units to differentiate different parts of a company that might have different security needs. As such, they are a basic component of the security in Dynamics 365.
A Business Unit is composed of users, teams, and security roles. A user part of a business unit can only be assigned security roles belonging to this business unit.

Each Dynamics 365 CRM has a root business unit created by default. It cannot be deleted nor disabled, but it can be renamed. All other business units created by system administrators will be a child of the root business unit.
Business units are useful if the company segregates its business and needs to have different data access for each subsidiary. If there is no need to segregate data between subsidiaries, divisions, or departments then there will only be the one business unit.
Note that two different Business Units don’t have the same Security Roles. On the other side, they can have two different Security Roles, but with the same name!
Users
A user has a set of attached privileges at various access levels. Each user can be assigned to multiple security roles. In such a situation and in case of conflict between two security roles, the one with broadest permission “wins”.
Users with security role “System Administrator” or “System Customizer” or another security role with equivalent permissions add and/or remove security roles for all users in the Dynamics 365. Note that when a user is assigned to the global administrator or the service administrator role in the Microsoft Online Services environment, it automatically assigns the user the System Administrator security role in Dynamics 365.
Note that if a user has been assigned to a given Security Role in a TEST environment, it should be assigned again – manually- in a PROD environment: It’s not possible to import security roles assignments via a solution.
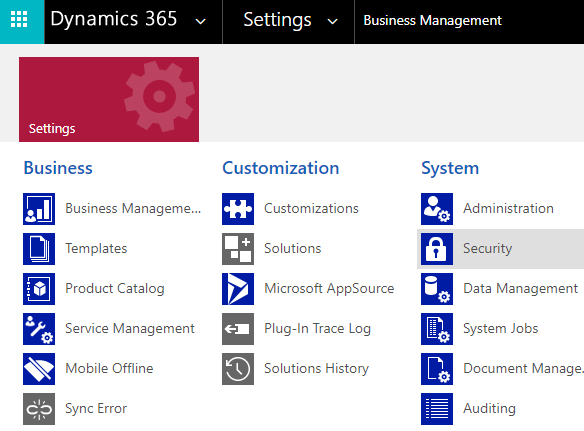
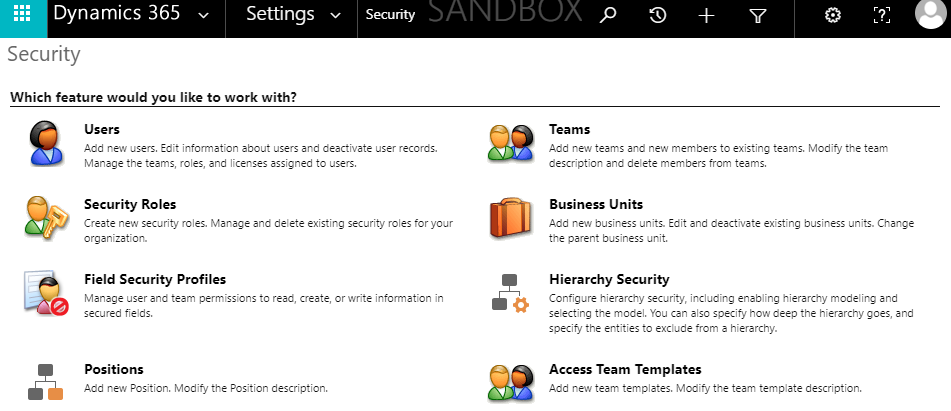
To assign a security role to a user, administrators need to go to Settings -> System -> Security.
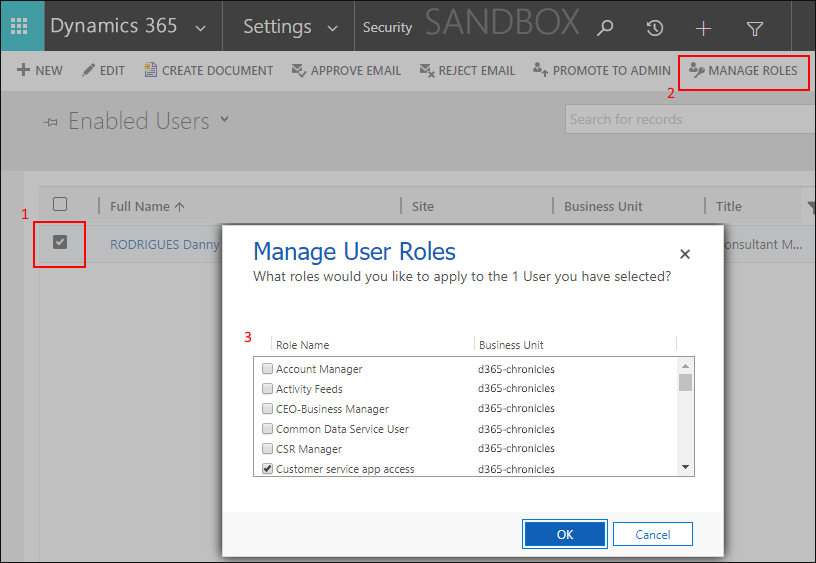
Then click on “User” and select one or multiple users. Then click on “Manage Roles” in the ribbon.
A pop-up “Manage User Roles” will appear. Security Roles assigned to the user(s) need to be selected.
Team
Dynamics 365 Teams are a collection of users. Those users can be from the same business unit but also for different ones. Users can also belong to multiple teams.
There are two kinds of teams in Dynamics 365:
- Owner Team
- As for users, security roles can be assigned to owner teams.
- All users belonging to the team will inherit their security roles.
- Access Team
- Compared to owner teams, access teams do not have security roles and cannot be the owner of records.
- It simply allows an easier way to share a specific record within a group of users, to give them the ability to work on a certain record (not the entire entity).
- It can be seen as an upgrade of the simple “Share” privilege. In fact, Access teams have been added to Dynamics 365 to improve the performance compared to the “Share” privilege.
- For an entity to be shared via Access Teams, it needs to be specifically configured for it. Once this is enabled it cannot be disabled after saving.
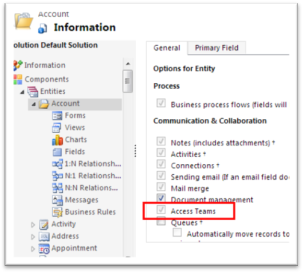
- Example: An organization has one Business Unit per continent. Salespersons can only work on opportunities linked to their own BU. But one specific opportunity requires collaboration between salesperson from two different continents. In such a case, an Access Team needs to be created to allows users from different BUs to work on the same opportunity.
Use Owner Teams when the number of teams is known at the design time of Dynamics 365 and when owning records by entities others than users is required by the company’s business policies.
When the number of teams is not known as design time, when teams are dynamically formed and dissolved or a unique set of users requires access to a single record without having ownership, Access Teams should be used.
Hierarchical security
Hierarchical security gives managers the privileges to read, update, append, and append to their subordinates’ records. It’s an addition to the security model in Dynamics 365 and all can be used together at the same time.
Hierarchical security enables easier visibility of subordinates’ activities that can be used in a dashboard and for easy reporting. The feature grants read permissions to managers above the direct manager
Two security models can be used for hierarchies:
- Manager Hierarchy
- Managers must be within the same business unit – or the parent business unit - as the user, they manage.
- It is based on the “Manager” field in the user entity. Based on this field, there is two types of relations between a manager and their subordinates:
- Direct report: the manager is the direct manager of the subordinate (e.g: the lookup points to him/her).
- Non-direct report: the manager is a direct or non-direct reporter of the subordinate’s manager (e.g: the “manager” lookup of the “manager” lookup of the subordinate).
There is a “Depth” parameter to set until how far a manager can see the data for the subordinates of his/her subordinates.
- For non-direct reports, a manager has only Read-only access to the data. For direct report, Read + Write + Update + Append + Append To rights are given to the manager.
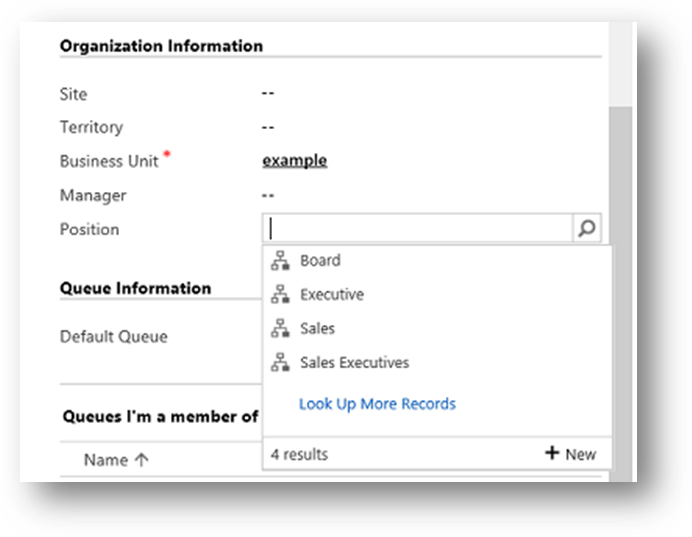
- Position Hierarchy
- It enables data access across business units. It’s useful if managers manage people across several business units. For example, in a customer service organization, the managers may need to access services cases handled in different business units.
- A user doesn’t have to be an actual manager of another user to access the user’s data. When Manager Hierarchy is based on the “Manager” field of the user’s entity, Position Hierarchy is based on the job a user has been tag too.
- In Dynamics 365, administrators can define various job positions and organize them in the Position Hierarchy. For example, the CEO will be on top, the VPs will be just below and the Managers below VPs.
- With Position Hierarchy, the direct higher positions have Read + Write + Update + Append + Appen To rights to lower position’s data. Non-direct higher positions have Read-only access.
- As for Manager Hierarchy, the “Depth” parameter enables to limit the amount of data accessible by higher positions.
- Note: To add a user to a position, the security privilege “Assign position for a user” must be granted.
Hierarchical security does not by-pass security roles. If a manager does not have access to an entity but its subordinates do, hierarchical security will not enable access to the manager. For example, if there is an entity called “Manage Evaluation” used by subordinates to evaluate their managers and the Manager security role has not to access the Read access to this entity, he/she will not be able to see the data.
By default, Hierarchical Security is disabled. Administrators need to enable it. Also, note that System Administrator can exclude given entities from the hierarchy model.
Others
Default Security Roles
Out-of-the-box, Dynamics 365 offers multiple pre-defined security roles.
- System Administrator
- System Administrator is the highest level role which encompasses all the privileges and has over-riding rights. The System Administrator has the authority to allow and remove access to other users and define the extent of their rights. For example, the System Administrator and the System Customizer are given access to custom entities by default while all other users need to be given access. This is the only role that cannot be edited.
- System Customizer
- The System Customizer role is similar to the System Administrator role which enables non-system administrators to customize Dynamics 365. A Customizer is a user who customizes entities, attributes, and relationships.
If the default security roles don’t match the security level required, system administrators have three possibilities:
- Modify a default security role
- Create a new security role from scratch
- Copy an existing security role as a new one with the “Save As” functionality.
As a rule, security roles should not be created from scratch. The best approach is to take a pre-defined security role, modify it, and save it under a new name. It enables to maintain a certain consistency and avoid mistakes such as forgetting “basics” miscellaneous privileges (e.g: the Read privilege on the entity “Web Resource”).
Be careful when a security role is being renamed. Dynamics 365 doesn’t prevent two security roles to have the same name!
Minimum User
Microsoft offers a solution that contains a Security Role name “min priv apps use”. As the name suggests, this role contains the minimum privilege and access levels required to log in the Dynamics 365. Users assigned only to this security role will not be able to change any record, but they can at least log in.
The solution can be found in Microsoft documentation.
Recommendation: It’s considered as a best practice to use the cumulative property of security roles. Each user should be assigned to the “Minimum User Security Role” and then security roles should be added to the users to enable them to work with the data.
In that way, the minimum user security role ensures that users can log in Dynamics and the other security role is only related to entities and task-level privileges.
Screenshots
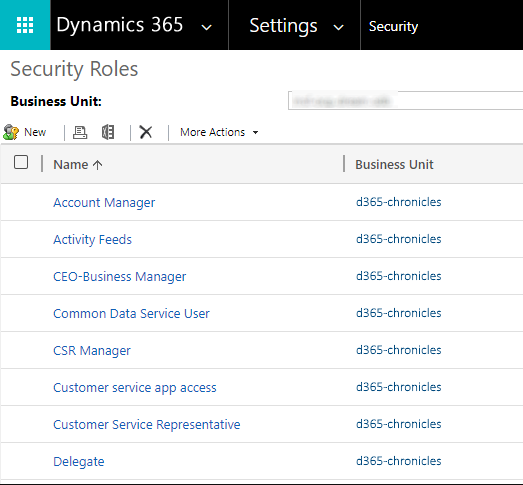
In Dynamics 365, the list of Security Roles is available under the “Security” region of Dynamics 365 configuration panel: Settings -> System -> Security.
A click on the feature “Security Roles” will display the list of all Security Roles, sort by their name in alphabetical order by default.
When clicking on a role, the matrix contains privileges and access levels is displayed. Privileges are grouped under different tabs based on their functionality. These groups include Core Records, Marketing, Sales, Service, Business Management, Service Management, Customization and Custom Entities.
TIP: The access level of all the privileges for a particular entity can be changed at one go by clicking on the row header. Similarly, the access level of a privilege across all entities can be changed in bulk by clicking on the column header.
Field-level Security
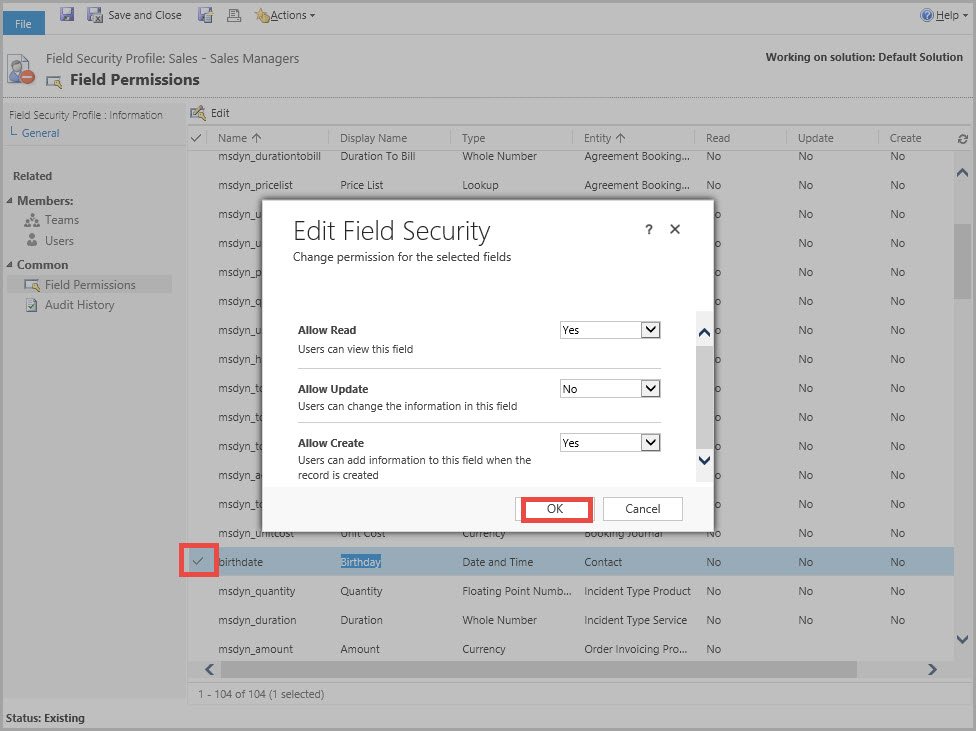
In addition to defining security around users and teams, a more minute level regulation of security can be done around a single field. This is achieved with Field Security Profiles.
A field security profile gives access to certain fields that have been enabled for field-level security. It allows users to read and/or update and/or create such fields. Users without access will see the field’s name but not its value – it will be replaced by “****”.
In the Security region of Dynamics 365 configuration, the features “Field Security Profile” will display a list with all profiles. To configure a profile, administrators can:
- Assign Teams or Users to it
- Select the permissions for each field enabled for Field Security. There are three permissions: read, update, and create.
For a field to be eligible to Field-level security, it must be specifically enabled:
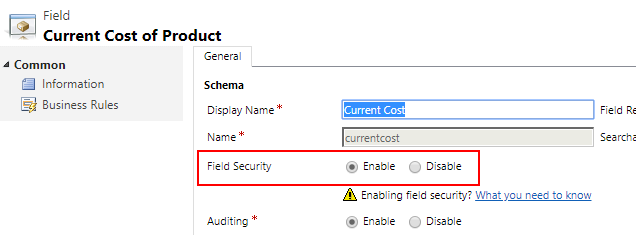
In a form, fields enabled for Field Security are indicated with a small key after their name.

Multiple Field Security Profiles can be created. As for security roles, users and/or teams can be assigned to Field Security Profiles.
Note that System Administrator don’t need to be assigned to a Field Security Profile to see a field – they can do everything!
Some out-of-the-box fields like “Created By” or “Parent Id” cannot be enabled for Field Security.
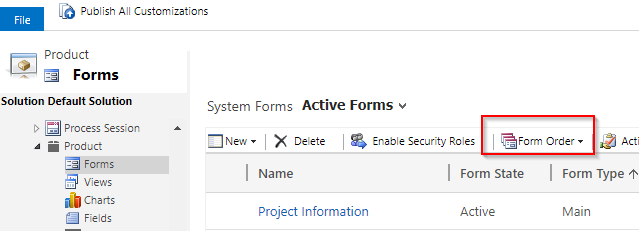
Forms
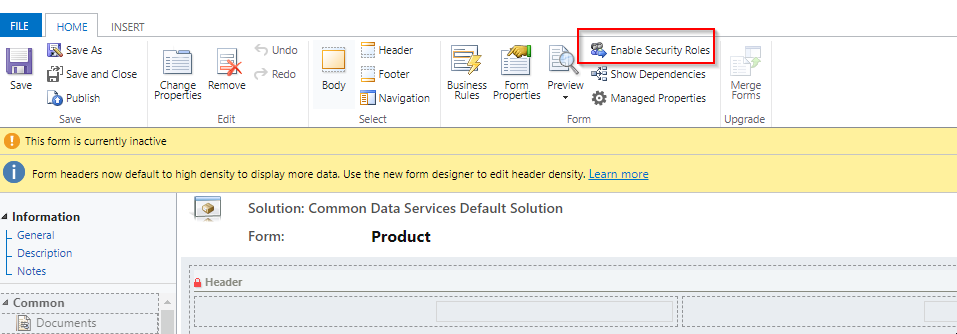
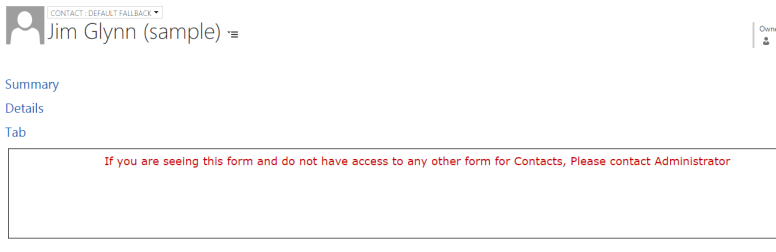
Security Roles are used to managing access to the data and action that can be taken on it, but it also enables to change of the UI of a form. For example, by offering fewer options to a user, it creates a cleaner UI and the interface is enhanced.
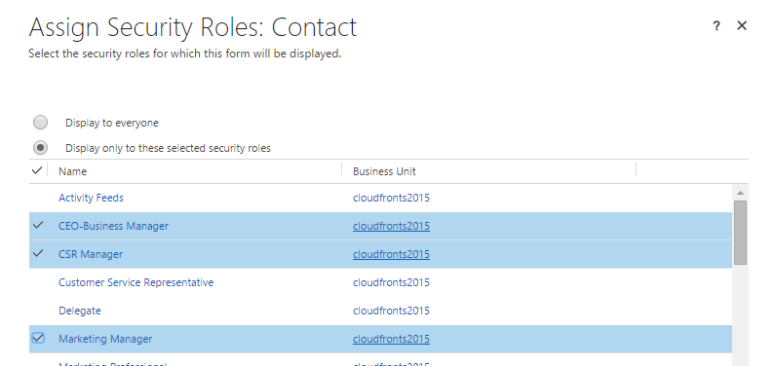
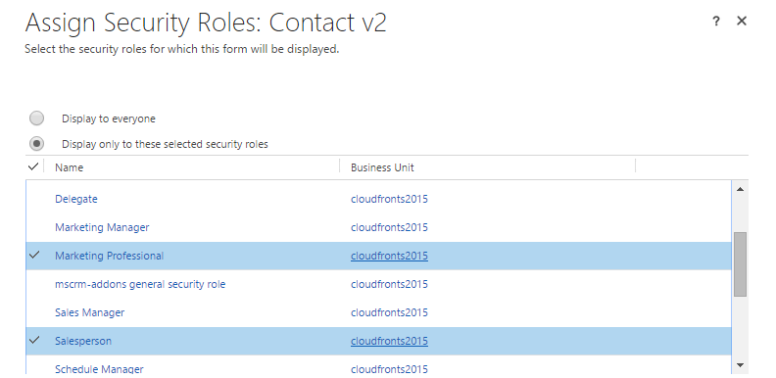
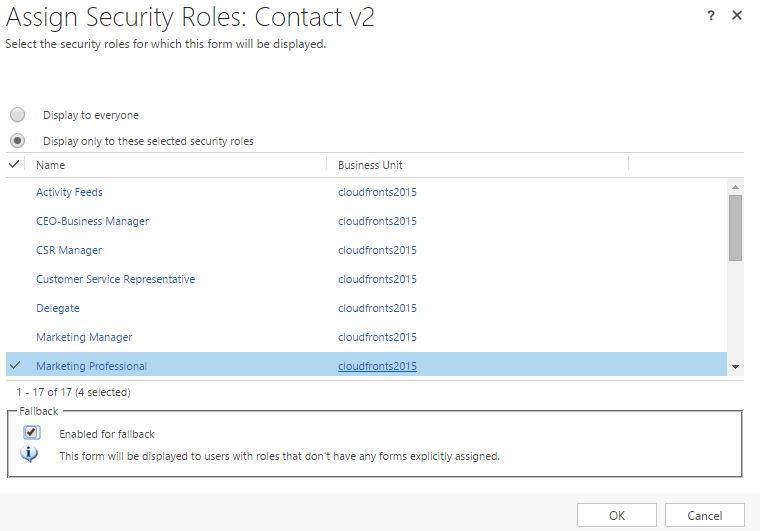
It’s possible to enable access to a given form only for given Security Roles. When customizing a form, the button “Enable Security Roles” allows to select one or multiple Security Roles that will be able to interact with the form. By default, all Security Roles are selected.
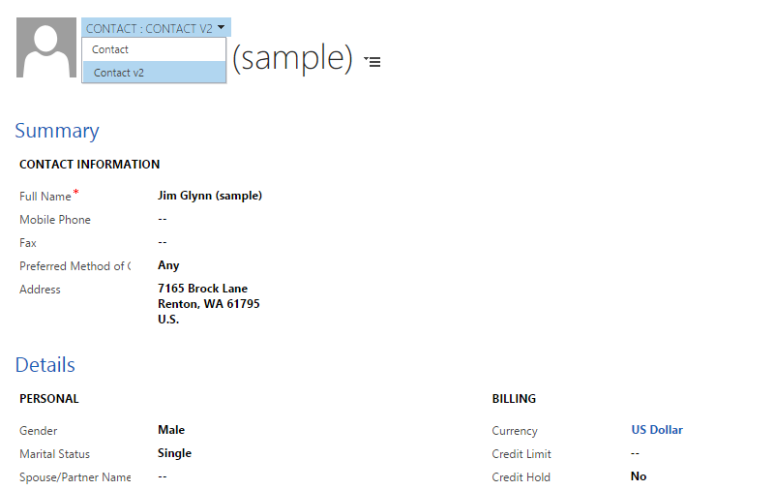
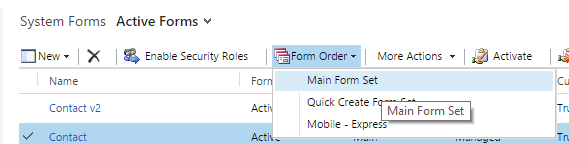
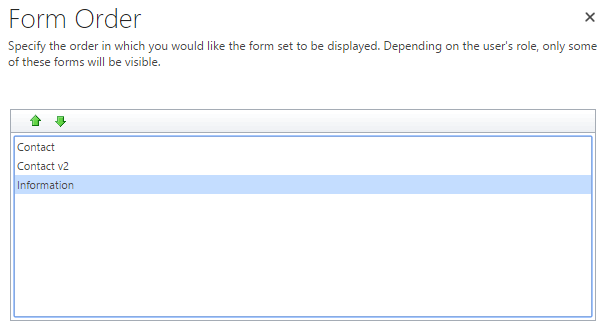
If a user as access to more than one security role, a drop-down list will let the user choose which form will be displayed. System Administrators can set the orders of the forms when customizing the entity.
As for Forms, Dashboards in Dynamics 365 can also be enabled for only a set of selected Security Roles.
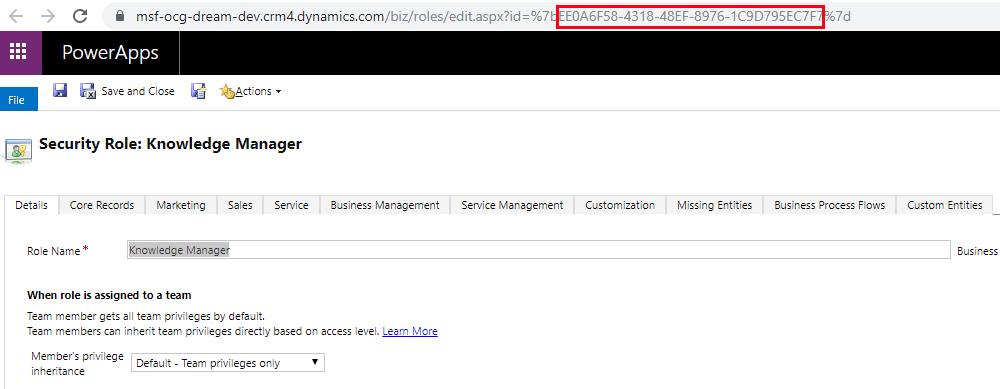
Unique ID
As for all records in Dynamics 365, each Security Role is assigned with a unique identifier and can be accessed through the Web API for example. The GUID can be found in the URL when opening a security role in Dynamics 365.
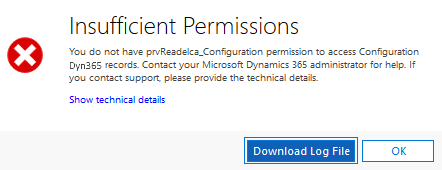
There is also an entity called “Privileges” in Dynamics 365. When an entity is created, there are 8 new “Privileges” records that are created – one per security role privilege. Each of these records has a GUID. When a user encounters an issue related to security roles privileges, the GUID is printed in the error log file.


Security in Microsoft World
Security Roles with privileges and access levels are specific to Dynamics 365. Security in other products of the Microsoft Family is managed differently, with each application having its one way to deal with data security and management.
For example, Sharepoint’s security contains Groups, Sites, and sharing capabilities and PowerBi makes usage of “Row-level security (RLS)”.
When combining such products together, the way to handle data security should be analyzed, defined, and discussed.


 in the User entity.