
Finally, most awaited feature has arrived in Microsoft’s Dynamics 365 business apps solution (formerly known as Dynamics CRM). Microsoft has introduced Editable grids in their latest release and new era called Dynamics 365. I have focused on what is Editable grid, what are its features. In next part of this blog, I will be covering how to configure the grid and how it can be used.
What is Editable grid?
Before release of D365, users needed to open the existing records to update any data in the entity. Even if users want to update single field in multiple records, they had to open the individual record and update the field and save the record. For each record, they had to repeat these steps. This approach of updating data was time consuming and irritating.
With introduction to editable grid, Microsoft has allowed users to update the records right away with all those validations which was applicable on the form.
Editable grid is nothing but a list or view of records having editing capabilities without opening the record.
Editable Grid Features
Types of grids
- Read-only grid – These are the same grid which users are seeing in earlier versions. The CRM entity views which do not have editing capabilities are called read-only grids in D365 release.
- Home grid – These are the CRM entity views having editable grid capabilities. Entity’s public views and personal views with editing capabilities are called home grid.
- Sub grid – This is old grid which is shown on entity form to show related records. Sub grids can also be made editable.
- Nested grid – This is new grid introduced in D365. Nested grids are shown when we expand any record in view itself without opening form. This grid also shows related records of expanded record from view.
Note: Nested grid is available only on Mobile and Tablets. It is not available on web client/CRM for Outlook.
- Dashboard grid – This is the grid which is shown on CRM dashboards.
Note: Dashboard grid is available only on Mobile and Tablets. It is not available on web client/CRM for Outlook.
Features
- Below types of fields have inline editable grid capabilities:
- Single line of text
- Date and Time
- Option Set
- Whole Number
- Decimal
- Floating Point Number
- Two Options
- Lookup
- Below types of fields are read only in editable grid:
- Customer
- Rollup Fields
- Calculated Fields
- Composite Fields
- Status and Status Reason Fields
- Business rules which are have scope at Entity level works on editable grids.
Note: Business Recommendations (introduced in this release) is not available on editable grids.
- Below JavaScript events are available on editable grid:
- On record select
- On save
- On change
- Users don’t have to explicitly click on save button. Records are saved automatically when focus from the record is moved.
- As its name suggests, only inline editing is possible and users cannot create records through inline editable grids. Users can still use quick create form to quickly create the records.
- Below grid functionality is available for editable grids:
- Sorting
- Searching
- Grouping
- Filtering
- Pagination
- Column resizing
- Column movement by simply drag and drop capabilities
- It also saves user state within the session. So, if user does any settings like column resizing, column movement on active accounts view, and if user navigates to any other entity, then when user comes back to the active accounts view within the same session, it shows the same settings.
- The editable grid is nothing but an additional control and can be exported through a solution and imported back into target environment as a solution.
How to configure editable grid
Read-only grid
- By default, when you create any custom entity or any OOB entities, editable grid is not configured.
- By default, read-only grid is shown to the users.
- You cannot disable read-only grids on any entity. You can choose which one to show by default i.e. either read-only or editable grid.
Home grid (editable grid)
- To enable editable grid on entity’s public views, you should add new control in entity.
- You can enable editable grid on entity’s public views as per below steps:
- Go to settings > Customizations > Customize the system.
- Expand entities section and click on entity on which you want to enable editable grid. You will see entity’s properties.
- Click on Controls section.
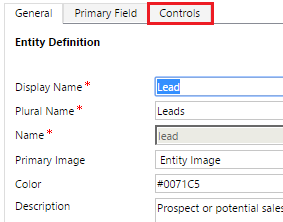
- By default, you will see below screen (if editable grid is not enabled).

- Click on Add Control
- Select Editable grid and click add.
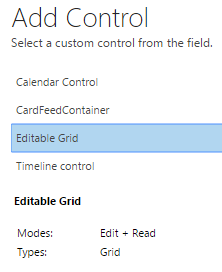
- You can select which grid to be shown as a default grid for an individual entity.

- Select additional settings like filtered lookup properties to filter lookup values in editable grid. Follow below steps to achieve the same:
- Select Editable Grid control as selected in above screenshot. You will see below options to set properties of editable home grid.

- Click on Add Lookup (Note: It allows to filter lookup values which will be populated in editable grids lookup field. If your view does not contain any lookup field, then you won’t see anything here).
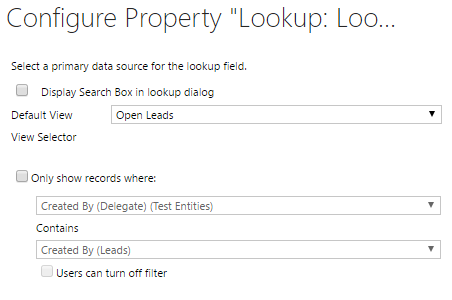
- Set the necessary options and click OK.
- Select Editable Grid control as selected in above screenshot. You will see below options to set properties of editable home grid.
- Save the changes and publish the customization.
Sub grid (Editable Grid)
- To enable editable grid for sub-grids, you need to add new control on entity form.
- You can enable editable grid for sub-grid by following below steps:
- Open form editor of entity’s form on which you want to enable editable sub grid.
- Select sub grid control and click on change properties.
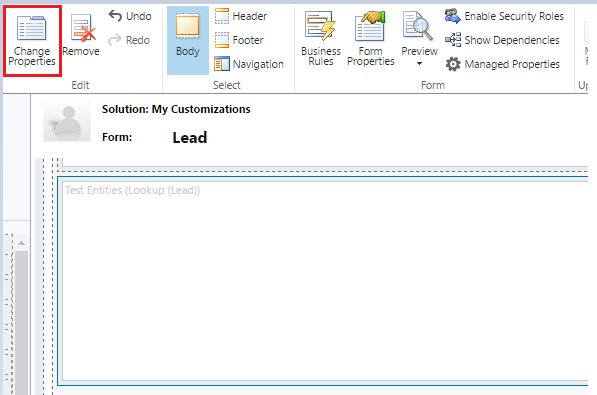
- Go to Controls Tab. Click on add control.

- Rest of the steps are same as I have mentioned above for home grid.
Nested Grid
- Nested grids are nothing but grid within grid. Nested grids are available only on Mobile & Tablets.
- Nested grid can be enabled on Home as well as sub grids.
- To enable nested grid, follow below steps:
- Follow similar steps as mentioned earlier to enable editable grid.
- Select Editable Grid and you will see an option to set properties for Nested Grid.
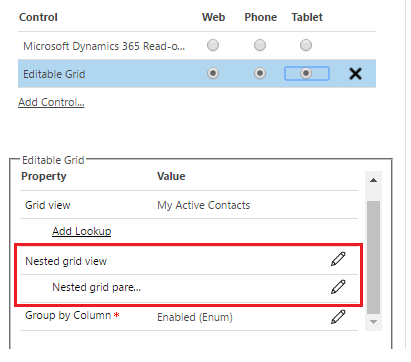
- Click on the pencil icon and select the entity and to be shown in nested grid. Select the parent lookup field on which the related records should be fetched.
- Save and publish the changes.
Dashboard Grid (Editable)
- Dashboard editable grid is available only on mobile and tablet devices.
- Follow below steps to enable editable grid on dashboard:
- Open dashboard in design mode.
- Select component and click on Edit Component.
- Go to Controls Tab and Add control.
- Follow the same steps as mentioned above.
How to add event handlers on editable grid events
- Adding event handlers is similar as we used to do for adding event handlers on form fields.
- You should navigate to Events tab and follow same steps as we used to perform earlier:
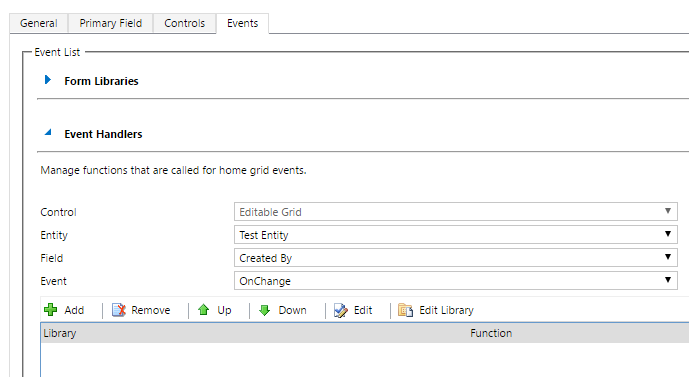
- For Home grid, you should navigate to Entity’s design page.
- For sub-grid, you should navigate to property page of sub grid.
- For dashboard grid, you should navigate to dashboard grid’s property page.
How to use Editable Grid
- Once grids are enabled for inline editing for home grids, you will see a new option in ribbon as ‘Show As’.
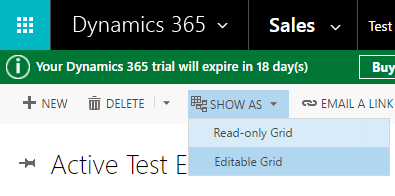
- If you have put Read-only grid as default grid, you can select any of the option. Read-only grid will show the old views.
- If you select, Editable Grid, you will see below options.
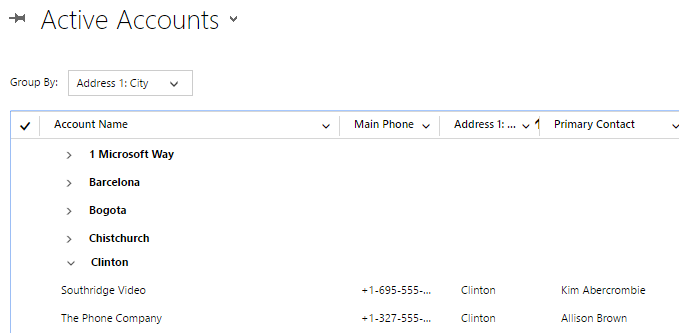
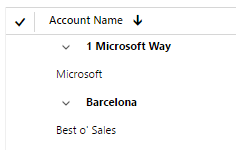
- Group By – Users can group by columns. So, if you have option set on any entity and you want to see all records grouped by individual values of option set, you can select the same in Group By drop down.
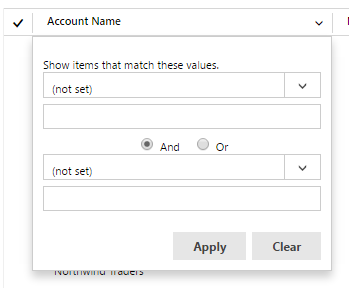
- Filtering the records – You can still filter the records by clicking an down arrow which is shown on each column’s right side.
- You can click on the column to sort either in ascending/descending order.
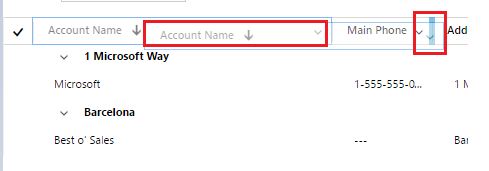
- You can drag-drop the column to see important information at the start at your convenience. Below screenshot is taken when user is dragging the Account Name column after Main Phone column.
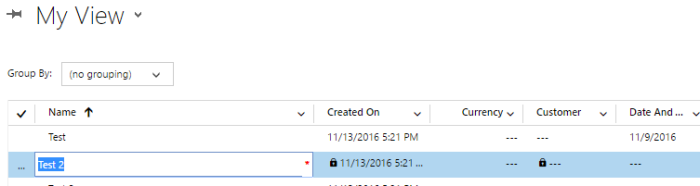
- Saving the record – As I mentioned in earlier blog, records get saved automatically when focus is moved from the record. Also, users can explicitly save the changes by clicking save option provided on right corner of the grid.

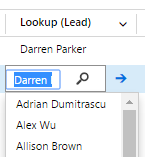
- Editing the records – The UI of editable grid is so intuitive, that users come to know whether the field is editable or locked. Also, you can easily navigate to the lookup record by clicking arrow. Refer below screenshots.
- Group By – Users can group by columns. So, if you have option set on any entity and you want to see all records grouped by individual values of option set, you can select the same in Group By drop down.
Some additional information
- Editable grid also works on same security model. i.e. if user does not have write access on the record, then editable grid does not allow users to update the record.
- Field level security works in same way in editable grid as well.
No comments:
Post a Comment