
Pre-Requisites
Given that you already have Admin Access to create Flows with HTTP Request Triggers, you’ll need to have Plugin Registration Tool in case you are not familiar – Download Plugin Registration Tool for Dynamics 365 CRM using PowerShell
Initiate a Flow
Here’s how you start building your Flow –
- You must select the HTTP Trigger when you start a new flow. This will be your Flow trigger.

- Now, in order to be able to get the URL of the HTTP Trigger which you’ll need, you’ll need to save the Flow first.
And for that, Flow needs to have more than 1 step. So just go ahead and add a variable, maybe.

- Once you save the Flow, the URL will be generated which you can copy

- Copy this URL and paste it in the Notepad. We’ll come to it later.
It should look like this –
So we’ll come to this later. Let’s keep this handy in clipboard since you’ve copied it anyway and let’s move towards registering the Webhook itself.
Register Webhook in Dynamics 365 CRM
Given that you have Plugin Registration Tool and you are logged in, you can proceed with registering a Webhook in the environment –
- In the menu, select Register a Webhook option.

- Now, you can start by giving it a name.
Then, in Endpoint URL – copy only till the work invoke
https://prod-131.westus.logic.azure.com:443/workflows/6092c774224e498ebe413f3d7c05a45e/triggers/manual/paths/invoke?api-version=2016-06-01&sp=%2Ftriggers%2Fmanual%2Frun&sv=1.0&sig=gvfm52Mpnhsz4Ew4ufRllNM_VhfC6a-GkCpM7AigPU0
Also, select the Authentication as HttpQueryString
- Now, coming the next part, you can start add properties to this –
Green are the Properties, Pink are the Values
https://prod-131.westus.logic.azure.com:443/workflows/6092c774224e498ebe413f3d7c05a45e/triggers/manual/paths/invoke?api-version=2016-06-01&sp=%2Ftriggers%2Fmanual%2Frun&sv=1.0&sig=gvfm52Mpnhsz4Ew4ufRllNM_VhfC6a-GkCpM7AigPU0
Also, in case you are wondering what does the %2F mean – It’s the HTML encoding for a slash symbol “/“
Ref Link: https://www.w3schools.com/tags/ref_urlencode.ASP
And, the properties should look like below –
- Now, you can go ahead and add a Step just like you would do in a Plugin assembly
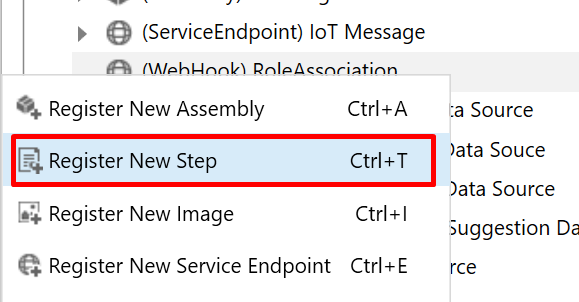
And then, for example, register a step on Associate. It could be any message.
- And, when you Associate a record, example – Assigning a security role to a User –

- The Webhook will call the HTTP Request Flow

And if you open the Flow, you can expand the first step and see the Detailed outputs


- You can copy the above Outputs and use this to generate Schema for the HTTP Trigger so that you can use it further in the Flow

And this is how it will be generated
No comments:
Post a Comment