
Lesson Goals
- Learn about workflow basics.
- Learn how to create a List Workflow using SharePoint Designer 2013.
- Learn how to run a workflow.
- Learn how to view a workflow's history.
- Learn how to add Actions to a workflow.
- Learn how to add Conditions to a workflow.
- Learn how to add parameters to a workflow initiation form.
- Learn how to create a reusable workflow.
- Learn how to associate a reusable workflow with a list/library.
Workflow Basics
Workflows are a popular way to perform automated work in SharePoint. The pay versions of SharePoint Server, Standard and Enterprise, come with extra out-of-box workflows that can be associated and configured with lists and libraries using just the browser. Custom workflows can be created with software applications such as SharePoint Designer 2013 or Visual Studio 2012.
SharePoint Designer is a powerful and fairly easy-to-use tool for creating custom workflows and does not require any formal developer skills. Visual Studio, although extremely powerful in creating custom workflows, requires developer skills to use.
The walk-throughs and exercises in this course will focus on using SharePoint Designer 2013 to create custom workflows.
Custom List Workflows
SharePoint Designer 2013 is a perfect tool for creating custom workflows for lists and libraries. When you create a list workflow, it is associated with a specific list or library at creation time and has access to any metadata of the item the workflow is run against.
The following walk-through will show you how to create a very basic custom list with a couple of custom columns. Once the list is created the walk-through shows how to use SharePoint Designer 2013 to create an associated custom workflow with the list. Later walk-throughs will build upon the workflow created in this walk-through.
- Create a new custom list in your site named "Workflow Demo".
- Click the Settings menu and choose the Add an app item.
- Select Custom List from the template choices and type "Workflow Demo" in the Name field.
- Click the Create button to complete creating the list.
- Add a choice column named "Colors" and a text column named "Workflow Output" to Workflow Demo list.
- Click the Create Column link on the LIST tab toolbar.
- Type "Colors" in the Column name field and select Choice for the data type option.
- Enter "Red", "Blue", and "Green" on separate lines in the choices field within the Additional Column Settings area.
- Click the OK button to complete creating the column.
- Click the Create Column link on the LIST tab toolbar.
- Type "Workflow Output" in the Column name text-box field.
- Click the OK button to create the column.
- Launch SharePoint Designer 2013 and create a List Workflow associated with the Workflow Demo list.
- Open SharePoint Designer 2013 and then open your team site in Designer.
- On the Site tab toolbar, click the List Workflow drop-down button and choose the Workflow Demo list.

- Type "Workflow Demo-WF" in the Name field of the Create List Workflow dialog and click the OK button.

- Leave the workflow open in SharePoint Designer for the next walk-through.
Workflow Actions
Workflow Actions are the main working component in a SharePoint Designer workflow. SharePoint Designer is limited to being able only to do things that are defined in an Action. However, SharePoint comes with a wide range of Actions out-of-box. The following is a grouped list of Actions available in a default installation of SharePoint Server 2013:
- Core Actions
- Add a Comment
- Add Time to Date
- Do Calculation
- Log to History List
- Pause for Duration
- Pause until Date
- Send an Email
- Set Time Portion of Date/Time Field
- Set Workflow Status
- Set Workflow Variable
- Stop Workflow
- Document Set Actions (not available in SharePoint Foundation)
- Capture a version of the Document Set
- Send Document Set to Repository
- Set Content Approval Status for the Document Set
- Start Document Set Approval Process
- List Actions
- Check In Item
- Check Out Item
- Copy List Item
- Create List Item
- Declare Record
- Delete Item
- Discard Check Out Item
- Set Content Approval Status
- Set Field in Current Item
- Undeclare Record (not available in SharePoint Foundation)
- Update List Item
- Wait for Field Change in Current Item
- Relational Actions (not available in SharePoint Foundation)
- Lookup Manager for a User
- Task Actions
- Assign a Form to a Group
- Assign a To-do Item
- Collect Data from a User
- Start Approval Process (not available in SharePoint Foundation)
- Start Feedback Process (not available in SharePoint Foundation)
- Utility Actions
- Extract Substring from End of String
- Extract Substring from Index of String
- Extract Substring from Start of String
- Extract Substring of String from Index with Length
- Find Interval Between Dates
Some of the actions listed are not available with SharePoint Foundation 2013.
Additional Actions can be purchased, downloaded for free, or created by in-house developers and installed in SharePoint and then configured with SharePoint Designer just like out-of-the-box actions.
SharePoint Designer workflows are created by combining as many Actions as necessary to get the job done.
The following walk-through will show you how to add and configure a couple of actions to the workflow that was created in the previous walk-through.
- Add a Log to History List action to the Workflow Demo-WF.
- Click the Action drop-down button from the Workflow tab toolbar and select the Log to History List action.

- Click the this message link inside the Log to History List action added from the previous step.

- Type "Hello from workflow" inside the text box field.

- Hover and click the orange bar below the Log to History List action.

- Type "Set Field" in the text box that appears when you start typing and press the Enter key to have SharePoint Designer insert the Set Field in Current Item action.
 This is just another way to add an action to a workflow. You could also use the Workflow tab's Action drop-down button like you did with the Log to History List action.
 - Click the field link inside the Set Field in Current Item action.

- Choose the Workflow Output field from the drop-down list.

- Click the value link inside the Set Field in Current Item action.

- Type "This field was set by the Workflow Demo-WF" in the value text box.
- Click the Action drop-down button from the Workflow tab toolbar and select the Log to History List action.
- Click the Publish button in the Workflows tab toolbar to publish the workflow to our SharePoint site.

- Create a new item in the Workflow Demo list and start an instance of the Workflow Demo-WF on it.
- Switch back to the browser window and click the Workflow Demo link in the sites Quick Launch menu.
- Click the new item link inside the list.
- Type "Item One" for the Title field and click the Save button.
- Click the ellipsis button to the right of Item One and select Workflows from the drop-down.This is just another way to add an action to a workflow. You could also use the Workflow tab's Action drop-down button like you did with the Log to History List action.
- Click the Workflow Demo-WF link on the Workflows page.

- Click the Start button on the workflows initiation page.
- Verify the workflow actions outcome.
- Verify the list now has a column titled Workflow Demo-WF and the Item One item's value for the column is Completed.
- Verify the Workflow Output column has the text we wrote to it through the workflow.

- Click the Completed link in the Workflow Demo-WF column.
- Verify the Workflow History area has the output from our workflow action.

Workflow Conditions
Workflow conditions are a way to control which Actions run or don't run within a workflow. Conditions provide workflows with If-Then and Else-If blocks to wrap Actions. SharePoint Designer provides the following conditions for use within custom workflows:
- Common Conditions
- If any value equals value
- If current item field equals value
- Other Conditions
- Created by specific person
- Created in a specific date span
- Modified by a specific person
- Modified in a specific date span
- Person is a valid SharePoint user
- Title field contains keywords
The following walk-through will show you how add a couple If current item field equals value conditions that will run different Log to History List actions based on valued within the Colors column of our Workflow Demo list. The conditions will be added into the Workflow Demo-WF that was created in the previous walk-through.
- Add If current item field equals value conditions to check for the different color values within the Colorscolumn of a Workflow Demo list item.
- Switch back to SharePoint Designer and the editor view of our Workflow Demo-WF workflow.
- Hover and click the orange bar below the last action.

- Click the Condition drop-down button and choose the If current item field equals value option.

- Click the field link in the condition and choose the Colors option from the drop-down list.

- Click the value link and choose the Red option from the drop-down list.

- Click the Else-If Branch button on the Workflow tab tool bar twice to add two more condition blocks to the workflow.

- Click the orange bar below the (Insert a condition) label and type "If current" and press the Enter key to have the editor fill in the rest.

- Click the field link inside the Else if branch and choose the Colors field from the drop-down list.

- Click the value link and choose the Blue color option from the drop-down list.
- Add a Log to History List action inside each of the condition branches.
- Click the (Start typing or use the Insert group in the Ribbon.) label in the first condition branch and type "Log" in the text box and press the Enter key to have the editor fill in the rest of the action.

- Click the this message link inside the Log to History List action and type "This items color choice was red" in the text-box field.

- Repeat the previous steps to add a Log to History List action inside the other two condition branches with messages reflecting "Blue" and "Green". The final condition branches should look like the following image:

- Click the (Start typing or use the Insert group in the Ribbon.) label in the first condition branch and type "Log" in the text box and press the Enter key to have the editor fill in the rest of the action.
- Click the Publish link in the Workflow tab toolbar to update the SharePoint site with the current changes.
- Test the condition branches in the Workflow Demo list.
- Switch back to the browser window and click the Workflow Demo link in the sites Quick Launch menu.
- Click the Workflows link from the item menu of Item One.
- Click the Workflow Demo-WF link under the Start a New Workflow heading.
- Click the Start button to start the workflow.
- Click the Completed link in the Workflow Demo-WF column for Item One.
- Verify the Workflow History has an entry with a message appropriate for the items Colors field.

Workflow Initiation Form
Initiation forms can be used with a SharePoint workflow to pass additional information into the workflow from the user who starts it. SharePoint Designer 2013 offers a wizard-driven interface for creating parameters and generating the Initiation form. The form that SharePoint Designer creates can be further customized with Microsoft InfoPath.
One drawback to using Initiation form parameters is that they work only if the workflow is manually started on an item. If a workflow is set to automatically start when an item is modified or created, then there is no opportunity for the user to interact with the Initiation form. The following shows the workflow settings and configuration tab in SharePoint designer with the Start Options and Initiation form outlined: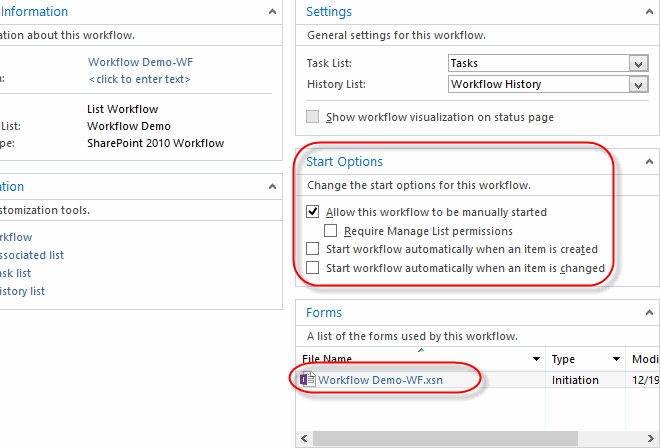
The following walk-through will show you how to add an Initiation parameter to the Workflow Demo-WF created in the previous walk-throughs in this lesson.
- Add Single line of text parameter named "Input Data" to the Workflow Demo-WF using SharePoint Designer.
- Switch back to SharePoint Designer and the editor view of our Workflow Demo-WF workflow.
- Click the Initiation Form Parameters button on the Workflow tab toolbar.

- Click the Add... button on the Association and Initiation Form Parameters dialog window.

- Type "Input Data" in the Field name field of the Add Field dialog window.

- Click the Next button.
- Click the Finish button.
- Click the OK button on the Association and Initiation Form Parameters dialog window.
- Modify the Set Field in Current Item workflow action to write the parameter information from the Initiation form into the Workflow Output field of the list item.
- Click the This field was set by the Workflow De... link of the Set Field in Current Item action.

- Click the fx button next to the text box to open the Lookup for Single line of text dialog window.

- Click the Data source drop-down and select the Workflow Variables and Parameters option.

- Click the Field from source drop-down and select Parameter: Input Data option.

- Click the OK button to save the settings.
- Click the This field was set by the Workflow De... link of the Set Field in Current Item action.
- Click the Publish button to save the workflow changes back to the SharePoint server.
- Run the Workflow Demo-WF to test the Initiation form parameter.
- Switch back to the browser window and click the Workflow Demo link in the site's Quick Launch menu.
- Click the Workflows link from the item menu of Item One.
- Click the Workflow Demo-WF link under the Start a New Workflow heading.
- Type "Hello from the initiation form!" in the Input Data field of the Initiation form.

- Click the Start button to start the workflow.
- Verify the Workflow Output field for Item One has the text from the Initiation form.

Reusable Workflows
Reusable workflows allow you to create a workflow backed by a SharePoint Content Type instead of an existing list or library. Once the content type is assigned to a list or library, the workflow can be associated with that same list or library. Unlike creating a List Workflow, a reusable workflow does require extra steps of associating the workflow with the list/library. The benefit is that the workflow can be used on as many lists/libraries that support the content type without having to re-create the workflow.
The following walk-through shows how to use SharePoint Designer to create a reusable workflow for the Documentcontent type.
- Launch SharePoint Designer 2010 and create a Reusable Workflow associated with the Document content type.
- If SharePoint Designer is not already open, click the Site Actions menu and choose the Edit in SharePoint Designer option.
- Click the Workflows link in the Navigation menu.

- From the Workflows tab toolbar, click the Reusable Workflow.

- Type "Reusable Demo-WF" in the Name field of the Create Reusable Workflow dialog window.
- Select Document in the Content Type drop-down field of the Create Reusable Workflow dialog window.

- Click the OK button to complete creating the new reusable workflow.
- Add a Log to History List action to the Reusable Demo-WF workflow.
- Click the Action drop-down button on the Workflow tab toolbar and choose the Log to History List action.
- Click the this message link in the Log to History List action and click the ellipsis button to the right of the text box to open the String Builder dialog.

- Type "Reusable demo workflow started on: " in the text box and click the Add or Change Lookup button at the bottom of the String Builder dialog window.

- Select Name (for use in forms) for the Field from source field in the Lookup for String dialog window and click the OK button.

- Click the OK button to close the String Builder dialog.
- Click the Publish button in the Workflow tab toolbar to save and publish the new workflow to SharePoint.
- Associate the Reusable Demo-WF with the Documents library.
- Switch back to the browser window and click the Documents link in the sites Quick Launch menu.
- Click the Library Settings button on the LIBRARY tab toolbar.
- Click the Advanced settings link under the General Settings group.
- Click the Yes radio button for the Allow management of content types option.

- Click the OK button to save the setting.
- Click the Workflow Settings link under the Permissions and Management area of the Document Library Settingspage.

- Click the Add a workflow link.

- Select Document in the Run on items of this type drop-down list field.

- Select Reusable Demo-WF in the Select a workflow template list-box field.

- Type "Shared Docs Reusable WF" in the Name field.
- Check the box labeled Creating a new item will start this workflow in the Start Options group.

- Click the OK button to save.
- Run the Shared Docs Reusable WF against an item in the Documents library.
- Click the Documents link in the sites Quick Launch menu.
- Click the new document link to upload a new document to the library.
- Click the Browse button.
- Use the Choose File to Upload dialog to select the EvaluateSharePointServer2010-ITPro document from the class files you downloaded and click the Open button.
- Click the OK button on the Upload Document dialog.
- Type "Workflow Test" in the Title field and click the Save button to complete uploading the file.
- Click the Completed link under the Shared Docs Reusable WF column to open the workflow history page for item.
- Verify the Workflow History has the text entry from the Log to History List action with the file name included.

Creating Custom List Workflows
Duration: 15 to 25 minutes.
- Navigate to your team site.
- Import the Time-off-request-list-template.stp list template file and create a new list using the template. The new list will be used later in the exercise with a custom workflow.
- Click the Settings menu then click the Site Settings option.

- Click the List templates link on the Site Settings page within the Web Designer Galleries group.

- Click the FILES tab to open the toolbar then click the Upload Document link button.

- Click the Browse button in the Upload Template dialog.
- Navigate to the folder you downloaded the class files to and select the Time-off-request-list-template.stp file and click the Open button on the Choose File to Upload dialog window.
- Click the OK button on the Add a template dialog.

- Click the Save button on the List Template Gallery dialog to save the file into the gallery.
- Click the Settings menu then choose the Add an app option.

- Type "time-off" in the search field and click the search icon.

- Select the Time-Off Requests template from the list template.

- Type "Time-Off Requests" in the Name: field and click the Create button to complete creating the new list.

- Click the Time-Off Requests link in the Quick Launch and verify the new list has the following columns: Name,Start Date, End Date, Reason, Manager, and Manager Feedback.The columns were defined in the list template that the list was created with. If the list does not have these columns, make sure the list was created with the template imported in the earlier steps.

- Click the Settings menu then click the Site Settings option.
- Open the site in SharePoint Designer 2013.
- Using SharePoint Designer, create a new List Workflow for the Time-Off Requests list.
- Click the List Workflow drop-down button on the Site tab toolbar within the New group and select Time-Off Requests from the list.

- Type "Time-Off Request WF" in the Name field of the Create List Workflow dialog window and click the OK button to finish creating it.

- Click the List Workflow drop-down button on the Site tab toolbar within the New group and select Time-Off Requests from the list.
- Add a Log to History List action to the new workflow.
- Click the Action drop-down button in the Workflow tab toolbar and select the Log to History List option.

- Click the this message link within the workflow editor work area.

- Click the ellipsis button next to the log message text box to open the String Builder editor.

- Type "Time-Off request started for:" in the Name field then with you insertion point at the end of the line after the colon and click the Add or Change Lookup button.

- In the Lookup for String dialog box, leave the Data source field set to Current Item and select Name in the Field from source drop-down field.

- Click the OK button on the Lookup for String dialog to close and save your choices.
- Click the OK button on the String Builder dialog to close it and save the string.
- Click the Action drop-down button in the Workflow tab toolbar and select the Log to History List option.
- Add an action that will collect data from a user using a custom task.
- Hover your mouse pointer under the Log to History List action you created in the previous steps and click on the orange bar that appears.

- Type the word "collect" and the orange bar will change into a text box like the following image:
 This is just another way to add an action to a workflow. You could also use the Workflow tab's Action drop-down button like you did with the Log to History List action.
 - Press your Enter key to have the editor add the Collect Data from a User action.

- Click the data link in the Collect Data from a User action to open the Custom Task Wizard dialog.

- Click the Next button on the first page of the Custom Task Wizard dialog.
- On the second page of the Custom Task Wizard dialog, change the Name field to "Time-Off Request Task" and click the Next button.

- On the third page of the Custom Task Wizard dialog, click the Add button to add a new field to the custom task.

- Type "Time-Off Response" in the Field name field and choose Choice (menu to choose from) in the Information type drop-down field and click the Next button.

- Type "Approved" and "Denied" on separate lines in the Choices field of the Column Settings dialog and click theFinish button.

- Click the Add button back on the Custom Task Wizard dialog to add a second field to the list.

- Type "Manager Comments" in the Field name field and choose Multiple lines of text in the Information typedrop-down field of the Add Field dialog and click the Next button.

- Leave the Default value field blank and click the Finish button on the Column Settings dialog.
- Click the Finish button on Custom Task Wizard dialog to save the custom task.
- Click the this user link in the Collect Data from a User action to open the Select Users dialog.

- Select Workflow Lookup for a User... option within the list box and click the Add button on the Select Usersdialog.

- Select Manager in the Field from source drop-down list field and click the OK button on the Lookup for Person or Group dialog.

- Click the OK button to close and save your choice on the Select Users dialog.
- Hover your mouse pointer under the Log to History List action you created in the previous steps and click on the orange bar that appears.
- Add an action that will retrieve the Manager Comments from the previous task action into the Manager Feedback field of the list item.
- Hover and click the orange bar below Collect Data from a User action.

- Click the Action button drop-down in the Workflow tab toolbar and choose the Set Field in Current Item action from the list.

- Click the field link in the Set Field in Current Item action and choose Manager Feedback from the drop-down list.

- Click the value link in the Set Field in Current Item action and then click the ellipsis button to open the String Builder dialog.

- Type "Request feedback from Manager: " in the String Builder field and then click the Add or Change Lookupbutton.

- Select Association: Task List from the Data source drop-down field.

- Select ID from the Field drop-down field.

- Click the fx button next to the Value field text box.

- Select Workflow Variables and Parameters from the Data source field drop-down list in the Lookup for Integerdialog.

- Select Variable: collect from the Field from source field drop-down list in the Lookup for Integer dialog.

- Click the OK button to save your choices and close the Lookup for Integer dialog.
- Select Manager Comments from the Field from source field drop-down list.
 The Manager Comments custom task field will not show in the list until you've completed the Find the List Item portion of the Lookup for String dialog. The Find the List Item portion is how the workflow retrieves the specific task that was created by previous workflow action.
 - Click the OK button to close the Lookup for String dialog and save your settings.
- Click the OK button to close the String Builder dialog and save your string.
- Hover and click the orange bar below Collect Data from a User action.
- Add a Set Workflow Variable action that store the Time-Off Response of the custom task action created in previous steps. The workflow variable will be used in later steps with a condition to send different emails based on the Manager's response in the custom task.
- Hover and click the orange bar below Set Field in Current Item action.

- Select Set Workflow Variable from the Action drop-down list in the Workflow tab toolbar.

- Click the workflow variable link in the new action and select Create a new variable from the drop-down list.

- Type "Response" in the Name field and select String in the Type field and click the OK button to close the Edit Variable dialog and save your settings.

- Click the Value link of the Set Workflow Variable action.

- Click the fx button next to the Value field text box.

- Select Association: Task List from the Data source drop-down field.

- Select ID from the Field drop-down field.

- Click the fx button next to the Value field text box.

- Select Workflow Variables and Parameters from the Data source field drop-down list in the Lookup for Integerdialog.

- Select Variable: collect from the Field from source field drop-down list in the Lookup for Integer dialog.

- Click the OK button to save your choices and close the Lookup for Integer dialog.
- Select Time-Off Response from the Field from source field drop-down list.
 The Time-Off Response custom task field will not show in the list until you've completed the Find the List Item portion of the Lookup for String dialog. The Find the List Item portion is how the workflow retrieves the specific task that was created by previous workflow action.
 - Click the OK button to close the Lookup for String dialog and save your settings.
- Hover and click the orange bar below Set Field in Current Item action.
- Add an If any value equals value condition to the workflow.
- Hover and click the orange bar below the last action in the workflow.

- Select If any value equals value option from the Condition drop-down button in the Workflow tab toolbar.

- Click the value link in the workflow condition.

- Click the fx button next to the value text box.

- Select Workflow Variables and Parameters for the Data source field of the Define Workflow Lookup dialog.

- Select Variable: response for the Field from source field of the Define Workflow Lookup dialog.

- Click the OK button to close the Define Workflow Lookup and save your settings.
- Click the value link in the workflow condition and type "Approved", without the quotes, in the text box.

- Hover and click the orange bar below the last action in the workflow.
- Add a Send an Email action inside the If condition.
- Hover and click the orange bar directly below the label (Start typing or use the Insert group in the Ribbon).

- Select Send an Email from the Action menu drop-down button on the Workflow tab toolbar.

- Click the these users link in the Send an Email action.

- Click the User Lookup icon, looks like a book, next to the To field in the Define E-mail Message dialog.

- Click the Workflow Lookup for a User... option and click the Add button in the Select Users dialog.

- Select Created By in the Field from source drop-down list field of the Lookup for Person or Group dialog.

- Click the OK button to close the Lookup for Person or Group dialog and save your settings.
- Click the OK button to close the Select Users dialog and save your settings.
- Type "Vacation Request Approved" in the Subject field of the Define E-mail Message dialog.
- Type "Your vacation request has been approved" in the Body field of the Define E-mail Message dialog and click theOK button to close and save.
- Hover and click the orange bar directly below the label (Start typing or use the Insert group in the Ribbon).
- Add an Else block to the If condition.
- Hover and click the orange bar below the Send an Email action.

- Click the Else-If Branch button on the Workflow tab toolbar to add an Else block to the If condition.

- Hover and click the orange bar directly below the Else label.

- Select Send an Email from the Action menu drop-down button on the Workflow tab toolbar.

- Click the these users link in the Send an Email action.

- Click the User Lookup icon, which looks like a book, next to the To field in the Define E-mail Message dialog.

- Click the Workflow Lookup for a User... option and click the Add button in the Select Users dialog.

- Select Created By in the Field from source drop-down list field of the Lookup for Person or Group dialog.

- Click the OK button to close the Lookup for Person or Group dialog and save your settings.
- Click the OK button to close the Select Users dialog and save your settings.
- Type "Vacation Request Rejected" in the Subject field of the Define E-mail Message dialog.
- Type "Your vacation request has been rejected" in the Body field of the Define E-mail Message dialog and click theOK button to close and save.
- Hover and click the orange bar below the Send an Email action.
- Save the Time-Off Request WF workflow.
- Click the Save icon in the upper-left corner the SharePoint Designer window.

- Click the Save icon in the upper-left corner the SharePoint Designer window.
- Change the Time-Off Request WF to start automatically when a new item is added to the list.
- Click the Time-Off Request WF breadcrumb at the top of the workflow editor area.

- Check the Start workflow automatically when an item is created check box under Start Options.

- Click the Time-Off Request WF breadcrumb at the top of the workflow editor area.
- Publish the Time-Off Request WF workflow.
- Click the Publish button on the Workflow Settings tab toolbar.

- Click the Publish button on the Workflow Settings tab toolbar.
- Create a new item in the Time-Off Requests list to test the custom workflow.
- Switch back to your browser window or open one if you don't have one already open and browse to your site.
- Click the Time-Off Requests link in the site's Quick Launch menu.
- Click the new item link in the list.

- Enter the following information in the Time-Off Requests- New Item dialog and replace the Name and Managerfields with your account:
Name SP_Admin Start Date Select the following week's Monday End Date Select the following week's Friday Reason Going Fishing Manager SP_Admin - Click the Save button to save the new time-off request item.
- Click the Time-Off Requests link in the site's Quick Launch menu to refresh the page.
- Verify the column Time-Off Request WF has been added and the status for the new list item is In Progress.
 Until the task created by the workflow is completed, the workflow will remain In Progress. Once the task is completed, the workflow will continue to the next action defined in the workflow.
- Complete the Time-Off Request WF custom task.
- Click the Site Contents link in the site's Quick Launch menu.
- Click the Tasks link on the Site Contents page.
- Click the Time-Off Request Task link to open it.

- Select Approved in the Time-Off Response drop-down field and type "Of course, you can have all the time off you want!" in the Manager Comments field.

- Click the Complete Task button to complete the task and continue the workflow.
- Verify the Time-Off Request WF custom workflow has completed.
- Click the Time-Off Requests link in the site's Quick Launch menu.

- Verify the Manager Feedback column includes the Manager's comments and the Time-Off Request WF column status is Completed.

- Click the Completed link in the Time-Off Request WF column to view the workflow history.
- Verify the Log to History List action in your workflow added the custom message to the history log.

- Click the Time-Off Requests link in the site's Quick Launch menu.
- Verify the email was sent.
- Open Microsoft Outlook.
- Open the email message from your site with the subject of Vacation Request Approval and verify the body matches what you configured in the workflow.

- Close the email message and close Outlook.
Creating Reusable Workflows
Duration: 15 to 25 minutes.
- Create a reusable workflow for the document content type using SharePoint Designer.
- Navigate back to SharePoint Designer or open a new instance if you closed it from the previous exercise.
- If the Time-Off Request WF is still open from the previous exercise, click the Workflows breadcrumb at the top of the editor tab.
 Or if you closed it, you can click the Workflows link in the Navigation menu.
- Click the Reusable Workflow link in the WORKFLOWS tab toolbar New group.

- Type "Reusable Doc WF" in the Name field and choose Document in the Content Type drop-down field and click the OKbutton.

- Add an Association Column to the Reusable Doc WF.
- Click the Association Columns button in the WORKFLOW tab toolbar in the Variables group.

- Click the Add New Column... button on the Association Columns dialog.

- Type "Reusable WF Feedback" in the Field name field and click the Next button on the Add Column dialog.

- Leave the Default value field empty and click the Finish button of the Column Settings dialog.
- Click the OK button to close the Association Columns dialog and save your column setting.
- Click the Association Columns button in the WORKFLOW tab toolbar in the Variables group.
- Add a Set Field in Current Item action to the Reusable Doc WF and configure it to write text into the Reusable WF Feedback associated column.
- Hover and click the orange bar within Step 1 of the Reusable Doc WF.

- Click the Action drop-down button in the Workflows tab toolbar and choose the Set Field in Current Itemaction.

- Click the field link in the Set Field in Current Item action and choose the Reusable WF Feedback option from the drop-down list.
 Only fields defined in the content type and associated columns are available to use in a reusable workflow.
 - Click the value link in the Set Field in Current Item action.

- Type "This message was created by the Reusable Doc WF!" in the value text box.
- Hover and click the orange bar within Step 1 of the Reusable Doc WF.
- Publish the Reusable Doc WF.
- Click the Publish button in the WORKFLOW tab toolbar's Save group.

- Click the Publish button in the WORKFLOW tab toolbar's Save group.
- Associate and test the Reusable Doc WF workflow with the Shared Documents library of your site.
- Switch back to your browser window or open one if you don't have one already open and browse to your assigned student site.
- Click the Documents link in the site's Quick Launch menu.

- Click the FILES tab to open the toolbar and click the New Document button.

- Type "This is a sample document for use with a reusable workflow." in the new Word document and click the Saveicon in the upper-left corner of the Microsoft Word window.
- Click Shared Documents from the Other Web Locations on the Word Save As page.
- Type "Sample WF Doc" in the File name field and click the Save button.
- Close Microsoft Word.
- Click the LIBRARY tab to open the toolbar and click the Library Settings button.

- Click the Advanced settings link under the General Settings group.
- Click the Yes radio button for the Allow management of content types option.

- Click the OK button to save the setting.
- Click the Workflow Settings link under Permissions and Management.

- Click the Add a workflow link.
- Select Document from the Run on items of this type drop-down field.

- Select Reusable Doc WF from the Select a workflow template list box.

- Type "Reusable Document WF Test" in the Type a unique name for this workflow field.

- Leave the rest of the workflow settings at their defaults and click the OK button at the bottom of the form.
- Click the Documents link in the site's Quick Launch menu to navigate back the default view of the library.
- Click the ellipsis link next to the Sample WF Doc link then click the second ellipsis link in the balloon pop-up to open the context menu and click the Workflows link.

- Click the Reusable Document WF Test link.

- Click the Start button to start the workflow.
- Verify the Reusable Document WF Test column has the status of Completed.

- Click the ellipsis link next to the Sample WF Doc link and then click the second ellipsis link in the balloon pop-up to open the context menu and click the Edit Properties link.

- Verify the Reusable WF Feedback field exists and has the text "This message created by the Reusable Doc WF!" in it.

No comments:
Post a Comment