
First, I have created a blank site in SharePoint and added two lists: Departments and Team Employees.
Department List Structure:
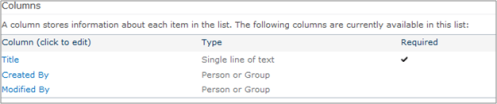
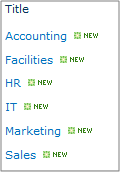
Department List:
Team Employees List:
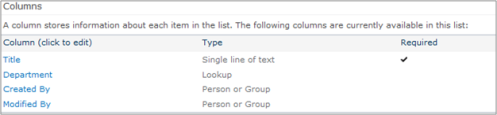
Note that each Employee has a Department, a lookup field pointing to the Title field in the Departments list. This list has no entries; we will build the client side code to populate it.
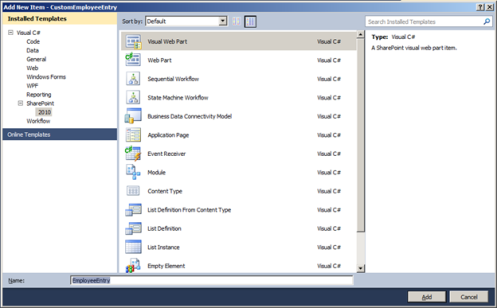
Right now, the Team Employee list is empty. We will build a custom web part to handle entering a new employee. Open Visual Studio, select New Project, SharePoint 2010, and Visual Web Part. Name the project CustomEmployeeEntry, and click OK.
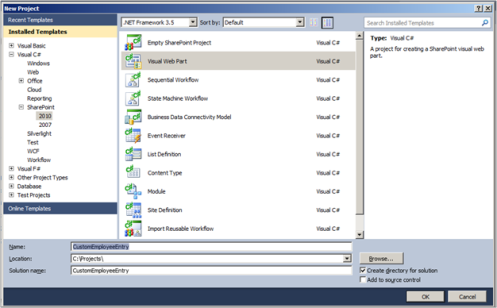
Enter the SharePoint site and validate. In Visual Studio 2010, there is no other choice but to deploy this as a farm solution (in Visual Studio 2012, the sandboxed solution option will be available).

Click Finish and wait for the project initialization to complete. When complete, close the initial code page that opens. Then in Solution Explorer, delete VisualWebPart1.

In Solution Explorer, right click the solution name, select Add and New Item. Select Visual Web Part, name it EmployeeEntry and click Add.
One of the beauties of SharePoint’s COM is that as a developer, you are not restricted to using ASP.NET controls. You can use regular HTML controls instead, which means that the ID you choose will not be modified by .Net. So add the following code to EmployeeEntryUserControl.aspx after last directive:
<div>Name:
<div><input
type=”text” id=”txtEmployee”
/></div></div>
type=”text” id=”txtEmployee”
/></div></div>
<div>Department:
<div><select
id=”ddlDepartment”></select></div></div>
id=”ddlDepartment”></select></div></div>
<br />
<div><input
type=”submit” id=”btnSubmit” value=”Save”onclick=”btnSubmit_OnClientClick(); return false;”
/></div>
type=”submit” id=”btnSubmit” value=”Save”onclick=”btnSubmit_OnClientClick(); return false;”
/></div>
We have included JavaScript placeholder for the button client event that we want to trap. We will complete this shortly. For now, switch to Design view and notice the layout.

It’s a rudimentary layout. We will not cover the look and feel of this web part since skinning is another topic. We will focus on using SharePoint COM to populate the drop down list, and also to submit the new employee without having to resort to a post back. We will not use ASP.net web controls or JQuery to accomplish this for the following reasons:
- ASP.Net requires client side code in order to access the control on the client. We want to avoid all server-side code for this demonstration.
- JQuery is a JavaScript library. It can be integrated successfully, but for now I want to focus on Javascript.
Additionally, the btnSubmit’s onclick event is a call to a method along with return false. This keeps the page from posting back since we are writing client side code to avoid unnecessary post backs to the server.
Return to Source view and then add the following include statement between the last directive and the beginning of your code:
<%@
Control
Language=”C#” AutoEventWireup=”true”CodeBehind=”EmployeeEntryUserControl.ascx.cs”Inherits=”CustomEmployeeEntry.EmployeeEntry.EmployeeEntryUserControl”%>
Control
Language=”C#” AutoEventWireup=”true”CodeBehind=”EmployeeEntryUserControl.ascx.cs”Inherits=”CustomEmployeeEntry.EmployeeEntry.EmployeeEntryUserControl”%>
<SharePoint:ScriptLink
ID=”ScriptLink1″ Name=”SP.js” LoadAfterUI=”true” Localizable=”false”runat=”server”></SharePoint:ScriptLink>
ID=”ScriptLink1″ Name=”SP.js” LoadAfterUI=”true” Localizable=”false”runat=”server”></SharePoint:ScriptLink>
<div>Name:
<div><input
type=”text” id=”txtEmployee”
/></div></div>
type=”text” id=”txtEmployee”
/></div></div>
<div>Department:
<div><select
id=”ddlDepartment”></select></div></div>
id=”ddlDepartment”></select></div></div>
<br />
<div><input
type=”submit” id=”btnSubmit” value=”Save”onclick=”btnSubmit_OnClientClick(); return false;”
/></div>
type=”submit” id=”btnSubmit” value=”Save”onclick=”btnSubmit_OnClientClick(); return false;”
/></div>
Including this script enables you to leverage SharePoint COM. Now below your HTML code, add the following:
<script
language=”javascript” type=”text/javascript”>
language=”javascript” type=”text/javascript”>
ExecuteOrDelayUntilScriptLoaded(PopulateDepartments, “sp.js”);
var _ctx = null;
var _web = null;
var _allDepartmentItems = null;
function PopulateDepartments() {
}
function PopulateDepartmentsSuccess() {
}
function PopulateDepartmentsFailed() {
}
</script>
This provides the stubs for the seven methods we will need to populate the Department drop down list. PopulateDepartments() will populate ddlDepartments with the current entries in the Departments list. Since we will do this asynchronously, PopulateDepartmentSuccess() and PopulateDepartmentsFailure() will handle the results.
The method ExecuteOrDelayUntilScriptLoaded() is the COM equivalent of JQuery $(document).ready(). Once the page is fully loaded, it executes the method provided, PopulateDepartments). This ensures all JavaScript libraries are in place before attempting to perform any functions on the page. Although you can use JQuery if you are more comfortable doing so, this tutorial is focusing on JavaScript and COM.
Ok, now let’s populate ddlDepartment. Add the following code to PopulateDepartments:
function PopulateDepartments() {
//Get the list
_ctx = SP.ClientContext.get_current();
_web = _ctx.get_web();
var list = _web.get_lists().getByTitle(“Departments”);
//Create the query and get the results
var query = new SP.CamlQuery();
query.set_viewXml(“<View><Query><OrderBy><FieldRef Name=\”Title\” /></Order By></Query></View>”);
_allDepartmentItems = list.getItems(query);
_ctx.load(_allDepartmentItems, ‘Include(Title, ID)’);
_ctx.executeQueryAsync(Function.createDelegate(this,this.PopulateDepartmentsSuccess),
Function.createDelegate(this, this.PopulateDepartmentsFailed));
}
The first thing we need is a reference to the SharePoint context, analogous to SPContext in server side SharePoint and to HttpContext.Current in ASP.Net. We will hold this in a pge level variable because we will need it again. Next, we need a reference to the current Site, or to SPContext.Site in server side code. This, too, we will need in other methods, so we’ll store it in a page level variable. Finally, we get a reference to the list by calling get_lists().getByTitle(“Departments”).
In order to retrieve the contents of the list, we will create a CamlQuary object, analogous to SPQuery in server side code. Notice that there is no ViewXml property. Instead, there is get_viewXml() and set_viewXml() for the getter and setter. We set the query to retrieve the list and to order the results by the Title field. It is possible to get a generic “give me the entire list” query, but it will be sorted by the ID field. For this demo, we want it sorted on the Title field.
Next, we set the items collection.
The final two lines are the most important. The Context.load() method determines when a JSON call is made to SharePoint in order to populate results. Prior to this, no call is made to SharePoint. The reason for this is that the object model will streamline the request in order to avoid pulling more information over the wire than is absolutely necessary. Additionally, it gives the developer complete control over when the call to the server is made. It is possible to wrap multiple requests into a single call.
Finally, the load is executed asynchronously. Two methods are provided, one for success and one for failure. Since this is just a demo, a failure will be nothing but a simple JavaScript message box letting the user know that populating the Departments list failed. For the success call, however, we will need to populate ddlDepartment with the results of the call.
In PopulateDepartmentSuccess, add the following:
function PopulateDepartmentsSuccess() {
//Clear out current entries
var ddlDepartment = this.document.getElementById(‘ddlDepartment’);
ddlDepartment.options.length = 0;
//Iterate through new entries and populate DDL
var listEnumerator = _allDepartmentItems.getEnumerator();
while (listEnumerator.moveNext()) {
var currentItem = listEnumerator.get_current();
ddlDepartment.options[ddlDepartment.options.length] = newOption(currentItem.get_item(“Title”), currentItem.get_item(“ID”));
}
}
First, we eliminate whatever may happen to be in the ddlDepartment drop down list.
Second, we get an enumerator from the list and loop through it in order to populate the list. Notice that we are including the ID in the drop down list as the value. Because the field in Team Employee will be a lookup to the Department list, we need the ID rather than the title.
Next, let’s look at the btnSubmit_OnClientClick event. I chose to name it this way to be somewhat consistent with how ASP.Net pages name their events.
function btnSubmit_OnClientClick() {
//Get the items we need
var employee = document.getElementById(“txtEmployee”).value;
var department = document.getElementById(“ddlDepartment”).value;
//Make the list item and save
var list = _web.get_lists().getByTitle(“Team Employees”);
var listItemCreationInfo = new SP.ListItemCreationInformation();
var item = list.addItem(listItemCreationInfo);
var listItemCreationInfo = new SP.ListItemCreationInformation();
var item = list.addItem(listItemCreationInfo);
item.set_item(“Title”, employee);
item.set_item(“Department”, department);
item.update();
_ctx.executeQueryAsync(Function.createDelegate(this,this.SaveEmployeeSuccess), Function.createDelegate(this,this.SaveEmployeeFailure));
}
We start by getting the values put into the txtEmployee and ddlDepartment fields. This is standard JavaScript. Returning to the SharePoint COM, we get a reference to the Team Employee list. Next, we get a ListItemCreationInformation object. The MSDN documentation is weak on this class. It states simply “Specifies the properties of the new list item.” That helps! The object seems to provide SharePoint with the information need to populate the Created By and Created fields when the list is submitted. This is an additional step when compared to server-side SharePoint code. In server-side code, the user is already known; in client-side code, it needs to be manually retrieved. This is just a guess, but it seems to make sense. We use the ListItemCreationInformation class to create a new ListItem.
We then call the set_item() method of the new ListItem class. It takes two parameters: the name of the field and the value. On the flip side, there is a get_item() method that takes one parameter, the name of the field, and returns the value. When setting the Department field, we provide the ID of the Department, not the name, because this is a lookup field.
Finally, we call the ListItem.update() method.
So far, no code has actually been executed. We need to pass everything to the ClientContext to create the JSON call and execute it in SharePoint. Again, we will call this asynchronously, so we need two more methods, SaveEmployeeSuccess and SaveEmployeeFailure. Like before, the failure event will be a simple JavaScript message box. The code for the success event is below.
function SaveEmployeeSuccess() {
var htmlP = document.createElement(‘p’);
var htmlMsg = document.createTextNode(‘Employee Saved!’);
htmlP.appendChild(htmlMsg);
var options = {
html: htmlP,
title: “Success”,
width: 150,
height: 75,
dialogReturnValueCallback: ResetForm
};
SP.UI.ModalDialog.showModalDialog(options);
}
We will take advantage of the SharePoint modal box to let the user know that the new employee has successfully saved. We use JavaScript to create a P tag with a message “Employee Saved!” added to it. Then we create an options object with the following properties set: html, title, width, height, and dialogReturnValueCallback. The HTML is what will be displayed in the modal, and the title it the title of the modal. The width and height are straightforward allowing you to size the window to your needs.
The dialogReturnValueCallback is interesting: it allows you to have a particular method called when the user closes the modal. In this case, we will create a ResetForm method.
function ResetForm() {
document.getElementById(“txtEmployee”).value = “”;
document.getElementById(“ddlDepartment”).selectedIndex = 0;
}
This method simply resets the two input fields ready to accept a new employee entry.
You can build the project, but since there is no server code, there is really nothing to compile that could fail. Instead, start the project in debugger mode, and then add the web control to the front page of the site. Depending on your environment, the performance of the drop down list’s load may be a little slow.
Note: If this were a production system, I would put this web part on a page that is secured to only those who have contributor rights or above. Putting this on the front page of a site viewed by people with Read Only rights would cause an error when attempting to submit the entry.
On the form, enter a name and select a department.
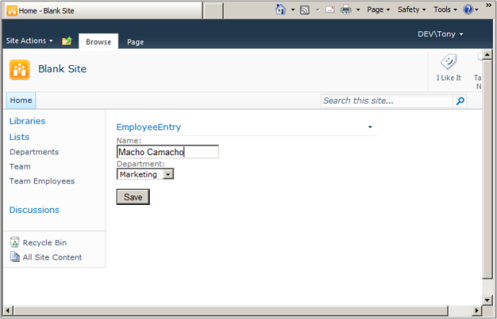
Click the save button and wait for the modal dialog to appear.

Close the modal and notice that ResetForm() resets the form entries so that you can enter another employee. That’s it! That’s how to use the SharePoint Client Object Model to populate a drop down list and submit the entry to a list without resorting to a page post back.
Client Object Model Limitations
SharePoint’s Client Object Model has a few limitations. First, it cannot be used to perform any administrative functions. Second, it is confined to the current web. This is meant to restrict any cross-site scripting vulnerabilities. Think of it as sandboxed SharePoint code.
What about browsers that have JavaScript turned off? My guess is that this kind of approach is best reserved for intranets. If I were developing an externally facing site using SharePoint, I would probably avoid this approach, or use it as a last resort.
The biggest problem with using the Client Object Model is that it is not well documented and getting intellisense to work has been problematic. Some articles talk about how to get it to work, but it has been hit and miss for me. If you know a way to do it, please post it in the comments.
Helpful data shared. I am extremely happy to read this write-up. thanks for giving us good info.Great walk-through.I appreciate this post.SharePoint 2013 Online Training
ReplyDelete