Let’s take the Grades list below as an example. Basically the idea is to implement a range of colours against the column Grade that differentiates grades. Based on the grade these colours will vary.
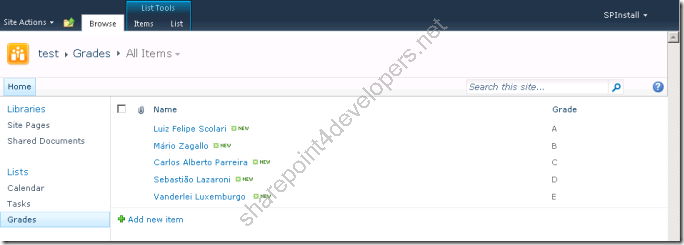
Figure 1 – Grades List
By using the SharePoint Designer 2010, this customisation is easy. Go to the Grades list in SharePoint Designer 2010 and open up the view called “All Items”, according to the Figure 2:
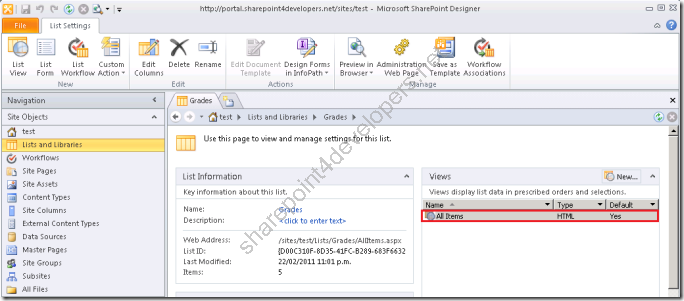
Figure 2 – All Items view
Interestingly the view can be visualised in both ways (Design and Code), which allows an easy customisation. By following the steps according to the Figure 3 the conditional formatting will be applied against the column Grade.
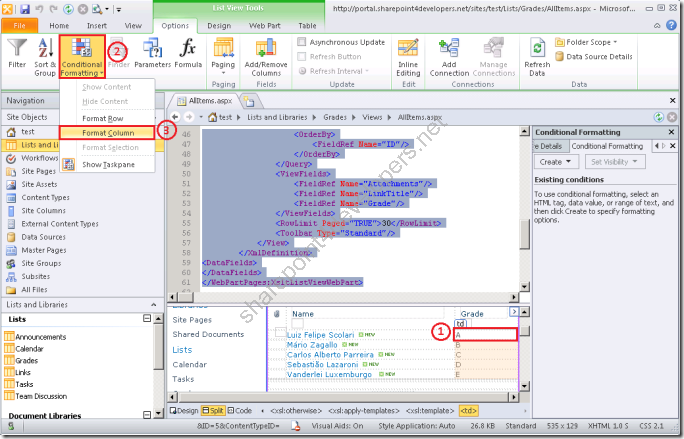
Figure 3 – Conditional Formatting in SharePoint 2010
Immediately after the step 3 above, you need to create a condition criteria that will do the task we need by applying a style in the Grades List.

Figure 4 – Condition Criteria
According to the condition criteria above, set the background colour to be Green.
Note: Different colours need to be applied against different condition criteria.

Figure 5 – Background colour
After configuring all the condition criteria, the conditional formatting can be visualised in different colours, according to the Figure 6:
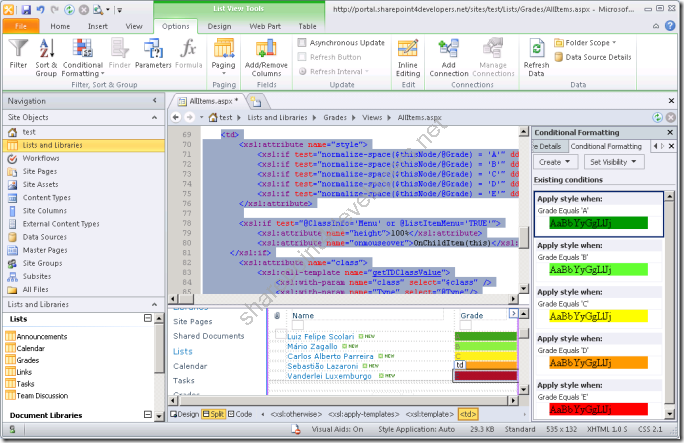
Figure 6 – Conditional Formatting colours
The conditional formatting bar is very clear, and summarises the criteria you have specified. It allows you to configure the styles at any time. Pretty handy!
In the end you will get your the Grades List set according to the Figure 7:
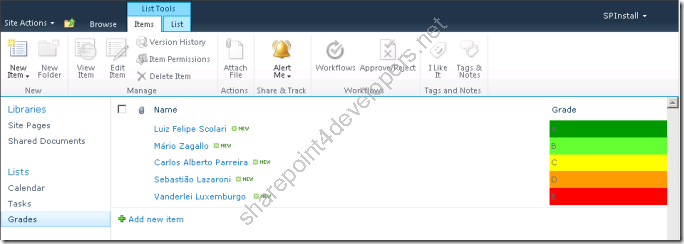
Figure 7 – Conditional Formatting applied to the Grades List
Conditional formatting in Visual Studio 2010
So far you have seen how to set conditional formatting manually. Now you will see how to set this up programmatically!
First of all you need to identify the Xsl section (from Figure 6), copy all the content from this section to a xsl file, according to the code below:
Code Snippet
- <xsl:stylesheet xmlns:x="http://www.w3.org/2001/XMLSchema"xmlns:d="http://schemas.microsoft.com/sharepoint/dsp" version="1.0" exclude-result-prefixes="xsl msxsl ddwrt"xmlns:ddwrt="http://schemas.microsoft.com/WebParts/v2/DataView/runtime"xmlns:asp="http://schemas.microsoft.com/ASPNET/20"xmlns:__designer="http://schemas.microsoft.com/WebParts/v2/DataView/designer"xmlns:xsl="http://www.w3.org/1999/XSL/Transform" xmlns:msxsl="urn:schemas-microsoft-com:xslt" xmlns:SharePoint="Microsoft.SharePoint.WebControls"xmlns:ddwrt2="urn:frontpage:internal" xmlns:o="urn:schemas-microsoft-com:office:office">
- <xsl:include href="/_layouts/xsl/main.xsl"/>
- <xsl:include href="/_layouts/xsl/internal.xsl"/>
- <xsl:param name="AllRows" select="/dsQueryResponse/Rows/Row[$EntityName = '' or (position() >= $FirstRow and position() <= $LastRow)]"/>
- <xsl:param name="dvt_apos">'</xsl:param>
- <xsl:template name="FieldRef_printTableCell_EcbAllowed.Grade"match="FieldRef[@Name='Grade']" mode="printTableCellEcbAllowed" ddwrt:dvt_mode="body"ddwrt:ghost="" xmlns:ddwrt2="urn:frontpage:internal">
- <xsl:param name="thisNode" select="."/>
- <xsl:param name="class" />
- <td>
- <xsl:attribute name="style">
- <xsl:if test="normalize-space($thisNode/@Grade) = 'A'" ddwrt:cf_explicit="1"xmlns:ddwrt="http://schemas.microsoft.com/WebParts/v2/DataView/runtime">background-color: #009900;</xsl:if>
- <xsl:if test="normalize-space($thisNode/@Grade) = 'B'" ddwrt:cf_explicit="1"xmlns:ddwrt="http://schemas.microsoft.com/WebParts/v2/DataView/runtime">background-color: #66FF33;</xsl:if>
- <xsl:if test="normalize-space($thisNode/@Grade) = 'C'" ddwrt:cf_explicit="1"xmlns:ddwrt="http://schemas.microsoft.com/WebParts/v2/DataView/runtime">background-color: #FFFF00;</xsl:if>
- <xsl:if test="normalize-space($thisNode/@Grade) = 'D'" ddwrt:cf_explicit="1"xmlns:ddwrt="http://schemas.microsoft.com/WebParts/v2/DataView/runtime">background-color: #FF9900;</xsl:if>
- <xsl:if test="normalize-space($thisNode/@Grade) = 'E'" ddwrt:cf_explicit="1"xmlns:ddwrt="http://schemas.microsoft.com/WebParts/v2/DataView/runtime">background-color: #FF0000;</xsl:if>
- </xsl:attribute>
- <xsl:if test="@ClassInfo='Menu' or @ListItemMenu='TRUE'">
- <xsl:attribute name="height">100%</xsl:attribute>
- <xsl:attribute name="onmouseover">OnChildItem(this)</xsl:attribute>
- </xsl:if>
- <xsl:attribute name="class">
- <xsl:call-template name="getTDClassValue">
- <xsl:with-param name="class" select="$class" />
- <xsl:with-param name="Type" select="@Type"/>
- <xsl:with-param name="ClassInfo" select="@ClassInfo"/>
- </xsl:call-template>
- </xsl:attribute>
- <xsl:apply-templates select="." mode="PrintFieldWithECB">
- <xsl:with-param name="thisNode" select="$thisNode"/>
- </xsl:apply-templates>
- </td>
- </xsl:template>
- </xsl:stylesheet>
Note: The SharePoint Designer 2010 created a subsection called xsl:attribute to store the conditional formatting you have specified (Lines 10 to 16).
In this example I am creating a feature that is going to deploy the Grades list. So check the structure of the solution for you to have an idea:

Figure 8 – Conditional Formatting solution
Note: The xsl files in SharePoint 2010 must be deployed under the directory Layouts\Xsl.
To deploy the Grades list I have coded the FeatureActivated method (available in the Event Receiver of the feature):
Code Snippet
- public override void FeatureActivated(SPFeatureReceiverProperties properties)
- {
- SPWeb web = (SPWeb)properties.Feature.Parent;
- string grades = "Grades";
- if (web.Lists.TryGetList(grades) == null)
- {
- // Creating list
- Guid listGuid = web.Lists.Add(grades, "", SPListTemplateType.GenericList);
- SPList list = web.Lists[listGuid];
- list.OnQuickLaunch = true;
- // Configuring fields
- SPField title = list.Fields["Title"];
- title.Title = "Name";
- title.Update(true);
- list.Fields.Add("Grade", SPFieldType.Text, true);
- // Updating view
- SPView mainView = list.Views[0];
- mainView.ViewFields.DeleteAll();
- mainView.ViewFields.Add("Attachments");
- mainView.ViewFields.Add("LinkTitle");
- mainView.ViewFields.Add("Grade");
- mainView.XslLink = "ConditionalFormattingXsl/grades.xsl";
- mainView.Update();
- // Saving changes
- list.Update();
- }
- }
Note: Pay attention to the line 27. That’s what I am talking about! Beautiful.
Once you have deployed the solution, activate it and you will get the Grades list created with the Conditional Formatting applied automatically.
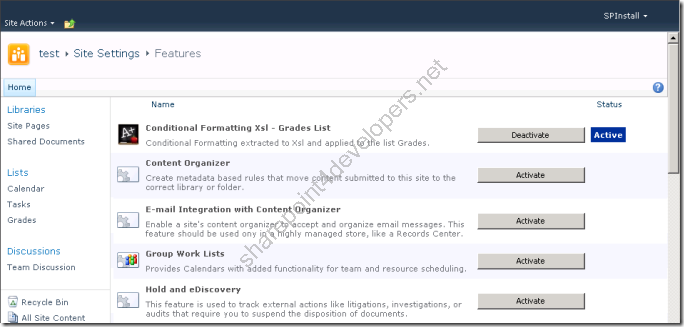
Figure 9 – Feature created
Download the solution here.
To make things easier, always use SharePoint Designer to set up conditional formatting on your views. Then copy the Xsl section and paste to a xsl file. It does the trick.
I hope it helps.
References:
http://stefan-stanev-sharepoint-blog.blogspot.com/2010/08/xsltlistviewwebpart-several-xslt-tips.html
http://msdn.microsoft.com/en-us/library/microsoft.sharepoint.spview.xsllink.aspx
http://office.microsoft.com/en-us/sharepoint-designer-help/apply-conditional-formatting-to-a-data-view-HA010099624.aspx

No comments:
Post a Comment