
For many SharePoint 2010 site designers and owners, the thought of being able to customize their themes is very exciting. On the flip side, the task of choosing multiple colors may seem daunting to people who know what they like when they can see it but have trouble making the selections.
If you’re in either camp, you’ll enjoy the capability to use PowerPoint to easily select a predefined theme or palette of colors or to make your custom choices and export that color file to SharePoint.
To create the Office Theme file using PowerPoint, follow these steps:
- Open PowerPoint and click the Design tab on the Ribbon.When you open PowerPoint, a New Slide file is created. You don't need to worry about changing the slide type or adding slides.
- On the Design tab, select a theme.The theme you select isn't particularly important, except that you may like the default color scheme. Remember the colors, not the graphics, are saved.
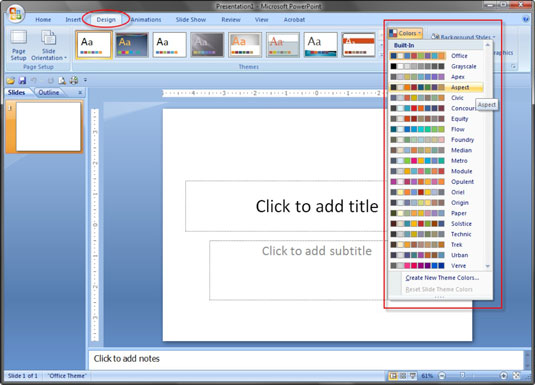
- To change the color scheme, click the Colors drop-down list on the Theme section of the Design tab.The drop-down list shows the built-in color themes available. You can also choose Create New Theme Colors at the bottom of the list.If you choose Create New Theme Colors, the dialog box for selecting these colors opens with the colors of the current theme inserted as a starting point.Okay, you're going to get déjà vu one way or another. If you started with the SharePoint themes and have never seen the theme selections in PowerPoint, you realize that SharePoint and PowerPoint share the same options.
- Select new colors as desired and then type a name for your new theme in the Name field.In PowerPoint, your custom named theme appears in the Custom area of theme choices.Watch your fonts! Make sure that the PowerPoint fonts in the themes match your desired heading and body fonts for your SharePoint site.
- Save your PowerPoint file as an Office Theme by choosing File→Save As. Select Office Theme (.thmx) file as the Save as Type.Consider saving the file to a location, such as your desktop or My Documents, so you can easily find it when you’re ready to upload it to SharePoint.
- Using the browser, open your SharePoint site and choose Site Actions→Site Settings.
- Click the Site Theme link in the Look and Feel section and then click the Theme Gallery link in the description at the top of the page.The Theme gallery, which is a SharePoint library, opens.
- Click the Add New Item link.The Upload Document dialog box appears.
- Click the Browse button to upload a single file or click the link to upload multiple files if you've created more than one .thmx file in PowerPoint.
- Upload your file(s) to the Theme gallery by clicking OK.A dialog box appears with the selected filename. You can add a description before saving if desired.

- Click the Save button to save the file.Your new theme is now saved in the SharePoint 2010 Theme gallery. You can see your new theme in alphabetical order by name in the theme choices. Choose your theme as you would choose any other theme.
Good References
http://www.sqlchick.com/entries/2011/1/9/using-powerpoint-2010-to-create-a-custom-theme-for-sharepoin.html
No comments:
Post a Comment